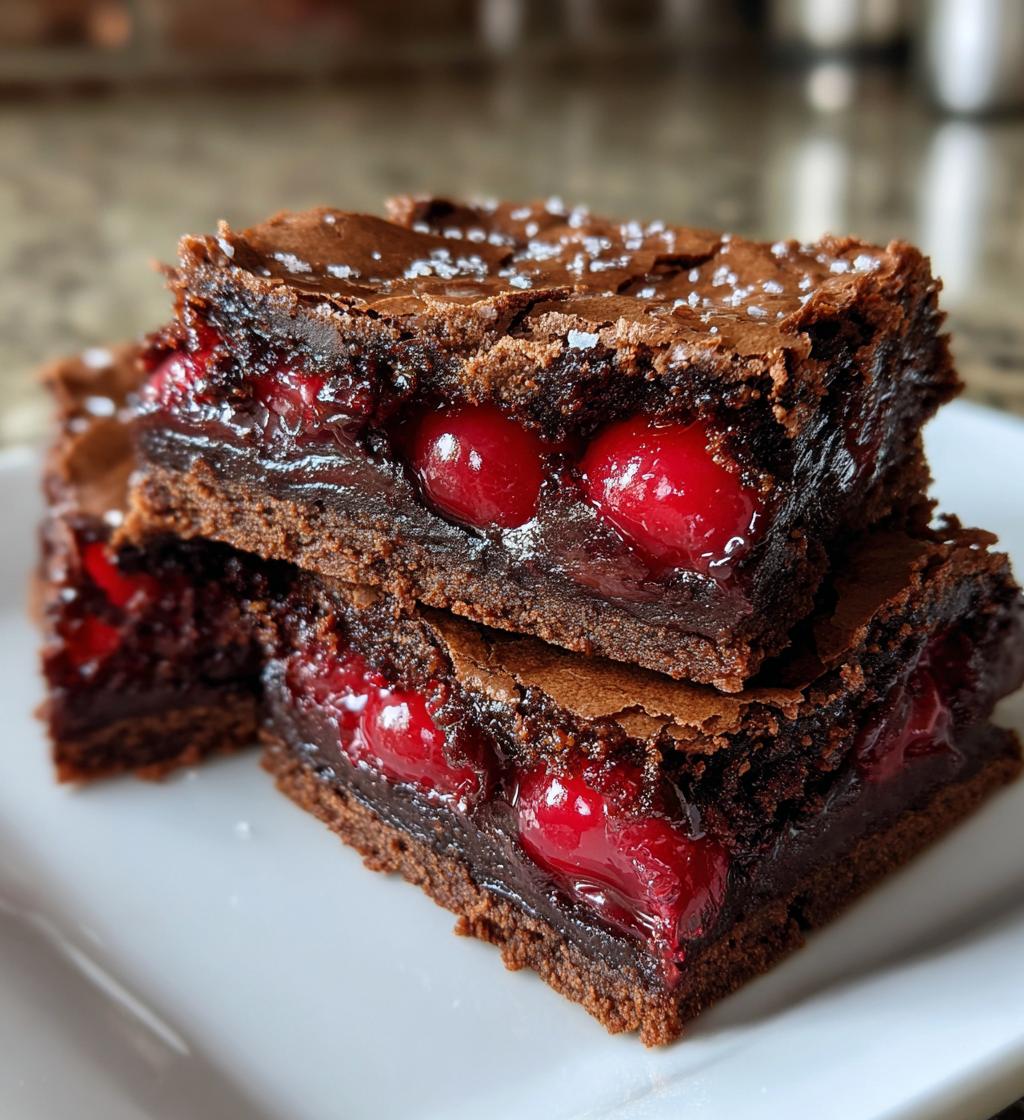
There’s something utterly enchanting about the classic flavors of the Black Forest, isn’t there? The rich, velvety chocolate combined with the sweet-tart burst of cherries creates a symphony of taste that’s hard to resist. My Black Forest cookie bars take that beloved combination and transform it into a delightful treat that’s perfect for any occasion. I remember the first time I made these bars; I was trying to impress some friends at a gathering. They disappeared in a flash, and I knew I’d struck gold! The chewy texture, the gooey chocolate chips, and those juicy pieces of cherry are simply unforgettable. Trust me, once you try these, you’ll be dreaming of them long after the last bite! It’s a little twist on a classic that brings joy to my kitchen, and I hope it does the same for yours!

Ingredients for Black Forest Cookie Bars
- 1 cup all-purpose flour
- 1/2 cup cocoa powder
- 1/2 teaspoon baking soda
- 1/4 teaspoon salt
- 1/2 cup unsalted butter, softened to room temperature
- 1 cup sugar
- 1 large egg
- 1 teaspoon vanilla extract
- 1 cup chocolate chips
- 1 cup cherries, pitted and chopped into bite-sized pieces
Make sure your butter is softened; it really helps in achieving that dreamy texture. When you’re chopping the cherries, you want them small enough to blend in but not so tiny that they lose their juicy goodness. Trust me, those little bursts of cherry flavor are what make these bars sing!
How to Prepare Black Forest Cookie Bars
Preheat the Oven
First things first, you’ll want to preheat your oven to 350°F (175°C). Preheating is crucial because it helps the cookie bars bake evenly and rise properly. You don’t want to skip this step, or your bars might end up dense and sad instead of soft and chewy!
Mixing Dry Ingredients
In a medium bowl, start by whisking together the all-purpose flour, cocoa powder, baking soda, and salt. Make sure to mix these dry ingredients well to avoid any clumps; you want a nice, even blend. When you’re done, you should have a beautiful cocoa-colored mixture that smells divine. This is the foundation of your cookie bars, so give it a good stir!
Creaming Butter and Sugar
Now, let’s move on to the butter and sugar! In a large mixing bowl, cream the softened unsalted butter and sugar together until the mixture is light and fluffy. This is one of the most important steps – it’s where the magic happens! Beat them together for about 2-3 minutes until it looks pale and has a creamy texture. The air you incorporate during this step is what gives your cookie bars that wonderful lightness.
Combining Wet Ingredients
Next up, add in your large egg and vanilla extract to the creamed butter and sugar. Mix until everything is well combined and you can’t see any streaks of egg. This ensures that the flavors meld beautifully, and you’re left with a smooth, cohesive mixture. It should smell heavenly already!
Incorporating Dry Ingredients
Now it’s time to bring it all together! Gradually add your dry ingredients to the wet mixture, stirring gently until everything is just combined. Be careful not to overmix; you want to keep that lovely texture we achieved earlier. Stop mixing as soon as you no longer see any dry flour, and let the batter remain a bit chunky. It’ll come together beautifully in the next steps!
Adding Chocolate Chips and Cherries
Time to fold in the star players: the chocolate chips and chopped cherries! Gently fold them into the batter with a spatula, being careful not to crush the cherries. You want those juicy bites intact to burst with flavor when you take a bite. It’s like a little surprise in every bar!
Baking the Cookie Bars
Spread the mixture evenly in a greased baking pan, making sure it’s nice and level. Pop it in the oven and bake for 25-30 minutes. Keep an eye on them; you’ll know they’re ready when a toothpick inserted into the center comes out clean or with just a few moist crumbs clinging to it. Once baked, let them cool in the pan for about 10 minutes before transferring to a wire rack to cool completely. This cooling time is essential for the bars to set properly, so don’t rush it!
Nutritional Information
Here’s the estimated nutritional breakdown for each delicious Black Forest cookie bar. Keep in mind that these values can vary slightly depending on specific ingredients and portion sizes, but this should give you a good idea of what to expect:
- Calories: 180
- Fat: 8g
- Saturated Fat: 5g
- Unsaturated Fat: 2g
- Trans Fat: 0g
- Cholesterol: 20mg
- Sodium: 50mg
- Carbohydrates: 24g
- Fiber: 2g
- Sugar: 15g
- Protein: 2g
These cookie bars are a delightful treat that balances indulgence with a bit of nutritional awareness. Just remember, they’re best enjoyed in moderation (though I won’t judge if you sneak an extra one or two!).
Tips for Success with Black Forest Cookie Bars
Want to make sure your Black Forest cookie bars turn out absolutely perfect? I’ve got some tried-and-true tips that will elevate your baking game and ensure every bite is a delight!
Use Room Temperature Ingredients
First off, make sure your butter and egg are at room temperature before you start mixing. This little trick helps them blend together more smoothly, creating that light and fluffy texture we all love. Trust me, it makes a difference!
Avoid Overmixing
When it comes to mixing, less is more! Be gentle when combining your wet and dry ingredients. Overmixing can lead to tough cookie bars instead of the tender, chewy ones you want. Just stir until everything is combined and a few flour streaks remain; that’s the sweet spot!
Measure Ingredients Accurately
Precision is key in baking! Use a kitchen scale if you have one, or make sure to spoon and level your flour and cocoa powder in measuring cups. Packing them down can result in too much dry ingredient, which might throw off the whole recipe.
Don’t Skip the Cooling Time
After baking, allow your cookie bars to cool in the pan for about 10 minutes before transferring them to a wire rack. This cooling period is crucial for them to set properly. If you cut them too soon, they might crumble and lose that perfect bar shape!
Experiment with Add-ins
Feel free to get creative! While chocolate chips and cherries are the stars here, you can add chopped nuts for extra crunch or even a sprinkle of sea salt on top before baking for a sweet and salty twist. Just remember to keep the balance of flavors in mind.
With these tips in your back pocket, you’ll be well on your way to making the best Black Forest cookie bars ever! Happy baking!
Variations on Black Forest Cookie Bars
If you’re feeling adventurous, there are so many fun ways to customize your Black Forest cookie bars! Here are a few variations to consider that will keep the spirit of this delicious treat while adding your own twist:
Use Dried Cherries for a Different Texture
If fresh cherries aren’t available or you’re looking for a more concentrated cherry flavor, try using dried cherries instead! They add a lovely chewiness and pair beautifully with the chocolate. Just make sure to chop them up a bit to help them distribute evenly throughout the batter.
Add Nuts for Extra Crunch
For those who love a bit of crunch in their desserts, sprinkle in some chopped walnuts or almonds! They not only add a delightful texture but also enhance the flavor profile. Just fold them in along with the chocolate chips and cherries. You might discover a new favorite combination!
Experiment with Different Chocolate Types
While semi-sweet chocolate chips are fantastic, why not switch things up? Try using dark chocolate chips for a richer taste, or even white chocolate chips for a sweeter contrast against the cocoa. You could also mix and match – a combination of dark and milk chocolate can be a decadent treat!
Incorporate a Hint of Coffee
For coffee lovers, adding a teaspoon of instant coffee granules to the batter can really elevate the chocolate flavor. It deepens the overall taste without making your cookie bars taste like coffee – just a subtle enhancement that you’ll love!
Make Them Gluten-Free
If you’re looking to make these cookie bars gluten-free, simply substitute the all-purpose flour for a 1:1 gluten-free baking blend. Be sure to check that the other ingredients, like baking powder or cocoa, are also gluten-free. It’s an easy swap that doesn’t sacrifice taste!
With these variations, you can keep your Black Forest cookie bars exciting and fresh. Don’t be afraid to experiment and find the combinations that make your taste buds dance! Happy baking!
Storage & Reheating Instructions
Once you’ve baked your delicious Black Forest cookie bars, you’ll want to store them properly to keep them fresh and tasty! Allow the bars to cool completely in the pan before transferring them. This cooling time is important, as it prevents any sogginess.
To store, simply place the cooled cookie bars in an airtight container. They’ll stay fresh for up to a week at room temperature. Just make sure to separate layers with parchment paper if you’re stacking them, so they don’t stick together. If you want them to last a bit longer, you can refrigerate them, where they’ll keep for about two weeks.
If you find yourself craving a warm treat, reheating these cookie bars is a breeze! Just pop them in the microwave for about 10-15 seconds to take the chill off and revive that gooey chocolate goodness. If you prefer a more crisp texture, you can warm them in a toaster oven or conventional oven at 350°F (175°C) for about 5 minutes. Just keep an eye on them to avoid overbaking!
With these simple storage and reheating tips, you can enjoy your Black Forest cookie bars any time you want a sweet treat. Happy snacking!
FAQ About Black Forest Cookie Bars
Q1: Can I substitute the fresh cherries with something else?
Absolutely! If fresh cherries aren’t available, you can use dried cherries for a different flavor and texture. Just make sure to chop them up a bit to help distribute them evenly in the batter. If you’re feeling adventurous, you could even try using frozen cherries; just make sure to thaw and drain them first!
Q2: How long do these cookie bars stay fresh?
Once stored in an airtight container, your Black Forest cookie bars will stay fresh for about a week at room temperature. If you want them to last longer, you can refrigerate them for up to two weeks. Just be sure to let them come to room temperature before serving for the best flavor!
Q3: What’s the best way to serve these cookie bars?
These cookie bars are delicious on their own, but for an extra special treat, you can serve them warm with a scoop of vanilla ice cream on top. Drizzling some chocolate sauce or a dollop of whipped cream can also elevate your dessert experience. Trust me, it’s a crowd-pleaser!
Q4: Can I make these cookie bars gluten-free?
Yes, you can definitely make these Black Forest cookie bars gluten-free! Just replace the all-purpose flour with a 1:1 gluten-free baking blend. Be sure to check that all your other ingredients, like baking soda and cocoa powder, are gluten-free as well. This way, everyone can enjoy this delightful treat!
Q5: How do I know when the cookie bars are done baking?
To check for doneness, insert a toothpick into the center of the cookie bars. If it comes out clean or with just a few moist crumbs, they’re ready to come out of the oven. Keep an eye on them towards the end of the baking time to avoid overbaking. You want them to be set but still soft and chewy!
Black Forest Cookie Bars: 5 Irresistible Takes to Try
- Total Time: 45 minutes
- Yield: 12 bars 1x
- Diet: Vegetarian
Description
Delicious Black Forest cookie bars with chocolate and cherries.
Ingredients
- 1 cup all-purpose flour
- 1/2 cup cocoa powder
- 1/2 teaspoon baking soda
- 1/4 teaspoon salt
- 1/2 cup unsalted butter, softened
- 1 cup sugar
- 1 large egg
- 1 teaspoon vanilla extract
- 1 cup chocolate chips
- 1 cup cherries, pitted and chopped
Instructions
- Preheat your oven to 350°F (175°C).
- In a bowl, mix flour, cocoa powder, baking soda, and salt.
- In another bowl, cream the butter and sugar until light.
- Add the egg and vanilla to the butter mixture and mix well.
- Gradually add the dry ingredients to the wet ingredients.
- Fold in the chocolate chips and cherries.
- Spread the mixture in a greased baking pan.
- Bake for 25-30 minutes or until a toothpick comes out clean.
- Let it cool before cutting into bars.
Notes
- Store in an airtight container.
- Can substitute dried cherries for fresh.
- Try adding nuts for extra crunch.
- Prep Time: 15 minutes
- Cook Time: 30 minutes
- Category: Dessert
- Method: Baking
- Cuisine: German
Nutrition
- Serving Size: 1 bar
- Calories: 180
- Sugar: 15g
- Sodium: 50mg
- Fat: 8g
- Saturated Fat: 5g
- Unsaturated Fat: 2g
- Trans Fat: 0g
- Carbohydrates: 24g
- Fiber: 2g
- Protein: 2g
- Cholesterol: 20mg
Keywords: Black Forest, cookie bars, dessert, chocolate, cherries