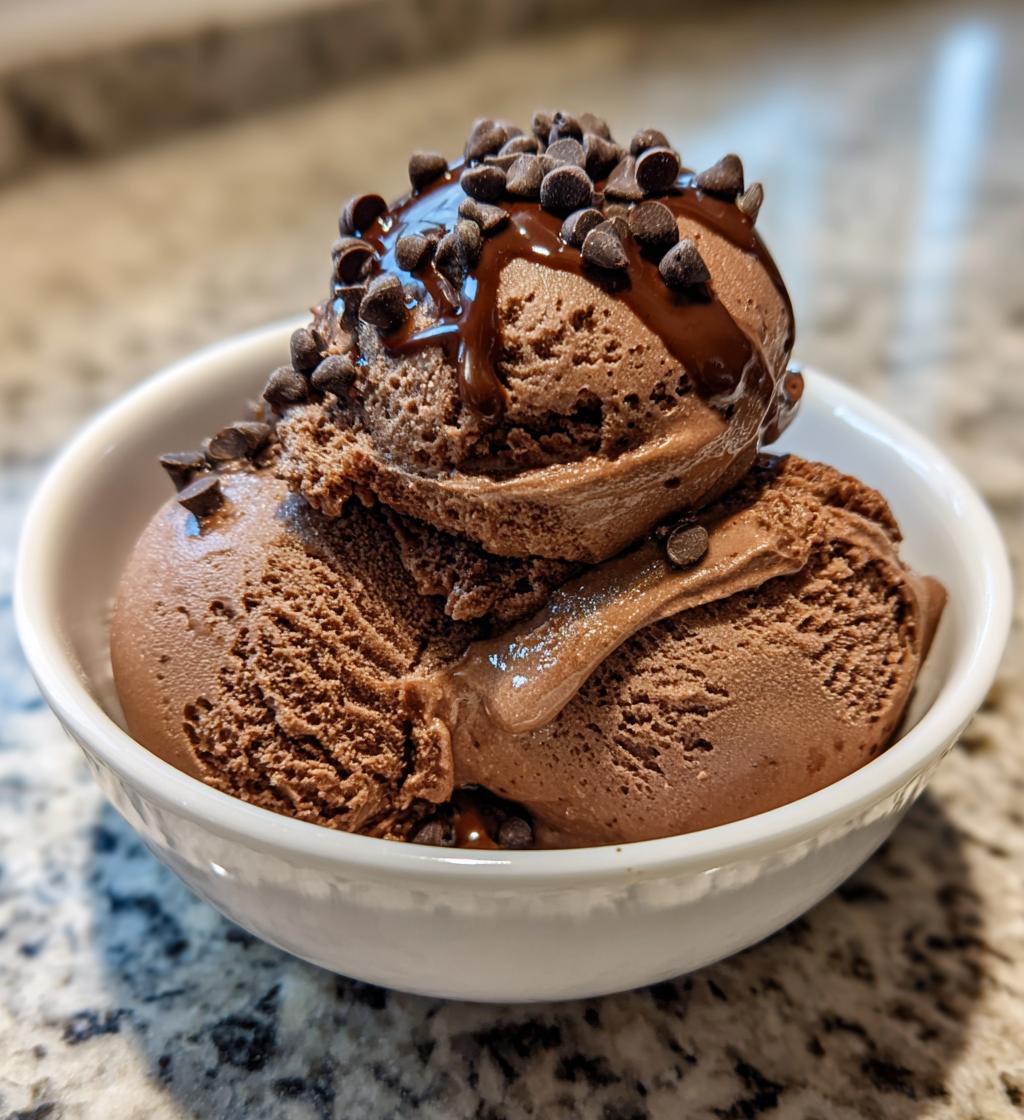
There’s something truly magical about homemade chocolate ice cream that you just can’t replicate from the store. When you whip up a batch of this creamy delight, you’re not just mixing ingredients; you’re crafting a dessert that’s filled with love and nostalgia. I mean, who doesn’t crave that rich, velvety texture that comes from making chocolate ice cream from scratch? It’s like a warm hug on a hot summer day or a sweet escape from the everyday hustle and bustle.
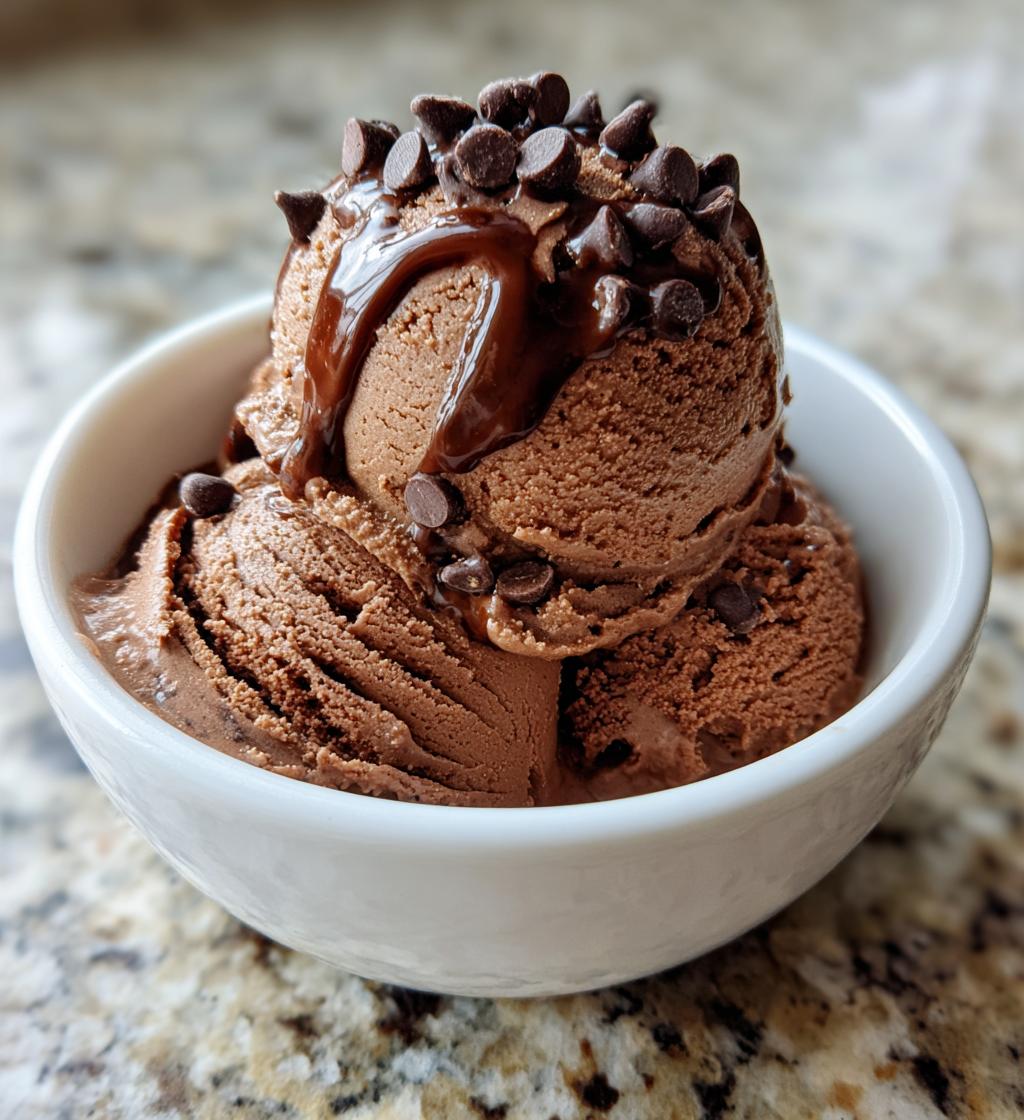
Imagine scooping into a bowl of this luscious chocolate ice cream, the kind that melts in your mouth and sends your taste buds dancing. It’s not just about satisfying your sweet tooth; it’s about the experience of creating something special right in your own kitchen. Plus, the thrill of knowing exactly what’s in your ice cream—no mystery ingredients here! And trust me, once you taste this homemade version, you’ll never want to go back to store-bought. Let’s dive into the wonderful world of chocolate ice cream and create something unforgettable together!
Ingredients List
To make the best homemade chocolate ice cream, you’ll need the following simple yet essential ingredients:
- 2 cups heavy cream: This is what gives your ice cream that rich, creamy texture that’s simply irresistible.
- 1 cup whole milk: Whole milk adds a nice balance to the cream, ensuring your ice cream is silky smooth.
- 3/4 cup granulated sugar: This sweetener enhances the chocolate flavor and helps create that perfect scoopable consistency.
- 1 cup cocoa powder: Use high-quality cocoa powder for a deep, rich chocolate flavor. It’s the star of the show!
- 1 teaspoon vanilla extract: Just a splash of vanilla elevates the flavor and rounds out the chocolate beautifully.
- 1/2 cup chocolate chips: These delightful little morsels add extra bursts of chocolatey goodness throughout the ice cream.
Gather these ingredients, and you’re well on your way to creating a dreamy dessert that everyone will love! Happy mixing!
How to Prepare Chocolate Ice Cream
Making your own chocolate ice cream is an exciting adventure! Let’s dive into the step-by-step process, ensuring you create a creamy, dreamy dessert that will have everyone begging for seconds.
- Start by mixing the base: In a large mixing bowl, combine the 2 cups of heavy cream, 1 cup of whole milk, 3/4 cup of granulated sugar, and 1 cup of cocoa powder. I often use a whisk to really blend everything together. You want to make sure the cocoa powder and sugar dissolve completely—this step is crucial for a smooth texture, so don’t rush it!
- Stir until dissolved: Keep mixing until you can’t see any cocoa or sugar particles. This should take about 2-3 minutes. You can also use a hand mixer if you want to speed things up, but be gentle; we’re not whipping this into a froth!
- Add the vanilla: Next, pour in 1 teaspoon of vanilla extract and give it another good stir. That hint of vanilla brings out the chocolate flavor beautifully—trust me on this one!
- Chill the mixture: For the best results, let your chocolate mixture chill in the fridge for about 30 minutes. This step is key because it helps the flavors meld together and makes the ice cream smoother. While you’re waiting, clean up the kitchen a bit or think about how you’re going to devour this treat later!
- Pour into the ice cream maker: Once your mixture is chilled, pour it into your ice cream maker. Make sure to follow your manufacturer’s instructions. If you’re using a classic churner, make sure the bowl has been pre-frozen for at least 24 hours—this will ensure a perfect consistency.
- Churn away! Turn on your ice cream maker and churn according to the instructions. This usually takes about 20-25 minutes. You’ll start to see it thicken up and take on that creamy texture we all love.
- Add chocolate chips: In the last few minutes of churning (usually about 5 minutes before it’s done), toss in 1/2 cup of chocolate chips. This will allow them to mix in without melting completely, giving you those delightful little pockets of chocolate goodness when you scoop!
- Transfer and freeze: Once the mixture has reached a soft-serve consistency, transfer it to an airtight container. Smooth the top with a spatula, seal it up, and pop it in the freezer for at least 4 hours. This step is essential for achieving that perfect scoopable texture when you’re ready to serve.
And voilà! You’ve made a rich, decadent chocolate ice cream that’s perfect for any occasion. Just remember, the waiting is the hardest part, but trust me, it’s worth it when you finally dig in!
Why You’ll Love This Recipe
Homemade chocolate ice cream isn’t just a treat; it’s an experience! Here’s why you’ll absolutely adore making it in your own kitchen:
- Quick preparation: With just 15 minutes of hands-on time, you can whip up a delicious chocolate ice cream base. The waiting part is the hardest, but the end result is totally worth it!
- Rich flavor: There’s nothing quite like the deep, velvety chocolate flavor you get when using high-quality cocoa powder and real ingredients. Store-bought just can’t compete!
- Customizable ingredients: You’re in control! Want to add a swirl of peanut butter or mix in some nuts? Go for it! You can create a variety of flavors and textures that suit your taste.
- Satisfaction of homemade dessert: There’s something incredibly rewarding about crafting your own ice cream. You get to enjoy the fruits of your labor and impress family and friends with your culinary skills!
- Perfect for any occasion: Whether it’s a hot summer day or a cozy movie night in, homemade chocolate ice cream is the perfect dessert to elevate any moment.
So what are you waiting for? Dive into this delightful process and treat yourself to a scoop (or two) of pure chocolate bliss!
Tips for Success
Ready to make your chocolate ice cream experience even better? Here are some tried-and-true tips to ensure you achieve the creamiest, dreamiest chocolate ice cream every single time:
- Use high-quality cocoa powder: This is where your chocolate flavor really shines! Opt for a brand that you love, as it makes a world of difference. The richer the cocoa, the more intense and delicious your ice cream will be.
- Mix thoroughly: When combining your ingredients, take your time. Make sure the sugar and cocoa powder are fully dissolved before moving on. A smooth base is key to a creamy texture, so don’t skip this step!
- Chill your mixture: Don’t rush the chilling process! Giving your chocolate mixture a good 30 minutes in the fridge helps develop the flavors and ensures a smoother end product. It’s a little patience that goes a long way.
- Keep an eye on the churning: Every ice cream maker is different. Pay attention to how your mixture thickens up as it churns. If it looks like it’s not quite coming together after 25 minutes, give it a little more time—just don’t let it turn into a solid block!
- Handle post-churning with care: Once your ice cream is churned, transfer it to an airtight container and smooth out the top to remove air pockets. This helps prevent ice crystals from forming, keeping your ice cream velvety and delicious. And remember, let it sit at room temperature for a few minutes before scooping for the perfect serve!
With these tips in your back pocket, you’ll be well on your way to creating chocolate ice cream that’s not just good, but absolutely divine. Enjoy the process and happy scooping!
Storage & Reheating Instructions
Now that you’ve crafted your delicious chocolate ice cream, let’s talk about how to keep it fresh and ready for whenever those chocolate cravings strike! Proper storage is key to maintaining the creamy texture and rich flavor that you’ve worked so hard to create.
First off, make sure to transfer your ice cream to an airtight container. This step helps prevent those pesky ice crystals from forming, which can ruin that smooth texture you love. I like to smooth the top with a spatula to get rid of any air pockets—this little trick really helps keep the ice cream creamy!
Store your chocolate ice cream in the coldest part of the freezer, ideally at 0°F (-18°C) or lower. It should stay fresh for about 2-3 weeks, but trust me, it probably won’t last that long because it’s just too irresistible!
When you’re ready to serve, take the container out and let it sit at room temperature for about 5-10 minutes. This little wait softens it up just enough to make scooping a breeze. If it’s still a bit too hard, you can use a warm scoop (just run it under hot water for a few seconds) to help you get that perfect scoop. Enjoy!
Nutritional Information Section
Before you dive into enjoying your homemade chocolate ice cream, let’s take a moment to talk about the nutritional information. Keep in mind that these values can vary based on the specific ingredients and brands you choose, but here’s a general guide for one serving (1/2 cup) of your delicious creation:
- Calories: 300
- Sugar: 25g
- Sodium: 50mg
- Fat: 20g
- Saturated Fat: 12g
- Carbohydrates: 30g
- Fiber: 2g
- Protein: 4g
- Cholesterol: 80mg
So, while this treat is definitely indulgent, it’s also packed with rich flavors and made with love. Enjoy every scoop knowing exactly what’s in it!
FAQ Section
Got questions about making the perfect chocolate ice cream? Don’t worry; I’ve got you covered! Here are some common queries that pop up, along with my answers to help you on your ice cream-making journey.
- Can I use a different type of milk? Absolutely! While whole milk gives the best creamy texture, you can use 2% milk or even non-dairy alternatives like almond or coconut milk. Just keep in mind that the creaminess might vary a bit.
- How long does the ice cream take to freeze? After churning, let your chocolate ice cream freeze for at least 4 hours for the best scoopable texture. If you can wait overnight, even better!
- What if I don’t have an ice cream maker? No ice cream maker? No problem! You can pour the chocolate mixture into a shallow dish and freeze it. Stir every 30 minutes for the first 2-3 hours to break up ice crystals until it’s creamy.
- Can I add other flavors or mix-ins? Definitely! Feel free to get creative. Add nuts, swirls of peanut butter, or even crushed cookies during the last few minutes of churning for an extra treat!
- How do I soften the ice cream if it’s too hard? If your chocolate ice cream is rock solid, just let it sit at room temperature for about 5-10 minutes before scooping. You can also run your scoop under hot water for a quick fix!
Hopefully, these answers help you feel more confident about making your own chocolate ice cream. Now, get ready to enjoy some delicious homemade goodness!
Equipment List
Before you get started on your homemade chocolate ice cream adventure, let’s make sure you have all the right tools at your disposal. Here’s a handy list of the essential equipment you’ll need to whip up this delicious treat:
- Ice Cream Maker: A good-quality ice cream maker is crucial for achieving that creamy texture. I recommend a machine with a built-in compressor for the best results, but a traditional churner works just fine if you plan ahead!
- Mixing Bowl: A large mixing bowl is a must for combining your ingredients. A glass or stainless steel bowl works great because it’s easy to clean and holds temperature well.
- Whisk or Hand Mixer: You’ll need a whisk or a hand mixer to blend your cream, milk, sugar, and cocoa powder smoothly. A whisk is perfect for a good workout, while a hand mixer can speed things up!
- Spatula: A flexible spatula helps you scrape down the sides of the bowl and transfer your mixture to the ice cream maker. It’s a handy tool to ensure nothing goes to waste!
- Airtight Container: Once your chocolate ice cream is churned, you’ll want to store it in an airtight container. This keeps it fresh and helps prevent ice crystals from forming.
- Measuring Cups and Spoons: Accurate measurements are key to a successful recipe, so make sure you have a set of measuring cups and spoons on hand.
With this equipment, you’re all set to create a dreamy batch of chocolate ice cream that will wow your family and friends. Let’s get churning!
Variations
Ready to make your chocolate ice cream experience even more exciting? Here are some creative variations and mix-ins to transform your classic recipe into something uniquely yours!
- Mint Chocolate Chip: Add a refreshing twist by incorporating 1 teaspoon of peppermint extract along with the vanilla. Toss in a cup of mini chocolate chips for that classic mint chocolate chip flavor!
- Peanut Butter Swirl: For peanut butter lovers, gently fold in 1/2 cup of creamy peanut butter during the last few minutes of churning. The result? A delicious chocolate-peanut butter combo that’s absolutely irresistible!
- Cookie Dough Delight: Craving a little crunch? Mix in chunks of your favorite cookie dough during the last few minutes of churning. Just make sure the dough is small enough to blend well throughout the ice cream.
- Chocolate Hazelnut: For a nutty flavor, add 1/2 cup of chopped hazelnuts or a swirl of chocolate hazelnut spread when your ice cream is almost done churning. It gives a delightful texture and taste!
- Spicy Chocolate: If you’re feeling adventurous, add a pinch of cayenne pepper or chili powder to the cocoa mixture for a surprising kick! It’s a fun twist that chocolate lovers will enjoy.
- Fruit Infusion: Incorporate fresh fruit or fruit purees, like raspberries or strawberries, during the last few minutes of churning for a delightful fruity contrast to the rich chocolate flavor.
These variations allow you to customize your chocolate ice cream based on your mood or the season. So go ahead, experiment a little, and enjoy the process of creating your own delicious ice cream masterpiece!
Print
Chocolate Ice Cream: 5 Simple Steps to Pure Bliss
- Total Time: 4 hours 15 minutes
- Yield: 6 servings 1x
- Diet: Vegetarian
Description
Delicious homemade chocolate ice cream.
Ingredients
- 2 cups heavy cream
- 1 cup whole milk
- 3/4 cup granulated sugar
- 1 cup cocoa powder
- 1 teaspoon vanilla extract
- 1/2 cup chocolate chips
Instructions
- In a bowl, mix heavy cream, milk, sugar, and cocoa powder.
- Stir until the sugar and cocoa are fully dissolved.
- Add vanilla extract and mix well.
- Pour the mixture into an ice cream maker.
- Churn according to the manufacturer’s instructions.
- In the last few minutes, add chocolate chips.
- Transfer to a container and freeze for at least 4 hours before serving.
Notes
- Use high-quality cocoa powder for better flavor.
- Allow ice cream to sit at room temperature for a few minutes before scooping.
- Store leftovers in an airtight container in the freezer.
- Prep Time: 15 minutes
- Cook Time: 0 minutes
- Category: Dessert
- Method: Churning
- Cuisine: American
Nutrition
- Serving Size: 1/2 cup
- Calories: 300
- Sugar: 25g
- Sodium: 50mg
- Fat: 20g
- Saturated Fat: 12g
- Unsaturated Fat: 8g
- Trans Fat: 0g
- Carbohydrates: 30g
- Fiber: 2g
- Protein: 4g
- Cholesterol: 80mg
Keywords: Chocolate Ice Cream, homemade ice cream, dessert