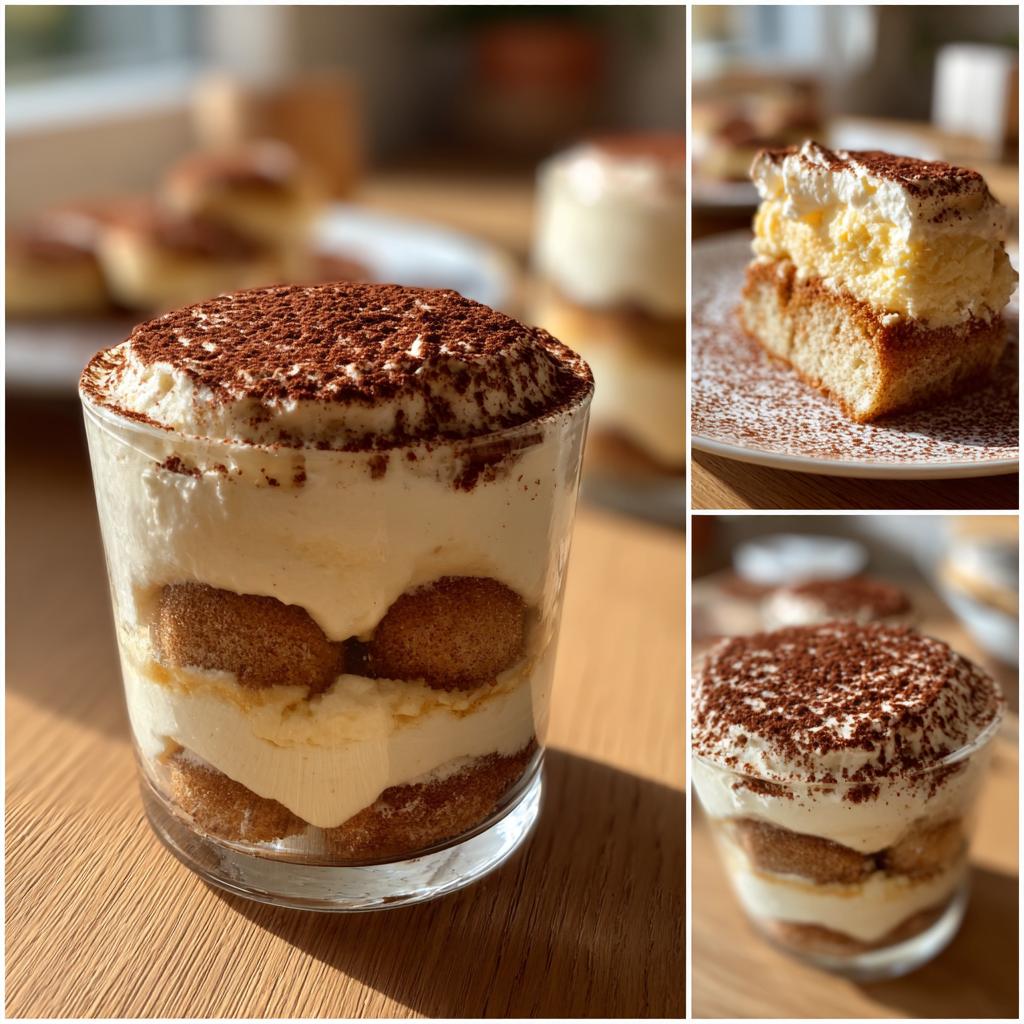
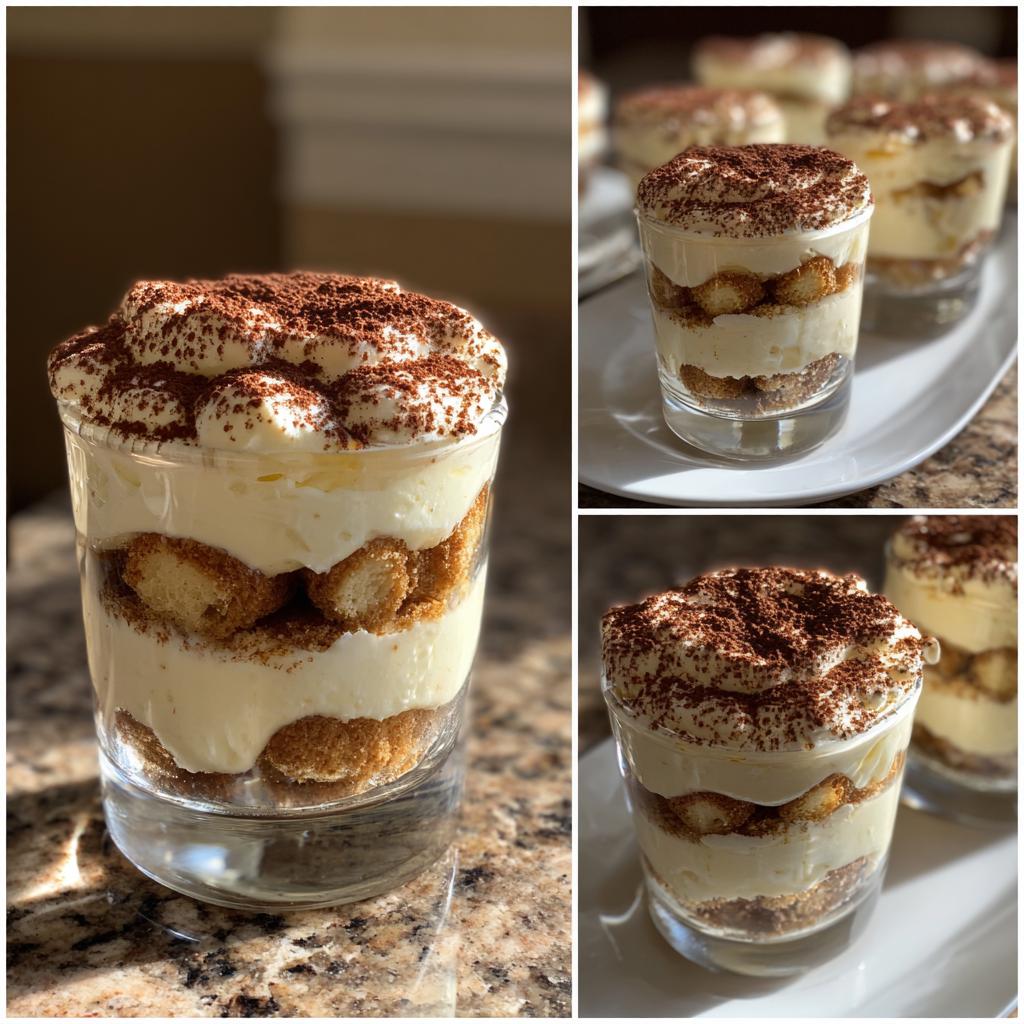
There’s something so enchanting about Mini No-Bake Tiramisu Cups. They bring the classic Italian dessert right to your fingertips, transforming a beloved recipe into a delightful, easy-to-serve treat! I remember the first time I made these for a summer gathering. Friends were mingling, laughter filled the air, and I served these little cups, each one layered with coffee-soaked ladyfingers and creamy mascarpone. The moment I saw their eyes light up with that first taste, I knew I had struck dessert gold!
What I love most about these Mini No-Bake Tiramisu Cups is how effortlessly they come together. You don’t even need to turn on the oven! Just a bit of whipping and layering, and you’re on your way to a luscious dessert that’s perfect for any occasion. Whether it’s a fancy dinner party or a casual get-together, these cups are a guaranteed crowd-pleaser. Plus, they can be made ahead of time and stored in the fridge, making them a stress-free choice for entertaining. Trust me, once you try them, you’ll be dreaming of ways to serve them again and again!
Ingredients List
Gathering the right ingredients is key to making the best Mini No-Bake Tiramisu Cups. Here’s what you’ll need:
- 1 cup mascarpone cheese: This rich and creamy Italian cheese is the star of the show! It adds that luxurious texture and flavor that makes tiramisu so delightful.
- 1 cup heavy cream: Whipping this will give your dessert a light and airy feel. Make sure it’s cold for the best results!
- 1/2 cup powdered sugar: This sweetener brings just the right amount of sweetness without being overpowering. You can adjust the amount to suit your taste!
- 1 cup brewed coffee, cooled: Brew your favorite coffee and let it cool down. For a more intense flavor, feel free to use espresso instead!
- 1 package ladyfingers: These delicate cookies soak up the coffee beautifully and create that classic tiramisu texture. You can usually find them in the international aisle or baking section of your grocery store.
- Cocoa powder for dusting: This isn’t just for looks! A light dusting of cocoa powder adds a lovely finish and a hint of chocolatey goodness on top.
With these ingredients in hand, you’re all set to whip up something truly special!
How to Prepare Mini No-Bake Tiramisu Cups
Preparing these Mini No-Bake Tiramisu Cups is a breeze, and I promise you’ll be amazed at how quickly they come together! Just follow these simple steps, and you’ll have a show-stopping dessert to impress everyone.
Step-by-Step Instructions
- Start with the cream mixture: In a large mixing bowl, combine the 1 cup of mascarpone cheese, 1 cup of heavy cream, and 1/2 cup of powdered sugar. Grab your hand mixer or stand mixer and whip it all together until soft peaks form. This usually takes about 2-3 minutes. You want it to be light and fluffy, so keep an eye on it!
- Prep the ladyfingers: While you’re mixing the cream, take your 1 cup of brewed coffee and let it cool if you haven’t already. Once it’s cool, dip each ladyfinger into the coffee briefly. Don’t let them soak too long, or they’ll get mushy! A quick dip on each side should do the trick—just enough to absorb that delicious coffee flavor.
- Layer it up: Now it’s time for the fun part! Grab your serving cups (small glasses or mason jars work wonderfully). Start by placing a layer of the dipped ladyfingers at the bottom of each cup. Try to fit them snugly, but don’t stress if they don’t look perfect—this is all about the taste!
- Add the mascarpone mixture: Spoon a layer of your whipped mascarpone mixture over the ladyfingers. Smooth it out with a spatula or the back of a spoon. You want to create a nice, even layer! Repeat this process: add another layer of coffee-dipped ladyfingers, followed by another layer of mascarpone. Keep going until your cups are filled, usually about two to three layers works best.
- Dust with cocoa powder: Once your cups are filled to the brim with deliciousness, it’s time to finish them off. Grab your cocoa powder and dust a light layer on top of each cup. This adds that classic tiramisu touch and makes them look extra fancy!
- Chill and serve: Now, here’s the hardest part—waiting! Cover the cups with plastic wrap and pop them in the fridge for at least 2 hours. This chilling time allows all those beautiful flavors to meld together and makes the dessert even more delightful. If you can, let them chill longer; overnight is even better!
And there you have it! With these steps, you’ll be well on your way to serving up the most delightful Mini No-Bake Tiramisu Cups that will have everyone coming back for seconds. Enjoy the process, and don’t forget to savor the sweet rewards of your hard work!
Why You’ll Love This Recipe
- Quick and Easy Preparation: With just 20 minutes of hands-on time, you’ll have these Mini No-Bake Tiramisu Cups ready to chill. No baking required, which means less mess and more time to enjoy!
- Perfect for Any Occasion: Whether it’s a casual weeknight dinner or a fancy celebration, these cups fit right in. They’re elegant enough for a dinner party yet simple enough for a cozy family meal.
- Customizable to Your Taste: Feel free to experiment! You can adjust the sweetness, swap in different flavored coffee, or even layer in some chocolate shavings for an extra treat. The possibilities are endless!
- Make-Ahead Convenience: These mini desserts can be prepared a day in advance. Just pop them in the fridge and let them chill until it’s time to serve. This makes hosting a breeze!
- Delightful Layers of Flavor: Each spoonful delivers a heavenly combination of coffee-soaked ladyfingers and creamy mascarpone. The balance of flavors and textures is simply divine!
- Impressive Presentation: The individual cups look beautiful on any table, making them a show-stopping dessert. Trust me, your guests will be impressed!
Tips for Success
To make sure your Mini No-Bake Tiramisu Cups turn out perfectly, here are some handy tips straight from my kitchen to yours!
- Don’t Overwhip the Cream: When whipping your heavy cream, stop as soon as you see soft peaks. If you whip it too long, it can turn grainy and lose that lovely light texture. You want it fluffy, not butter!
- Perfect Coffee Dipping: Be quick when dipping the ladyfingers! A swift dip is all you need to soak up that coffee flavor without turning them into mush. Think of it as a quick swim rather than a long soak!
- Layering Techniques: Don’t worry about making the layers perfect. Embrace the rustic look! Just aim for even layers of ladyfingers and mascarpone. The beauty of dessert is in its delicious imperfections!
- Chill Time is Crucial: Patience pays off! Letting the cups chill for at least 2 hours is essential for the flavors to meld beautifully. If you can wait overnight, you’ll be rewarded with an even richer taste!
- Personalize Your Flavors: Feel free to get creative! Swap out the brewed coffee for flavored coffee or add a splash of coffee liqueur for an adult twist. You can also toss in some chocolate shavings or a layer of fruit puree for a unique spin!
- Experiment with Sweetness: If you prefer a less sweet dessert, start with less powdered sugar and adjust to taste. You can always add more, but it’s tough to take sweetness away once it’s mixed in!
- Presentation Matters: Use clear cups or jars to showcase those beautiful layers. They’ll look even more enticing when your guests can see the delightful coffee and creamy mascarpone peeking through!
With these tips in mind, you’ll be well on your way to creating the most scrumptious Mini No-Bake Tiramisu Cups. Enjoy the journey, and happy baking!
Nutritional Information
Here’s a quick look at the typical nutritional values for one serving of Mini No-Bake Tiramisu Cups. Keep in mind that these are estimates and can vary based on specific ingredients used:
- Calories: 300
- Sugar: 25g
- Fat: 20g
- Saturated Fat: 12g
- Unsaturated Fat: 8g
- Trans Fat: 0g
- Carbohydrates: 30g
- Fiber: 1g
- Protein: 5g
- Cholesterol: 70mg
- Sodium: 50mg
These delightful cups are not only a treat for your taste buds but also a sweet indulgence that fits nicely into a balanced diet. Enjoy them in moderation as part of your dessert rotation!
Serving Suggestions
When it comes to enjoying your delightful Mini No-Bake Tiramisu Cups, the right pairings can elevate the experience even more. Here are some ideas to consider that complement the rich flavors of this classic Italian dessert:
- Fresh Berries: A side of mixed fresh berries, like strawberries, raspberries, or blueberries, adds a refreshing contrast to the creamy tiramisu. Their natural sweetness and tartness balance the richness beautifully!
- Espresso or Coffee: Serve your tiramisu cups with a shot of espresso or a nice cup of coffee. The bold flavors will enhance the coffee notes in the dessert, making it a perfect after-dinner treat.
- Chocolate-Dipped Biscotti: For a little extra crunch, consider pairing with chocolate-dipped biscotti. Dipping a biscotti into your tiramisu cups is a fun way to enjoy both treats together!
- Gelato: A scoop of creamy gelato—especially flavors like vanilla, hazelnut, or chocolate—would be a dreamy addition. It adds another layer of indulgence to your dessert spread.
- Sweet Wine: If you’re feeling fancy, consider serving a glass of sweet dessert wine or even a light prosecco. The bubbles and sweetness can brighten up the overall flavor profile.
- Cheese Plate: For something a bit different, a cheese plate featuring soft cheeses like brie or mascarpone, along with some honey and nuts, can create a lovely savory balance to the sweet tiramisu.
These pairing suggestions can help make your Mini No-Bake Tiramisu Cups the star of any gathering! Feel free to mix and match based on your mood and occasion. Enjoy!
Storage & Reheating Instructions
Storing your delicious Mini No-Bake Tiramisu Cups is super simple, and it’s all about keeping that creamy goodness intact. Here’s how to do it:
- Refrigeration: If you have any leftovers (which is rare because they’re so tasty!), cover the cups tightly with plastic wrap or transfer them to an airtight container. They can be stored in the refrigerator for up to 3 days. Just make sure they’re well-covered to prevent any odors from seeping in!
- Freezing: While I don’t recommend freezing these cups because the texture can be affected, if you must, you can freeze the mascarpone mixture separately from the ladyfingers. Just be aware that the ladyfingers may lose their delightful crunch upon thawing.
- Serving After Storage: When you’re ready to enjoy your leftovers, simply pull them from the fridge. They’re best served cold, so no need to reheat! Just dust with a little extra cocoa powder for that fresh look, and they’re ready to impress again!
Following these storage tips will help maintain the quality of your Mini No-Bake Tiramisu Cups, ensuring that each bite is as delightful as the first. Enjoy your sweet treats at your leisure!
FAQ Section
Got questions about making your Mini No-Bake Tiramisu Cups? You’re not alone! Here are some of the most common queries I get, along with my tried-and-true answers:
- Can I use a different type of cheese instead of mascarpone? While mascarpone is traditional for tiramisu, you can substitute it with cream cheese for a tangier flavor. Just whip it well until smooth before mixing. It won’t be quite the same, but it’ll still be delicious!
- What if I don’t have ladyfingers? No problem! You can use pound cake or even sponge cake as an alternative. Just cut them into strips that can soak up the coffee. The key is to maintain that lovely texture and flavor, so opt for something that can absorb the coffee nicely!
- How can I make these mini tiramisu cups gluten-free? To make a gluten-free version, look for gluten-free ladyfingers or sponge cake. There are some great store-bought options available, or you can bake your own if you’re up for it!
- Can I make these cups in advance? Absolutely! These Mini No-Bake Tiramisu Cups are perfect for making ahead of time. Just prepare them as instructed, chill them in the fridge, and they’ll be ready to serve when you are. They often taste even better after a night in the fridge as the flavors meld together!
- How many servings does this recipe yield? This recipe makes about 4 servings, but you can easily double or triple the ingredients if you need more. Just make sure you have enough cups or jars to hold all that creamy goodness!
These tips should help you navigate any bumps along the way while making your Mini No-Bake Tiramisu Cups. Enjoy every delightful layer!
Print
Mini No-Bake Tiramisu Cups: 5 Steps to Dessert Bliss
- Total Time: 2 hours 20 minutes
- Yield: 4 servings 1x
- Diet: Vegetarian
Description
A simple dessert featuring layers of coffee-soaked ladyfingers and creamy mascarpone.
Ingredients
- 1 cup mascarpone cheese
- 1 cup heavy cream
- 1/2 cup powdered sugar
- 1 cup brewed coffee, cooled
- 1 package ladyfingers
- Cocoa powder for dusting
Instructions
- In a bowl, combine mascarpone cheese, heavy cream, and powdered sugar.
- Whip until soft peaks form.
- Dip ladyfingers briefly in cooled coffee.
- Layer dipped ladyfingers in cups.
- Add a layer of mascarpone mixture over the ladyfingers.
- Repeat layers until cups are filled.
- Dust with cocoa powder on top.
- Chill for at least 2 hours before serving.
Notes
- Use espresso for a stronger coffee flavor.
- Adjust sugar to taste.
- Store in the refrigerator for up to 3 days.
- Prep Time: 20 minutes
- Cook Time: 0 minutes
- Category: Dessert
- Method: No-Bake
- Cuisine: Italian
Nutrition
- Serving Size: 1 cup
- Calories: 300
- Sugar: 25g
- Sodium: 50mg
- Fat: 20g
- Saturated Fat: 12g
- Unsaturated Fat: 8g
- Trans Fat: 0g
- Carbohydrates: 30g
- Fiber: 1g
- Protein: 5g
- Cholesterol: 70mg
Keywords: Mini No-Bake Tiramisu Cups, dessert, easy tiramisu