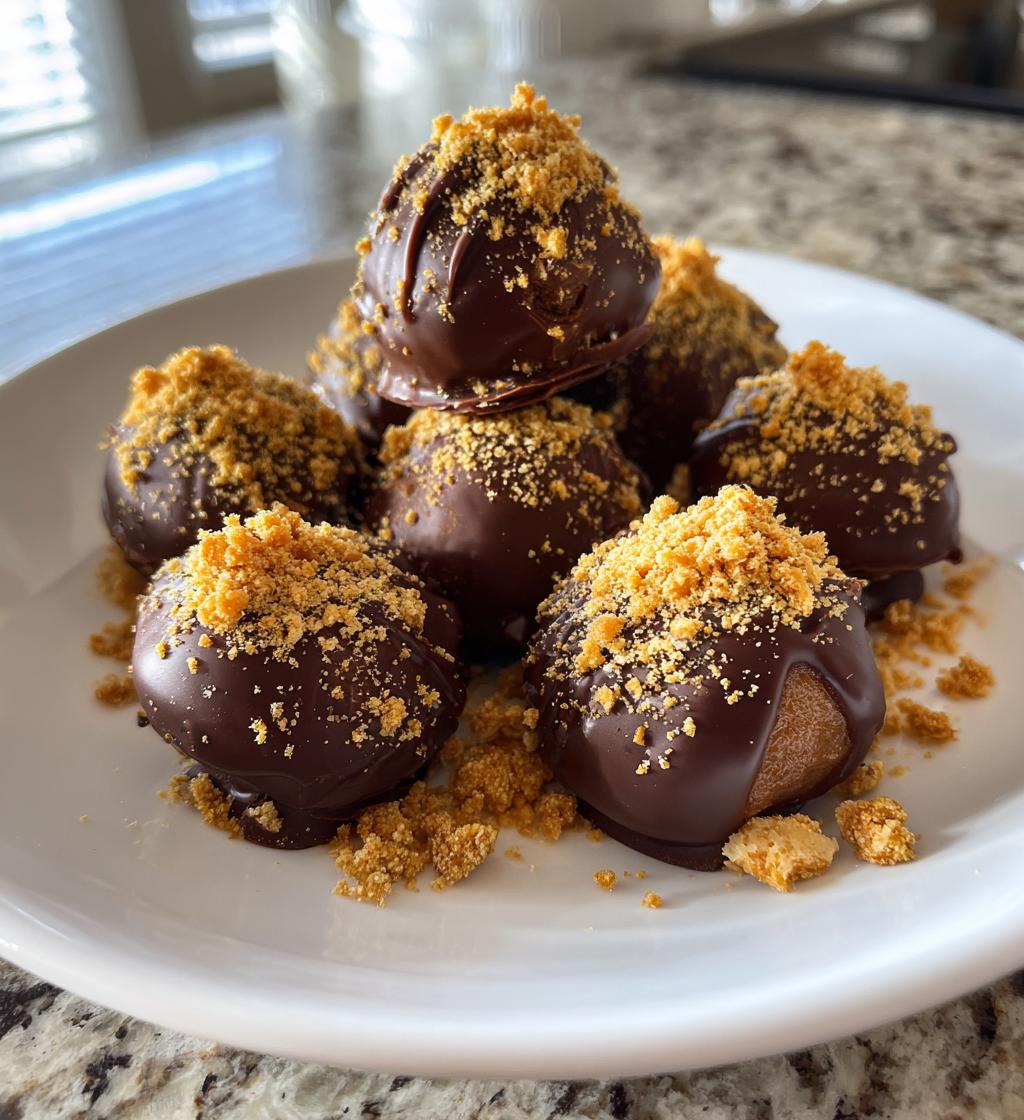
No-bake desserts are a total game-changer, aren’t they? They bring all the fun and flavor without the stress of preheating the oven or worrying about timing. I mean, who wouldn’t love that? My absolute favorite has to be these No Bake Caramel Crunch Butterfinger Truffles. They’re like little bites of happiness, bursting with that irresistible combination of creamy, crunchy, and sweet flavors. I remember the first time I made these with my kids; we were all giggling as we rolled the mixture into balls, our hands covered in chocolate and Butterfinger crumbs. It felt like a mini party right in our kitchen! Whether it’s a family movie night or a gathering with friends, these truffles never fail to impress and disappear in no time. Trust me, once you taste them, you’ll be hooked too!
Ingredients List
To whip up these delightful No Bake Caramel Crunch Butterfinger Truffles, you’ll need just a handful of simple ingredients. Here’s what you’ll want to gather:
- 1 cup Butterfinger crumbs – You can easily make these by crushing Butterfinger candy bars in a ziplock bag or food processor until they’re finely crumbled. The more crumbs, the better the flavor!
- 1/2 cup cream cheese, softened – Make sure it’s at room temperature to blend smoothly with the crumbs. The cream cheese adds a rich creaminess that balances the sweetness.
- 1/4 cup caramel sauce – You can use store-bought caramel or make your own if you’re feeling adventurous! This sticky goodness is what gives the truffles that luscious texture.
- 1 cup chocolate chips – I love semi-sweet chocolate, but feel free to use milk chocolate for a sweeter bite or dark chocolate for a richer taste.
- 1 tablespoon coconut oil – This is key for melting the chocolate smoothly and helps it coat the truffles perfectly. It adds a subtle flavor that pairs beautifully with the other ingredients.
Gather these goodies, and you’re all set to create something truly scrumptious!
How to Prepare No Bake Caramel Crunch Butterfinger Truffles
Making these No Bake Caramel Crunch Butterfinger Truffles is a breeze! Follow these easy steps, and you’ll have a delicious treat ready to impress your family and friends in no time.
Step 1: Mix the Base
First up, grab a mixing bowl and combine your Butterfinger crumbs with the softened cream cheese. Use a spatula or a sturdy wooden spoon to mix everything together until smooth. You want to reach a thick, dough-like consistency that holds together well. If it feels too crumbly, just mix a little longer, and it should come together nicely. Trust me, the smoother, the better!
Step 2: Add Caramel
Now it’s time to add that caramel sauce. Pour it in and mix until it’s evenly distributed throughout the mixture. This is where the magic happens! You want every bite to have a hint of that sweet, gooey caramel flavor. Make sure there are no lumps of cream cheese left; everything should be smooth and creamy.
Step 3: Shape the Truffles
With your mixture ready, it’s time to shape it into truffles! I like to use a small cookie scoop, which helps keep them uniform in size—aim for about 1 inch in diameter. Roll them gently between your palms until they’re nice and round. This part is so fun! You can even get the kids involved; just watch out for the sticky mess!
Step 4: Chill the Truffles
Once you’ve shaped all the truffles, pop them in the refrigerator for about 30 minutes. Chilling is essential as it helps the truffles firm up, making them easier to coat in chocolate later. Plus, it gives you a little break to clean up the kitchen!
Step 5: Prepare the Chocolate Coating
While the truffles chill, it’s time to melt your chocolate chips and coconut oil. I usually do this in the microwave for a quick and easy method. Just place them in a microwave-safe bowl and heat in 30-second intervals, stirring in between until everything is smooth and fully melted. Be careful not to overheat it—burnt chocolate is a sad fate!
Step 6: Coat the Truffles
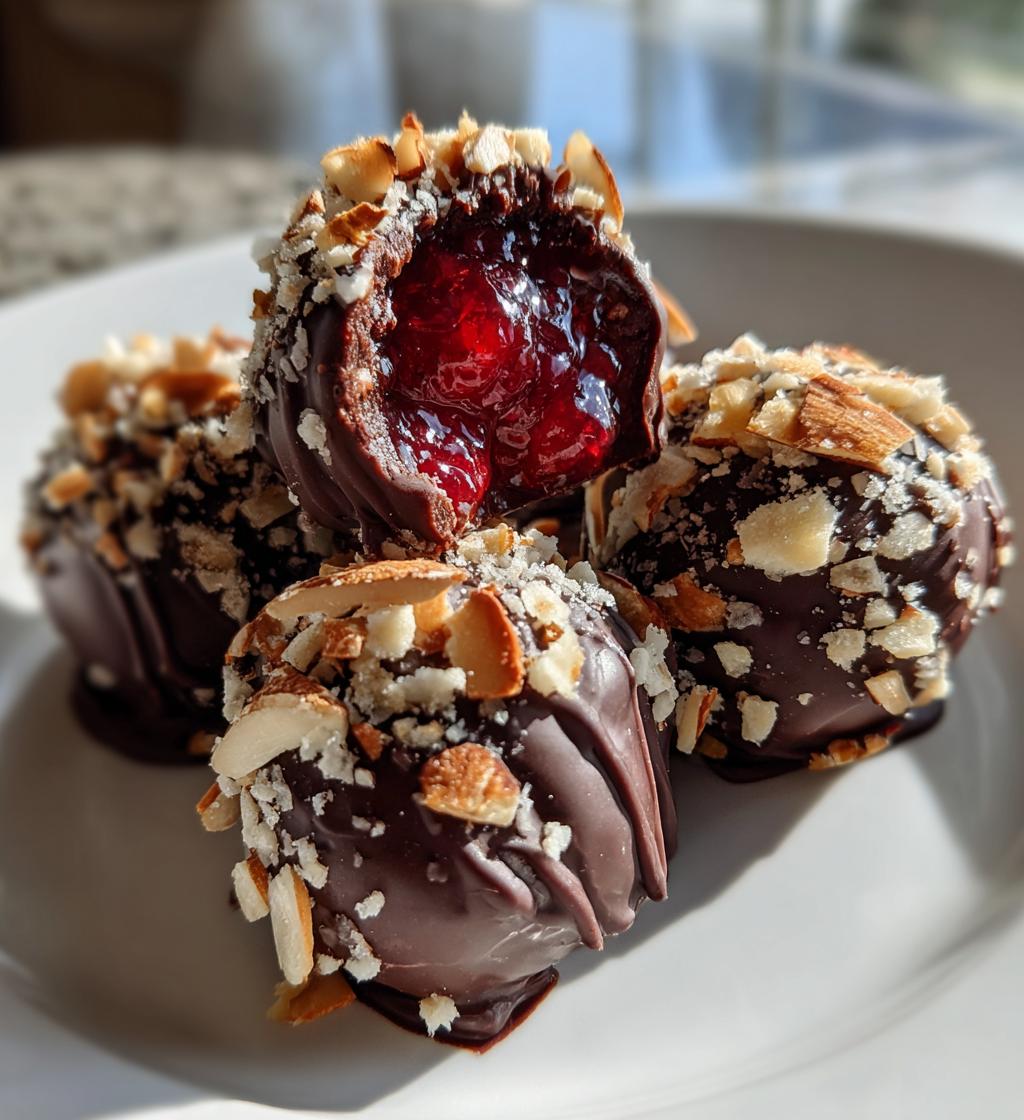
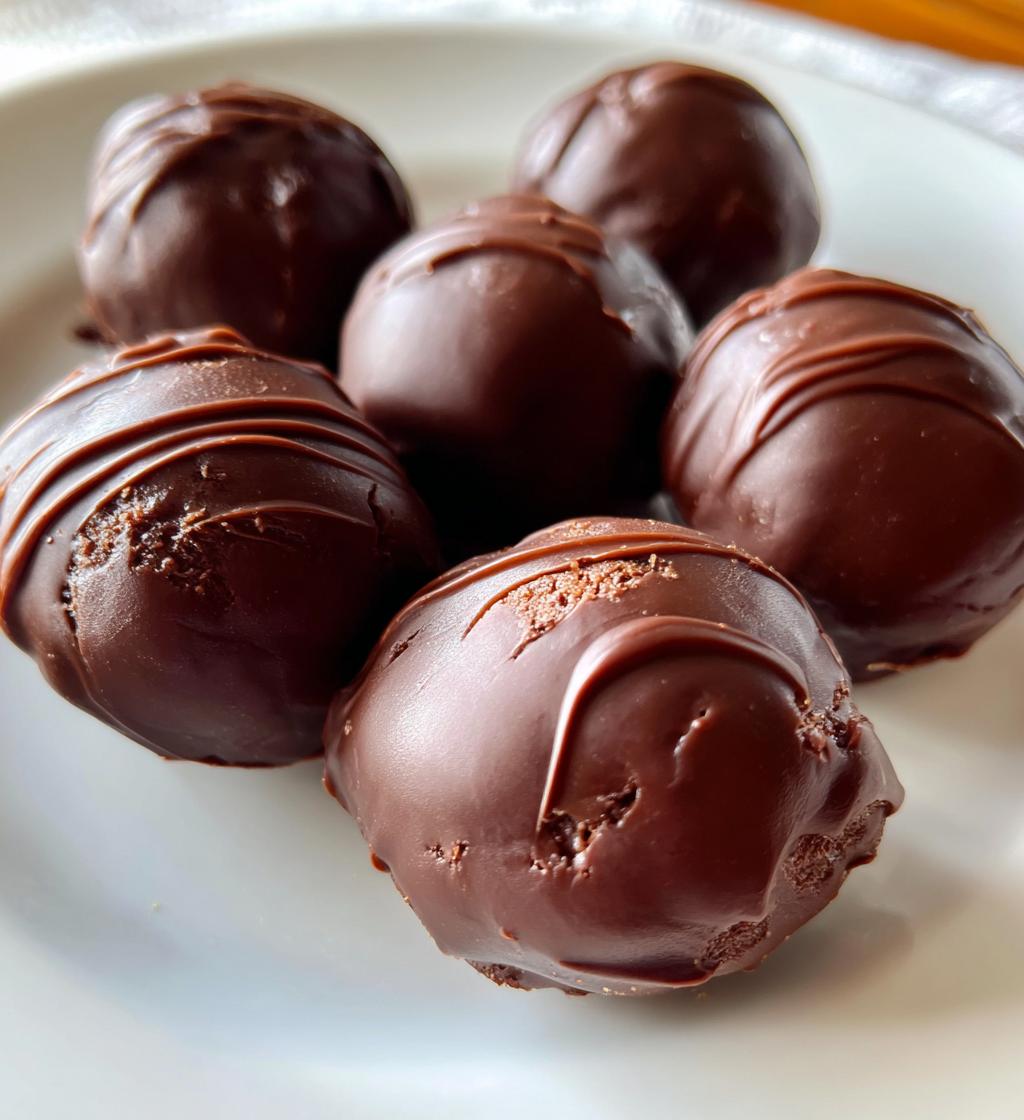
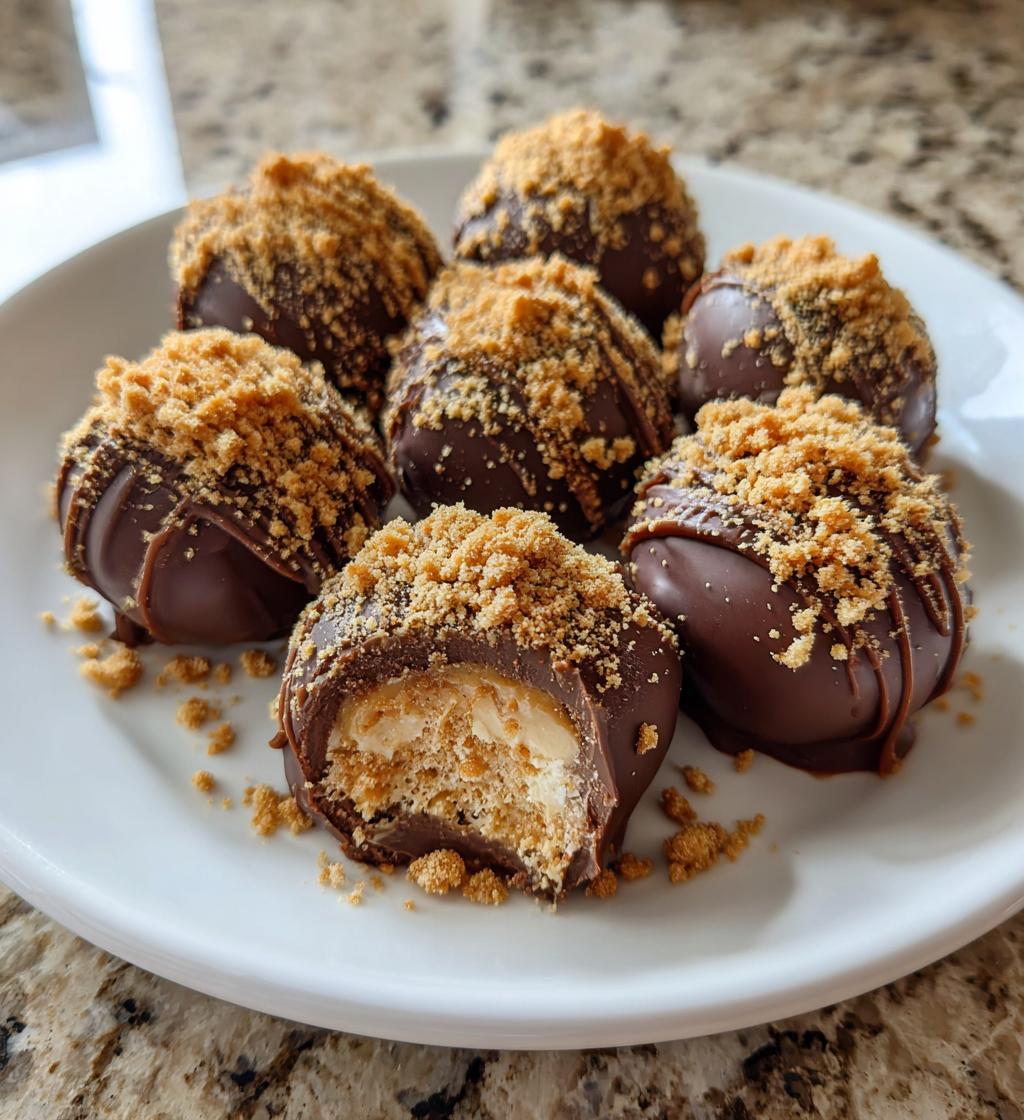
Now it’s time for the fun part! Take each chilled truffle and dip it into the melted chocolate, making sure it’s fully coated. Use a fork to lift it out, letting any excess chocolate drip off before placing it back on the baking sheet. This ensures a nice, even coating, and you can sprinkle some leftover Butterfinger crumbs on top for a little extra flair!
Step 7: Set and Serve
After coating, lay the truffles out on a baking sheet lined with parchment paper. Let them set at room temperature or pop them back in the fridge for about 15 minutes to speed things up. Once set, they’re ready to enjoy! Store any leftovers in an airtight container in the refrigerator for up to a week. But let’s be real; they probably won’t last that long!
Nutritional Information
Before you dive into these delightful No Bake Caramel Crunch Butterfinger Truffles, here’s a quick look at the nutrition per truffle. Each truffle has approximately 120 calories, with 8g of sugar and 7g of fat. Keep in mind that these values can vary based on the specific ingredients and brands you choose to use. While I can’t provide exact numbers, I can guarantee you’ll be savoring every bite without a hint of guilt!
Why You’ll Love This Recipe
These No Bake Caramel Crunch Butterfinger Truffles are truly a treat you won’t want to miss! Here are just a few reasons why they’ll become a favorite in your home:
- Quick Preparation: You can whip these up in just about 15 minutes, with no baking required!
- Easy Cleanup: Less mess means more time to enjoy with family and friends. Just a few bowls and utensils to wash!
- Rich Flavor: The combination of creamy cream cheese, crunchy Butterfinger, and gooey caramel creates a flavor explosion in every bite.
- Customizable: Feel free to switch up the chocolate or add in your favorite nuts for a personal touch!
- Perfect for Any Occasion: Whether it’s a party, holiday, or just a sweet treat for yourself, these truffles are always a hit!
Once you try them, you’ll see why they’re a go-to recipe for every occasion!
Tips for Success
To make your No Bake Caramel Crunch Butterfinger Truffles truly shine, here are some insider tips that I’ve picked up along the way:
- Storage: Keep these little delights in an airtight container in the refrigerator. They’ll stay fresh for up to a week, but trust me, they’ll likely disappear long before that!
- Flavor Variations: Want to switch things up? Try adding a pinch of sea salt to the chocolate for a salted caramel vibe, or fold in some crushed pretzels for an extra crunch. You could even use different candy bars—Snickers or Reese’s would be fun alternatives!
- Serving Suggestions: These truffles are perfect for parties! Serve them on a decorative platter or in cute little cupcake liners for a festive touch. They also make great gifts—just package them in a clear bag tied with a ribbon for a sweet surprise!
- Getting Kids Involved: This is a fun recipe to make with kids. Let them help dip the truffles in chocolate or sprinkle the Butterfinger crumbs on top. It’s a great way to create sweet memories together!
With these tips, you’ll be sure to impress everyone with your delicious truffles. Enjoy the process and the smiles that come with sharing these tasty treats!
FAQ Section
Got questions about making these No Bake Caramel Crunch Butterfinger Truffles? No worries! Here are some common queries I’ve heard, along with my answers:
- Can I substitute the cream cheese? Absolutely! You can use mascarpone cheese or even a non-dairy cream cheese alternative if you’re looking for a vegan option.
- How long can I store these truffles? They’ll stay fresh in the refrigerator for up to a week, but trust me, they’re usually gone way before that!
- What’s the best way to serve these truffles? They look great on a decorative platter or in cupcake liners. You can also package them as gifts in cute boxes or bags for friends and family!
- Can I freeze the truffles? Yes! Just make sure to store them in an airtight container. They can last up to three months in the freezer. Just thaw them in the fridge before serving.
Hopefully, this helps you get the most out of your truffle-making adventure!
For more delicious truffle recipes, check out Coffee Truffles or No Bake Oreo Cheesecake!
Print
No Bake Caramel Crunch Butterfinger Truffles You Must Try
- Total Time: 45 minutes
- Yield: 24 truffles 1x
- Diet: Vegetarian
Description
Delicious no-bake truffles made with Butterfinger candy bars and caramel.
Ingredients
- 1 cup Butterfinger crumbs
- 1/2 cup cream cheese, softened
- 1/4 cup caramel sauce
- 1 cup chocolate chips
- 1 tablespoon coconut oil
Instructions
- In a bowl, mix Butterfinger crumbs and cream cheese until smooth.
- Add caramel sauce and mix well.
- Form the mixture into small balls.
- Chill the balls in the refrigerator for 30 minutes.
- Melt chocolate chips and coconut oil in a microwave.
- Dip each truffle in the melted chocolate.
- Place on a baking sheet and let them set.
Notes
- Store in the refrigerator for up to a week.
- Use any leftover Butterfinger crumbs for topping.
- Prep Time: 15 minutes
- Cook Time: 0 minutes
- Category: Dessert
- Method: No-Bake
- Cuisine: American
Nutrition
- Serving Size: 1 truffle
- Calories: 120
- Sugar: 8g
- Sodium: 30mg
- Fat: 7g
- Saturated Fat: 4g
- Unsaturated Fat: 2g
- Trans Fat: 0g
- Carbohydrates: 11g
- Fiber: 1g
- Protein: 2g
- Cholesterol: 10mg
Keywords: No Bake Caramel Crunch Butterfinger Truffles