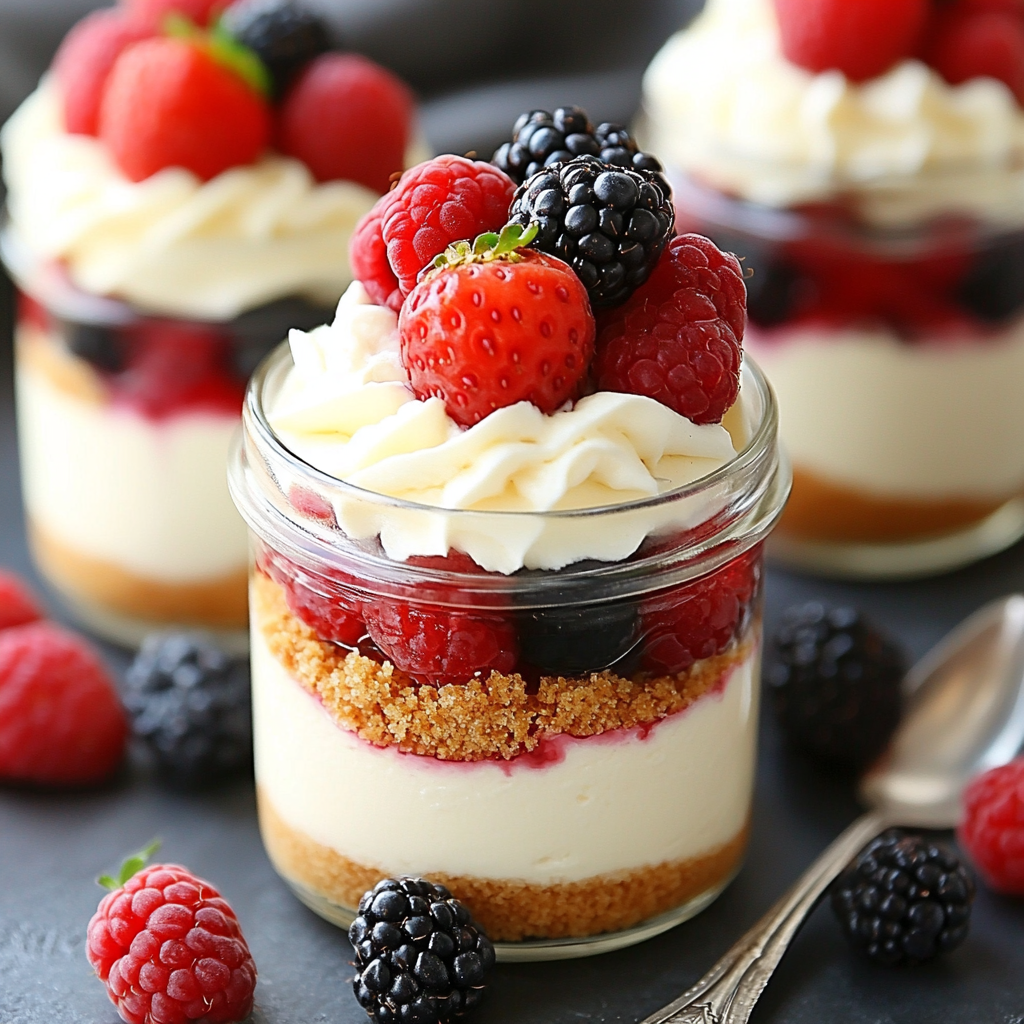
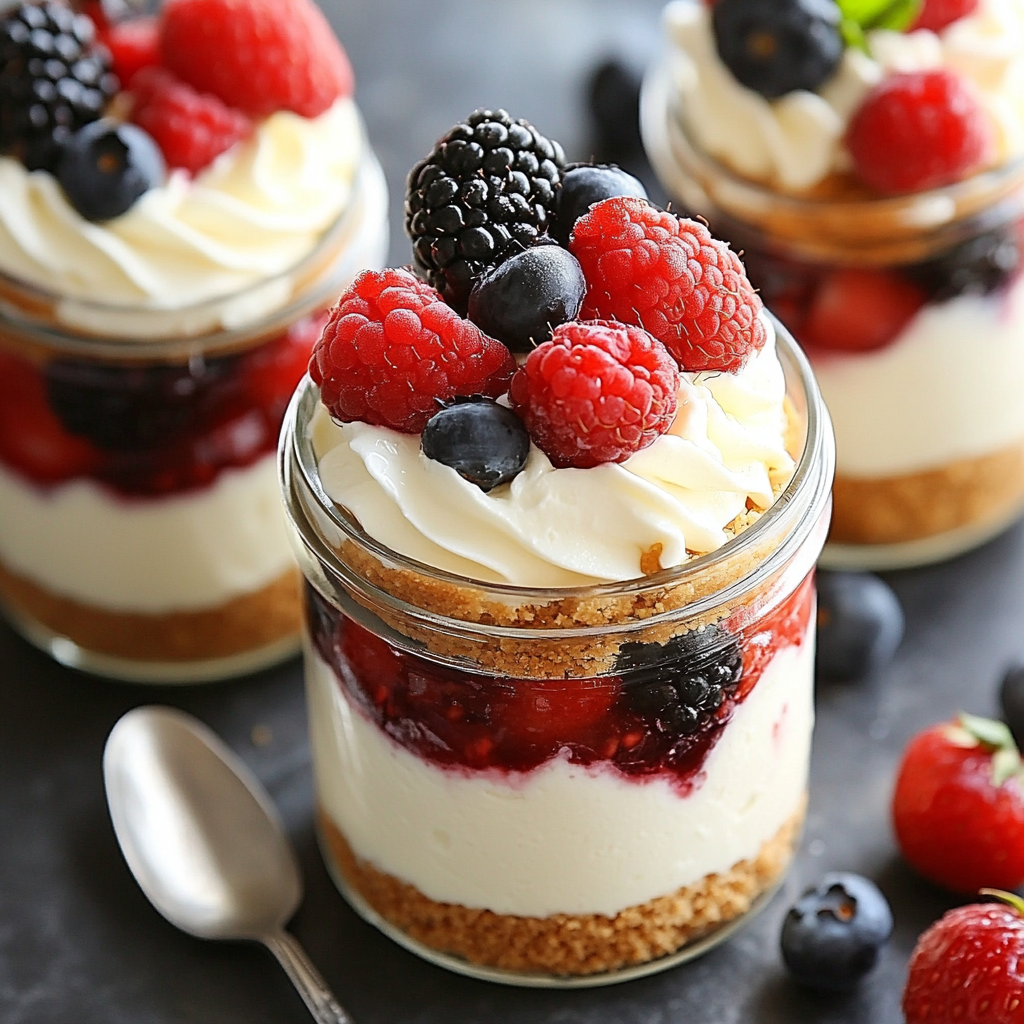
As a passionate home cook, I find joy in creating desserts that not only taste divine but also look stunning. One of my all-time favorites is the No-Bake Cheesecake Jars Recipe. This delightful treat is perfect for any occasion, whether it’s a cozy family dinner or a festive gathering with friends. The best part? You don’t need to turn on the oven! Just imagine creamy cheesecake layered with crunchy graham cracker crumbs and topped with fresh berries. It’s like a little piece of heaven in a jar!
Ingredients for No-Bake Cheesecake Jars Recipe
Before we dive into the delightful process of making No-Bake Cheesecake Jars, let’s gather our ingredients. I always find that having everything ready makes the cooking experience smoother and more enjoyable. Here’s what you’ll need:
- ???? Cream Cheese: 8 oz (softened) – This is the star of our cheesecake! Make sure it’s softened to room temperature for easy mixing.
- ???? Granulated Sugar: 1/2 cup – This sweetener will balance the tanginess of the cream cheese.
- ???? Vanilla Extract: 1 teaspoon – A splash of vanilla adds a warm, inviting flavor that enhances the cheesecake.
- ???? Heavy Cream: 1 cup (cold) – Whipping this cream will give our cheesecake its light and fluffy texture.
- ???? Graham Cracker Crumbs: 1 cup – These crumbs create a deliciously crunchy base and layers in our jars.
- ???? Fresh Berries: 1 cup (such as strawberries, blueberries, or raspberries) – These not only add a pop of color but also a burst of freshness to each bite.
As I gather these ingredients, I can’t help but feel excited about the deliciousness that’s about to unfold. Each component plays a vital role in creating that perfect balance of creamy, sweet, and tangy flavors. Plus, the vibrant berries on top will make these jars look as good as they taste!
Now that we have our ingredients ready, let’s move on to the tools we’ll need to bring this recipe to life. Trust me, having the right tools makes all the difference in the kitchen!
Tools Needed for No-Bake Cheesecake Jars Recipe
Before we embark on our cheesecake-making journey, let’s gather the essential tools. Having the right equipment not only makes the process smoother but also adds to the fun! Here’s what you’ll need to create these delightful No-Bake Cheesecake Jars:
- ????️ Mixing Bowls: A couple of medium-sized mixing bowls will be perfect for combining our ingredients. I love using glass bowls because they let me see the beautiful layers forming!
- ????️ Electric Mixer: This handy tool is a game-changer for whipping the cream and mixing the cheesecake filling. If you don’t have one, a whisk will do, but be prepared for a bit of a workout!
- ???? Spatula: A silicone spatula is my go-to for folding the whipped cream into the cheesecake mixture. It helps keep everything light and fluffy, which is key for a perfect texture.
- ???? Spoons or Piping Bag: You’ll need these for layering the cheesecake filling into the jars. A piping bag makes it super easy to get that filling in without making a mess!
- ???? Serving Jars or Cups: Choose your favorite jars or cups to showcase your beautiful cheesecake. I love using mason jars because they add a rustic charm to the dessert.
- ???? Plastic Wrap or Lids: To cover the jars while they chill in the fridge, you’ll need some plastic wrap or lids. This keeps the cheesecake fresh and prevents any fridge odors from sneaking in.
As I gather these tools, I can already envision the creamy layers and vibrant berries coming together. Each tool plays a role in crafting this delightful dessert, and I can’t wait to see the final result! Now that we have everything we need, let’s move on to the step-by-step preparation of our No-Bake Cheesecake Jars Recipe.
Step-by-Step Preparation of No-Bake Cheesecake Jars Recipe
Now that we have our ingredients and tools ready, it’s time to dive into the fun part: making our No-Bake Cheesecake Jars! I love this part because it’s where the magic happens. Each step brings us closer to that creamy, dreamy dessert. Let’s get started!
Step 1: Prepare the Crust for No-Bake Cheesecake Jars Recipe
The crust is the foundation of our cheesecake jars, and it’s super easy to make! I start by grabbing my graham cracker crumbs. If you’re feeling adventurous, you can crush whole graham crackers in a zip-top bag with a rolling pin. It’s a bit of a workout, but the smell of fresh crumbs is worth it!
In a mixing bowl, I combine the graham cracker crumbs with a little melted butter. This helps bind the crumbs together, creating that perfect crunchy layer. I usually add about 4 tablespoons of melted butter for every cup of crumbs. Once mixed, I can’t resist tasting a little bit—it’s like a sweet, buttery hug!
Next, I take my serving jars and spoon about 2 tablespoons of the crumb mixture into the bottom of each jar. I press it down gently with the back of a spoon to create a solid base. This step is crucial because it gives our cheesecake a delightful crunch with every bite. Plus, it looks so pretty peeking through the glass!
Step 2: Make the Cheesecake Filling for No-Bake Cheesecake Jars Recipe
Now, onto the star of the show: the cheesecake filling! In a mixing bowl, I add the softened cream cheese, granulated sugar, and vanilla extract. Using my electric mixer, I beat the mixture on medium speed until it’s smooth and creamy. It usually takes about 2-3 minutes, and the transformation is magical! The mixture goes from lumpy to velvety in no time.
Once the cream cheese mixture is ready, I move on to whipping the heavy cream. In a separate bowl, I pour in the cold heavy cream and whip it until stiff peaks form. This step is like a workout for my arms, but the fluffy texture is so worth it! When I lift the whisk, the cream should hold its shape, looking like soft clouds.
Now comes the fun part: gently folding the whipped cream into the cream cheese mixture. I use a spatula and fold carefully to keep that airy texture. It’s like a dance, and I love how the two mixtures come together to create a light and fluffy filling. Once it’s combined, I can’t help but sneak a taste—pure bliss!
Step 3: Assemble the No-Bake Cheesecake Jars Recipe
With the crust and filling ready, it’s time to assemble our jars! I start by spooning a generous layer of the cheesecake filling over the graham cracker crust in each jar. I fill them about halfway, making sure to smooth the top with my spatula. It’s like creating a little cheesecake canvas!
Next, I repeat the layers. I sprinkle another 2 tablespoons of graham cracker crumbs on top of the cheesecake filling, followed by another layer of the creamy filling. I fill the jars to the top, leaving just a little space for the fresh berries. The layers look so beautiful, and I can already imagine how delicious they’ll taste!
Step 4: Chill the No-Bake Cheesecake Jars Recipe
Now that my jars are beautifully layered, it’s time to let them chill. I cover each jar with a lid or plastic wrap to keep them fresh. Then, I pop them in the fridge for at least 4 hours, but overnight is even better! This waiting period allows the cheesecake to set perfectly, making it easier to scoop out when it’s time to serve.
As I wait, I can’t help but daydream about the first bite. The creamy filling, the crunchy crust, and the burst of fresh berries on top—it’s a dessert lover’s dream come true! Once the chilling time is up, I’ll be ready to serve these delightful No-Bake Cheesecake Jars to my family and friends. They won’t believe how easy it was to create such a stunning dessert!
Serving Suggestions for No-Bake Cheesecake Jars Recipe
Now that our No-Bake Cheesecake Jars are chilled and ready to go, it’s time to think about how to serve them. Presentation is key, and I love to make my desserts not only delicious but also visually appealing. Here are some serving suggestions that will elevate your cheesecake jars to the next level!
Creative Toppings for No-Bake Cheesecake Jars Recipe
Toppings can transform a simple dessert into a showstopper! Here are some of my favorite ideas:
- ???? Honey Drizzle: A light drizzle of honey adds a touch of sweetness and a beautiful shine. It’s like a golden crown for your cheesecake!
- ???? Chocolate Shavings: For chocolate lovers, sprinkle some chocolate shavings or mini chocolate chips on top. It adds a rich flavor and a delightful crunch.
- ???? Citrus Zest: A sprinkle of lemon or lime zest can brighten up the flavors. It’s like a burst of sunshine in every bite!
- ???? More Fresh Berries: Don’t hold back on the berries! Add a mix of strawberries, blueberries, and raspberries for a colorful and fresh topping.
- ???? Chopped Nuts: A handful of chopped nuts, like almonds or pecans, can add a lovely crunch and nutty flavor. It’s a great way to add texture!
- ???? Whipped Cream: A dollop of freshly whipped cream on top makes everything feel extra special. It’s like a fluffy cloud resting on your cheesecake!
As I layer on these toppings, I can’t help but feel excited about how they enhance the overall experience. Each topping adds its own unique flavor and texture, making every bite a delightful surprise. Plus, they make the jars look so inviting that it’s hard to resist diving in!
When serving, I like to place the jars on a beautiful platter or a rustic wooden board. It creates a lovely display that’s perfect for gatherings or special occasions. You can even add some extra berries or mint leaves around the jars for a pop of color. Trust me, your guests will be impressed!
So, whether you’re hosting a party or just treating yourself, these serving suggestions will take your No-Bake Cheesecake Jars to new heights. Now, let’s move on to some tips for perfecting this delightful recipe!
Tips for Perfecting Your No-Bake Cheesecake Jars Recipe
As I’ve whipped up my fair share of No-Bake Cheesecake Jars, I’ve learned a few tips and tricks along the way. These little nuggets of wisdom can help you avoid common pitfalls and ensure your dessert turns out perfectly every time. Let’s dive into some of the most important tips for perfecting your cheesecake jars!
Common Mistakes to Avoid in No-Bake Cheesecake Jars Recipe
Even the most seasoned home cooks can make mistakes, but that’s all part of the journey! Here are some common missteps I’ve encountered and how to steer clear of them:
- ???? Using Cold Cream Cheese: One of the biggest mistakes is using cold cream cheese. It’s essential to let it soften at room temperature. If it’s too cold, you’ll end up with lumps in your filling. Trust me, a smooth filling is key to a delightful cheesecake!
- ???? Overwhipping the Cream: While whipping the heavy cream, be careful not to overwhip it. If you whip it too long, it can turn grainy and even start to separate. Aim for stiff peaks, but stop once you reach that fluffy, cloud-like texture.
- ???? Not Pressing the Crust Firmly: When making the crust, it’s important to press the graham cracker crumbs firmly into the bottom of the jars. If you don’t, the crust may crumble when you try to scoop out the cheesecake. A solid base is crucial for a great texture!
- ⏳ Skipping the Chilling Time: I know it’s tempting to dig in right away, but skipping the chilling time can lead to a runny cheesecake. Allowing the jars to chill for at least 4 hours (or overnight) helps the filling set properly, giving you that perfect slice.
- ???? Overloading on Toppings: While toppings are fun, be cautious not to overload them. Too many toppings can overwhelm the delicate flavors of the cheesecake. A few well-chosen toppings can enhance the dessert without stealing the show!
By keeping these tips in mind, you’ll be well on your way to creating stunning and delicious No-Bake Cheesecake Jars. Each step is an opportunity to learn and grow as a home cook, and I can’t wait for you to experience the joy of making this delightful dessert!
FAQs about No-Bake Cheesecake Jars Recipe
How long do No-Bake Cheesecake Jars last in the fridge?
One of the best things about No-Bake Cheesecake Jars is their longevity! When stored properly in the fridge, these delightful jars can last up to 5 days. I always make sure to cover them with lids or plastic wrap to keep them fresh and prevent any fridge odors from sneaking in. Just remember, the longer they sit, the more the flavors meld together, which can be a delicious surprise! However, I find that they’re usually devoured long before that time is up!
Can I use different flavors for No-Bake Cheesecake Jars Recipe?
Absolutely! The beauty of No-Bake Cheesecake Jars lies in their versatility. You can easily switch up the flavors to suit your taste or the occasion. For a chocolate twist, simply add cocoa powder or melted chocolate to the cream cheese mixture. If you’re feeling fruity, try incorporating lemon zest, orange zest, or even a swirl of fruit puree. The possibilities are endless! I love experimenting with different flavors, and each variation brings a new adventure to my dessert table.
What can I substitute for cream cheese in No-Bake Cheesecake Jars Recipe?
If you’re looking for a cream cheese alternative, there are several options you can try! For a lighter version, Greek yogurt works wonderfully. It adds a tangy flavor and creamy texture, making it a great substitute. You can also use mascarpone cheese for a richer taste. If you’re dairy-free, consider using cashew cream or a dairy-free cream cheese alternative. Just keep in mind that the flavor and texture may vary slightly, but it’s all about finding what works best for you. I’ve tried a few alternatives, and they can be just as delicious!
Conclusion on No-Bake Cheesecake Jars Recipe
As I wrap up this delightful journey through the world of No-Bake Cheesecake Jars Recipe, I can’t help but feel a sense of accomplishment. This recipe is not just about creating a dessert; it’s about the joy of cooking and sharing something special with loved ones. Each jar is a little treasure, filled with creamy goodness and topped with vibrant berries, ready to bring smiles to faces.
Print
No-Bake Cheesecake Jars Recipe: A Simple Delight Awaits!
- Total Time: 4 hours 20 minutes
- Yield: 4 servings
- Diet: Vegetarian
Description
A delightful no-bake cheesecake layered in jars, featuring creamy cheesecake, crunchy graham cracker crumbs, and fresh berries.
Ingredients
- ???? Cream Cheese: 8 oz (softened)
- ???? Granulated Sugar: 1/2 cup
- ???? Vanilla Extract: 1 teaspoon
- ???? Heavy Cream: 1 cup (cold)
- ???? Graham Cracker Crumbs: 1 cup
- ???? Fresh Berries: 1 cup (such as strawberries, blueberries, or raspberries)
Instructions
- Prepare the crust by mixing graham cracker crumbs with melted butter and pressing into the bottom of jars.
- Make the cheesecake filling by beating softened cream cheese, sugar, and vanilla until smooth, then fold in whipped heavy cream.
- Assemble the jars by layering cheesecake filling over the crust, followed by more graham cracker crumbs and another layer of filling.
- Chill the jars in the fridge for at least 4 hours or overnight to set.
Notes
- Using softened cream cheese is crucial for a smooth filling.
- Do not overwhip the cream to avoid a grainy texture.
- Press the crust firmly to prevent crumbling.
- Allow adequate chilling time for the cheesecake to set properly.
- Be mindful of the amount of toppings to maintain balance in flavors.
- Prep Time: 20 minutes
- Cook Time: 0 minutes
- Category: Dessert
- Method: No-Bake
- Cuisine: American
Nutrition
- Serving Size: 1 jar
- Calories: 350
- Sugar: 20g
- Sodium: 150mg
- Fat: 25g
- Saturated Fat: 15g
- Unsaturated Fat: 5g
- Trans Fat: 0g
- Carbohydrates: 30g
- Fiber: 1g
- Protein: 5g
- Cholesterol: 80mg
Keywords: no-bake cheesecake, dessert, easy recipe, cheesecake jars