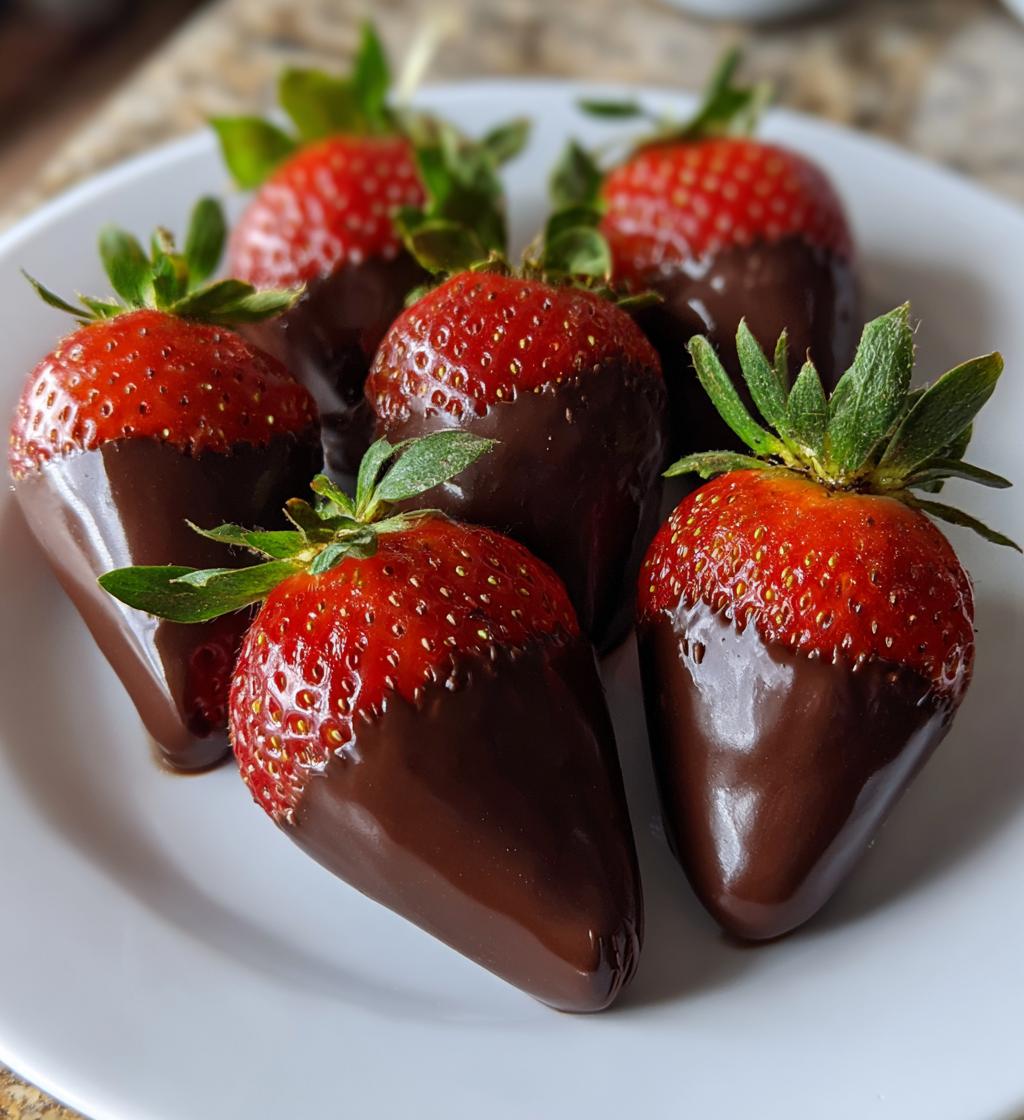
There’s something truly magical about quick desserts, isn’t there? You know, those treats that come together in a flash but still feel like a special occasion? That’s exactly what my No-Bake Chocolate Covered Strawberries are all about! I remember the first time I made these for a surprise date night with my partner. I wanted something sweet and elegant but didn’t have hours to spend in the kitchen. So, I turned to these delightful strawberries, and wow, did they impress! The moment we bit into those luscious chocolate-covered gems, it was like a burst of flavor and joy. Every juicy strawberry, coated in rich chocolate, felt like a little celebration in itself. They’re not just a treat; they’re an experience! Perfect for gatherings, movie nights, or just a sweet pick-me-up after a long day. And the best part? They take just 15 minutes! Trust me, once you try this recipe, you’ll find yourself making these strawberries for every occasion. They’ll become your go-to dessert for any sweet craving!
Ingredients List
Gathering your ingredients is half the fun! Here’s what you’ll need to create these delectable No-Bake Chocolate Covered Strawberries:
- 1 pound fresh strawberries: Choose ripe, juicy strawberries for the sweetest flavor. Look for ones that are firm and have a vibrant red color. Make sure they are free from blemishes for the best presentation!
- 8 ounces dark chocolate: Use good-quality dark chocolate for a rich, indulgent taste. You can go for chocolate chips or a chocolate bar, but I prefer bars for easier melting!
- 1 tablespoon coconut oil: This little addition helps the chocolate melt smoothly and gives it a lovely sheen. Plus, it adds a hint of tropical flavor that complements the strawberries beautifully!
With these simple ingredients, you’ll be on your way to creating something truly special in no time. Let’s get started!
How to Prepare No-Bake Chocolate Covered Strawberries
Now that you have your ingredients ready, let’s dive into the fun part—preparing these gorgeous No-Bake Chocolate Covered Strawberries! It’s a super straightforward process, and I promise you’ll be snacking on these delights in no time. Just follow these simple steps, and you’ll have an impressive treat that’ll wow anyone!
Step-by-Step Instructions
Preparing the Strawberries
First things first, we need to get those strawberries prepped and ready for their chocolate bath:
- Start by washing your strawberries gently under cool running water. You want to remove any dirt or residue without damaging them.
- After washing, pat them dry with a clean kitchen towel. This step is super important! If they’re wet, the chocolate won’t stick properly.
- Make sure to use ripe strawberries for the best flavor. They should be red, firm, and plump. Trust me, the sweeter the fruit, the better the treat!
Melting the Chocolate
Now onto the chocolate! Melting it correctly is key to achieving that perfect dip:
- Grab a microwave-safe bowl and add your dark chocolate and coconut oil. The coconut oil is the secret to achieving that glossy finish!
- Microwave the mixture in 30-second intervals, stirring in between. This helps prevent the chocolate from burning. It should take about 1-2 minutes total, depending on your microwave.
- Once melted, give it a good stir until it’s smooth and silky. You want it to be warm, but not too hot; if it’s too hot, it can create a weird texture when you dip the strawberries.
Dipping the Strawberries
Here comes the fun part—dipping! This is where your strawberries transform into delicious treats:
- Hold a strawberry by the green leafy top and dip it into the melted chocolate, making sure to cover it completely. You can even give it a little twist to ensure it’s fully coated!
- Let any excess chocolate drip back into the bowl. You don’t want your strawberries to be too heavy with chocolate.
- Place the dipped strawberry back onto the parchment-lined baking sheet. Repeat this process with the remaining strawberries. You’ll be amazed at how quickly they come together!
Setting the Strawberries
Finally, it’s time to let the chocolate set:
- Once all your strawberries are dipped and placed on the baking sheet, pop them in the refrigerator.
- Let them chill for about 15-30 minutes, or until the chocolate has hardened completely. This is crucial for that beautiful snap when you bite into them!
And just like that, you’ve prepared your No-Bake Chocolate Covered Strawberries! How easy was that? Now you can enjoy these sweet treats at your next gathering, or just keep them all to yourself—you deserve it!
Why You’ll Love This Recipe
- Quick and Easy: With just 15 minutes of prep time, you can whip up a stunning dessert without breaking a sweat. Perfect for those last-minute cravings!
- Irresistibly Delicious: The combination of juicy strawberries and rich dark chocolate is simply divine. Each bite is a burst of flavor that’s sure to satisfy your sweet tooth!
- Customizable: Feel free to get creative! Add your favorite toppings like crushed nuts, sprinkles, or even a drizzle of white chocolate for a fun twist.
- No-Bake Convenience: No oven required! This recipe is perfect for warm days or when you just don’t want to heat up the kitchen.
- Impressive Presentation: These chocolate-covered strawberries are not just tasty; they look gorgeous on any dessert platter. They’re sure to wow your guests!
Tips for Success
Want to take your No-Bake Chocolate Covered Strawberries to the next level? Here are some pro tips that will ensure your strawberries turn out perfectly every time!
- Keep the Chocolate Warm but Not Hot: It’s crucial that your melted chocolate mixture is warm enough to coat the strawberries but not so hot that it burns or thickens quickly. If it cools down too much, you can pop it back in the microwave for a few seconds. Just remember to stir it well!
- Use High-Quality Chocolate: Go for a good-quality dark chocolate that you enjoy eating on its own. It makes a world of difference in taste! Whether you choose chips or bars, make sure it’s something rich and satisfying.
- Experiment with Toppings: Don’t be shy about adding toppings! Crushed nuts, sprinkles, or even a drizzle of white chocolate can elevate your strawberries. Just sprinkle them on right after dipping while the chocolate is still wet for the best adhesion.
- Work in Batches: If you’re making a lot of these beauties, consider working in smaller batches. This way, you can keep the chocolate warm and avoid it hardening before you finish dipping all the strawberries.
- Chill for Perfect Texture: Make sure to refrigerate the strawberries long enough for the chocolate to set completely. This not only makes them easier to handle but also gives that delightful snap when you bite into them. Aim for at least 15-30 minutes!
With these simple tips, you’ll be a pro at making No-Bake Chocolate Covered Strawberries in no time. Happy dipping!
Variations
One of the best things about No-Bake Chocolate Covered Strawberries is how versatile they are! You can easily mix things up and create delicious variations that suit your taste or occasion. Here are some fun ideas to inspire you:
- Different Types of Chocolate: While dark chocolate is a classic choice, don’t hesitate to experiment! Try using milk chocolate for a sweeter treat or white chocolate for a creamy, rich flavor. You can even drizzle a bit of melted chocolate over the top for a beautiful contrast!
- Add Flavor Extracts: Want to elevate the flavor? Add a splash of vanilla or almond extract to your melted chocolate. It gives a delightful twist that pairs beautifully with the strawberries!
- Nutty Toppings: For a crunchy texture, sprinkle some chopped nuts like almonds, hazelnuts, or pistachios on top of the dipped strawberries while the chocolate is still wet. It adds a fantastic crunch and additional flavor.
- Sweet Sprinkles: Brighten up your strawberries by adding colorful sprinkles! They’re perfect for birthday parties or festive occasions, making your treats look even more appealing.
- Drizzled Chocolate: After dipping the strawberries, you can take a different type of melted chocolate (like white chocolate) and drizzle it over the top. This not only looks stunning but adds another layer of flavor!
- Infused Chocolate: If you’re feeling adventurous, try infusing your chocolate with flavors like orange zest or peppermint extract before melting it. These subtle notes can transform the whole experience!
With all these variations, you can customize your No-Bake Chocolate Covered Strawberries to fit any occasion or mood. Get creative and have fun with it! The possibilities are endless, and I can’t wait to see what delicious combinations you come up with!
Nutritional Information Section
Alright, let’s talk about the nutritional side of these delightful No-Bake Chocolate Covered Strawberries! While I’m no nutritionist, I like to keep track of what I’m munching on, especially when it comes to sweets. Here’s an estimated breakdown per serving, which is about three strawberries:
- Calories: 150
- Fat: 10g
- Saturated Fat: 6g
- Unsaturated Fat: 3g
- Trans Fat: 0g
- Cholesterol: 0mg
- Sodium: 5mg
- Carbohydrates: 15g
- Fiber: 2g
- Sugar: 10g
- Protein: 2g
Keep in mind that these numbers are estimates and can vary based on the specific brands of chocolate or strawberries you use. But hey, it’s a sweet treat, right? Enjoy them in moderation, and you’ll be just fine! Now, grab some strawberries and get dipping!
Storage & Reheating Instructions
So, you’ve whipped up a batch of these luscious No-Bake Chocolate Covered Strawberries, and now you might be wondering how to store any leftovers (if there are any!). Don’t worry; I’ve got you covered!
First off, to keep your strawberries fresh and tasty, store them in an airtight container. If you have a container that’s just the right size to fit the strawberries without squishing them, that’s perfect! Layer them carefully, placing parchment paper between layers to prevent sticking.
Make sure to keep the container in the refrigerator. This helps maintain that delightful crunch of the chocolate and the juiciness of the strawberries. They’ll stay fresh for about 2-3 days, but trust me, they’ll likely be gone long before then!
Now, about reheating—there’s really no need to reheat these beauties since they’re best enjoyed cold. However, if you want to melt any leftover chocolate from dipping, you can gently reheat it in the microwave in short intervals, stirring in between to keep it smooth. Just remember, once the strawberries are coated, they’re meant to be enjoyed chilled! So, grab one right out of the fridge, and enjoy that sweet, chocolatey goodness!
FAQ Section
Got questions about making the perfect No-Bake Chocolate Covered Strawberries? Don’t worry! I’ve got you covered with some answers to common queries that might pop up as you whip up these delightful treats.
Q1: Can I use milk chocolate instead of dark chocolate?
Absolutely! Milk chocolate will give you a sweeter flavor and a creamier texture. Just keep in mind that the overall taste will be different, but still delicious. Feel free to experiment and see which you prefer!
Q2: How long do the chocolate-covered strawberries last?
When stored properly in an airtight container in the refrigerator, these beauties will stay fresh for about 2-3 days. But let’s be honest, they’re usually gone way before that!
Q3: Can I make these ahead of time?
Yes! You can prepare your No-Bake Chocolate Covered Strawberries a day in advance. Just make sure to store them in the fridge until you’re ready to serve. They’ll still taste amazing!
Q4: What toppings can I add to the chocolate-covered strawberries?
Oh, the possibilities are endless! You can go for crushed nuts, colorful sprinkles, shredded coconut, or even drizzle some white chocolate on top for a beautiful presentation. Get creative!
Q5: Do I need to temper the chocolate for this recipe?
Nope! One of the best parts about this no-bake recipe is that you don’t need to temper the chocolate. Just melt it with the coconut oil, and you’re good to go! This keeps things simple and stress-free.
For more tips on chocolate melting techniques, check out this guide on melting chocolate.
For additional dessert ideas, you might enjoy these No-Bake Chocolate Peanut Butter Bars or Chocolate Covered Strawberries Recipe Guide.
Print
No-Bake Chocolate Covered Strawberries: 15-Minute Delight
- Total Time: 15 minutes
- Yield: 12 servings 1x
- Diet: Vegetarian
Description
Delicious no-bake chocolate covered strawberries
Ingredients
- 1 pound fresh strawberries
- 8 ounces dark chocolate
- 1 tablespoon coconut oil
Instructions
- Wash and dry the strawberries thoroughly.
- Melt the dark chocolate and coconut oil in a microwave-safe bowl.
- Dip each strawberry in the chocolate mixture, covering it completely.
- Place the dipped strawberries on a parchment-lined baking sheet.
- Refrigerate until the chocolate hardens.
Notes
- Use ripe strawberries for the best flavor.
- Add toppings like crushed nuts or sprinkles if desired.
- Prep Time: 15 minutes
- Cook Time: 0 minutes
- Category: Dessert
- Method: No-Bake
- Cuisine: American
Nutrition
- Serving Size: 3 strawberries
- Calories: 150
- Sugar: 10g
- Sodium: 5mg
- Fat: 10g
- Saturated Fat: 6g
- Unsaturated Fat: 3g
- Trans Fat: 0g
- Carbohydrates: 15g
- Fiber: 2g
- Protein: 2g
- Cholesterol: 0mg
Keywords: No-Bake Chocolate Covered Strawberries