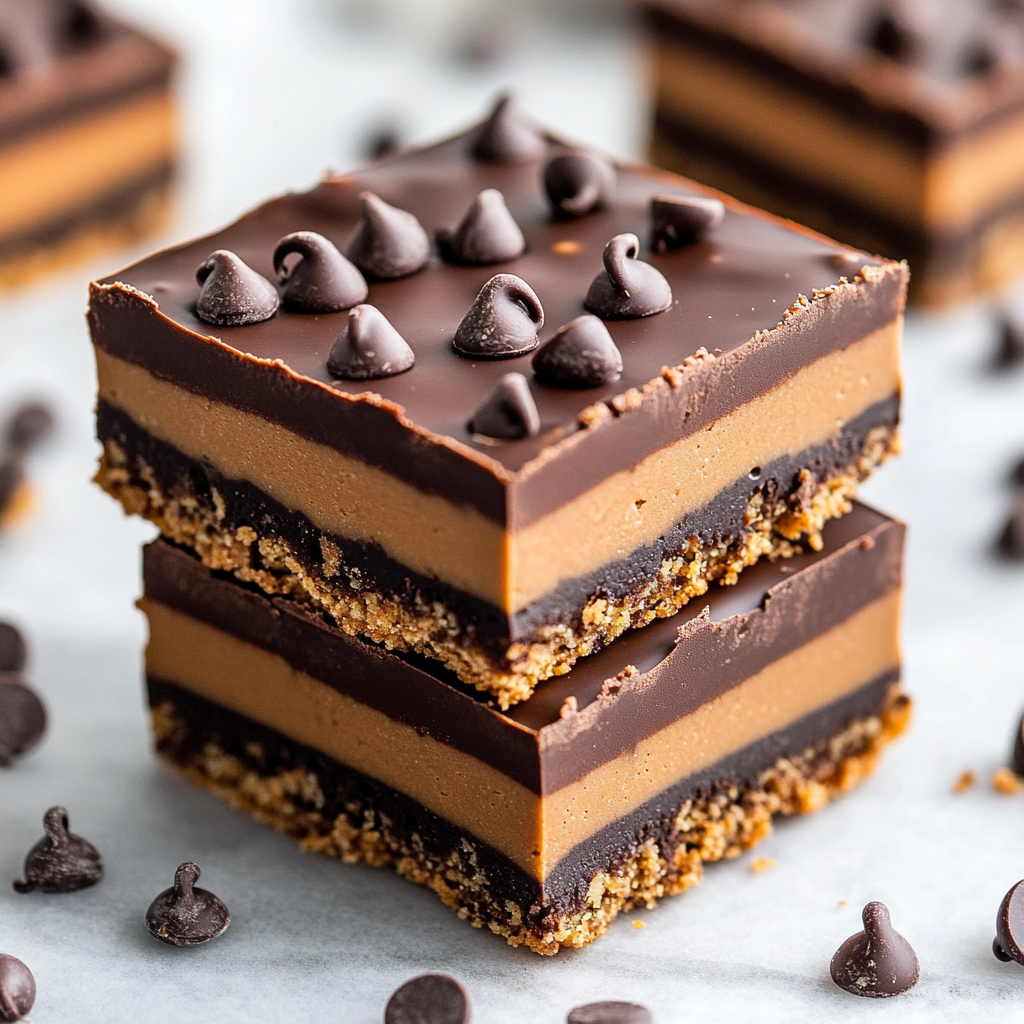
As a passionate home cook, I find joy in creating delicious treats that require minimal effort but deliver maximum flavor. One of my all-time favorites is the No-Bake Chocolate Peanut Butter Bars Recipe. These bars are a delightful combination of creamy peanut butter and rich chocolate, making them a perfect indulgence for any occasion. Whether you’re hosting a gathering or simply craving something sweet, these bars are sure to impress!
Ingredients for No-Bake Chocolate Peanut Butter Bars Recipe
Before we dive into the delightful world of making No-Bake Chocolate Peanut Butter Bars, let’s gather our ingredients. I always find that having everything ready makes the cooking process smoother and more enjoyable. Plus, it’s a great way to get the kids involved! They love helping me measure and mix, and it turns into a fun little adventure in the kitchen.
Here’s what you’ll need:
- 🍪 Graham cracker crumbs – 2 cups
- 🥜 Creamy peanut butter – 1 cup
- 🍬 Powdered sugar – 1 cup
- 🍫 Chocolate chips – 1 cup (semi-sweet or milk chocolate)
- 🧈 Butter – 1/2 cup (1 stick, unsalted)
Each ingredient plays a vital role in creating that perfect balance of flavors and textures. The graham cracker crumbs provide a sweet, crunchy base, while the creamy peanut butter adds a rich, nutty flavor that’s simply irresistible. The powdered sugar sweetens the mixture, making it a delightful treat, and the chocolate chips? Well, they’re the cherry on top, bringing everything together in a luscious, melty layer.
As I gather these ingredients, I can’t help but reminisce about the first time I made these bars. I was a bit nervous, thinking I might mess it up. But as soon as I mixed the peanut butter and graham cracker crumbs, I knew I was onto something special. The smell of peanut butter wafting through the kitchen was enough to make my mouth water!
So, let’s make sure we have everything on hand. Once you have your ingredients ready, we’ll be all set to create these scrumptious No-Bake Chocolate Peanut Butter Bars that will have everyone asking for seconds!
Tools Needed for No-Bake Chocolate Peanut Butter Bars Recipe
Before we embark on our sweet adventure of making No-Bake Chocolate Peanut Butter Bars, it’s essential to gather the right tools. Having everything at your fingertips not only makes the process smoother but also adds to the fun! I always feel like a chef in a bustling kitchen when I have my tools ready to go. Here’s what you’ll need:
- 🍽️ Mixing Bowl: A large mixing bowl is crucial for combining the peanut butter, graham cracker crumbs, and powdered sugar. I love using a glass bowl because I can see the beautiful mixture come together!
- 🥄 Spatula: A sturdy spatula is perfect for mixing and pressing the peanut butter layer into the pan. It’s also great for spreading the melted chocolate on top. I always keep a silicone spatula handy; it’s so easy to clean!
- 📏 Baking Dish: An 8×8-inch (20×20 cm) square baking dish is ideal for this recipe. I recommend using one that’s non-stick or lining it with parchment paper, which makes lifting the bars out a breeze.
- 🔥 Microwave-Safe Bowl: You’ll need a microwave-safe bowl for melting the chocolate and butter. I often use a glass bowl for this, as it heats evenly and allows me to keep an eye on the melting process.
- 🔪 Knife: Once the bars are set, a sharp knife will help you cut them into perfect squares or rectangles. I like to warm the knife slightly under hot water for cleaner cuts!
- 🧊 Refrigerator: This is where the magic happens! You’ll need a fridge to chill the bars until they’re firm and ready to be devoured.
As I gather these tools, I can’t help but feel a sense of excitement. Each item plays a role in creating something delicious. I remember the first time I made these bars; I was a bit overwhelmed by the process. But with my trusty tools by my side, I felt like I could conquer anything in the kitchen!
So, let’s make sure we have everything ready. Once we have our tools in place, we’ll be all set to dive into the delightful world of No-Bake Chocolate Peanut Butter Bars. Trust me, the end result will be worth every moment spent in the kitchen!
Step-by-Step Preparation of No-Bake Chocolate Peanut Butter Bars Recipe
Now that we have our ingredients and tools ready, it’s time to roll up our sleeves and dive into the step-by-step preparation of these delightful No-Bake Chocolate Peanut Butter Bars. I love this part because it’s where the magic happens! Each step brings us closer to that sweet, creamy goodness. Let’s get started!
Step 1: Prepare the Base for No-Bake Chocolate Peanut Butter Bars Recipe
The first step is all about creating a solid foundation for our bars. Start by lining your 8×8-inch baking dish with parchment paper. I like to leave some overhang on the sides. This little trick makes it super easy to lift the bars out later. It’s like having a built-in handle!
Once your dish is ready, it’s time to mix the graham cracker crumbs, creamy peanut butter, and powdered sugar. I usually grab my large mixing bowl and pour in the graham cracker crumbs first. The sound of those crumbs hitting the bowl is music to my ears! Then, I add the peanut butter. The creamy texture is so satisfying, and it smells heavenly. Finally, I sprinkle in the powdered sugar, which adds that perfect touch of sweetness.
Now, using my trusty spatula, I mix everything together until it forms a thick, cohesive mixture. It’s like a little workout for my arms, but it’s so worth it! Once it’s all combined, I can’t resist taking a small taste. The flavor is simply irresistible!
Step 2: Create the Peanut Butter Layer in No-Bake Chocolate Peanut Butter Bars Recipe
With our base mixture ready, it’s time to press it into the prepared baking dish. I like to use my hands for this part; it feels more personal, like I’m really putting my heart into it. I take the mixture and transfer it into the dish, spreading it out evenly. Then, I press it down firmly to create a smooth layer. It’s important to pack it tightly so that our bars hold together nicely.
As I press down, I can feel the mixture becoming more compact, and I can already imagine how delicious these bars will be! Once I’m satisfied with the layer, I take a moment to admire my work. It’s a beautiful sight, and I can’t wait to add the chocolate topping!
Step 3: Melt the Chocolate Topping for No-Bake Chocolate Peanut Butter Bars Recipe
Now comes the fun part—melting the chocolate! I grab my microwave-safe bowl and add the chocolate chips and butter. The combination of these two ingredients is like a match made in heaven. I pop the bowl in the microwave and set it for 30 seconds. The anticipation builds as I wait for the chocolate to melt.
After the first interval, I take it out and give it a good stir. The chocolate starts to melt beautifully, and I can see it transforming into a smooth, glossy mixture. I return it to the microwave for another 30 seconds, stirring again until it’s completely melted. I always make sure not to overheat it; burnt chocolate is a sad sight!
Once it’s all melted and smooth, I can’t help but sneak a taste. It’s rich and decadent, and I know it will be the perfect topping for our bars!
Step 4: Assemble and Chill No-Bake Chocolate Peanut Butter Bars Recipe
With our peanut butter base and chocolate topping ready, it’s time to assemble the bars! I carefully pour the melted chocolate mixture over the pressed peanut butter layer. Using my spatula, I spread it evenly, making sure every inch is covered. The sight of that glossy chocolate on top is enough to make my heart skip a beat!
Once I’m satisfied with the chocolate layer, it’s time to chill. I place the baking dish in the refrigerator and let it sit for at least 2 hours. This is the hardest part for me—waiting! The aroma of chocolate and peanut butter fills the kitchen, and I can hardly contain my excitement.
After the chilling time is up, I can finally lift the bars out using the parchment paper overhang. The moment of truth has arrived! I grab my sharp knife and cut them into squares, feeling like a proud chef. Each piece is a little work of art, and I can’t wait to share them with family and friends!
And there you have it! The step-by-step preparation of No-Bake Chocolate Peanut Butter Bars is complete. I hope you’re as excited as I am to taste these delicious treats!

Serving Suggestions for No-Bake Chocolate Peanut Butter Bars Recipe
Now that we’ve crafted our delightful No-Bake Chocolate Peanut Butter Bars, it’s time to think about how to serve them. Presentation can elevate any dish, and these bars are no exception! I love to get creative when it comes to serving, and I have a few fun ideas that will make your treats even more irresistible.
First off, I often cut the bars into different shapes. While squares are classic, I sometimes go for fun shapes like triangles or even hearts, especially when I’m making them for a special occasion. It adds a personal touch that makes everyone smile. Plus, who doesn’t love a heart-shaped treat?
Next, I like to sprinkle a little sea salt on top of the chocolate layer before chilling. The contrast of sweet and salty is simply divine! It’s like a little surprise in every bite, and it enhances the flavors beautifully. If you’re feeling adventurous, you could also add a sprinkle of crushed nuts or even a drizzle of caramel for an extra layer of flavor.
When it comes to serving, I often pair these bars with a scoop of vanilla ice cream or a dollop of whipped cream. The creamy texture of the ice cream complements the rich chocolate and peanut butter perfectly. I remember one summer evening, I served these bars at a family gathering alongside some homemade vanilla ice cream. The combination was a hit, and everyone went back for seconds!
For a more festive touch, I sometimes arrange the bars on a colorful platter and garnish them with fresh berries. Strawberries or raspberries add a pop of color and a refreshing contrast to the richness of the bars. It’s a simple yet elegant way to elevate your dessert table.
Lastly, don’t forget about the drinks! A glass of cold milk is a classic pairing that never goes out of style. I also enjoy serving these bars with a warm cup of coffee or a rich hot chocolate, especially during the colder months. The combination of flavors is comforting and satisfying.
So, whether you’re serving these bars at a party, a family dinner, or just enjoying them at home, remember that presentation and pairing can make all the difference. I can’t wait for you to try these serving suggestions with your No-Bake Chocolate Peanut Butter Bars. Trust me, they’ll be a hit every time!
Tips for Perfecting No-Bake Chocolate Peanut Butter Bars Recipe
As I’ve made my fair share of No-Bake Chocolate Peanut Butter Bars, I’ve picked up a few tips along the way that can help you achieve the perfect batch every time. These little nuggets of wisdom have transformed my bars from good to absolutely irresistible! So, let’s dive into some of my favorite tips that will elevate your no-bake experience.
First and foremost, always use room temperature ingredients. When I take my peanut butter out of the pantry, I let it sit for a bit before mixing. This makes it easier to blend with the graham cracker crumbs and powdered sugar. Trust me, a smooth mixture is key to a creamy texture!
Another tip is to measure your ingredients accurately. I like to use a kitchen scale for the graham cracker crumbs and powdered sugar. It ensures that I have the right proportions, which is crucial for the bars to hold together. Too much or too little can lead to a crumbly mess, and we definitely want to avoid that!
When it comes to melting the chocolate, patience is your best friend. I always melt my chocolate in short intervals, stirring in between. This prevents overheating and ensures a silky-smooth finish. I remember the first time I rushed this step, and the chocolate turned into a clumpy disaster. Lesson learned!
Don’t forget to pack the peanut butter layer tightly in the baking dish. I like to use my hands to really press it down. This helps the bars hold their shape when you cut them. If the layer is too loose, you might end up with a delicious but messy treat!
For an extra touch of flavor, consider adding a splash of vanilla extract to the peanut butter mixture. It adds a lovely depth that complements the chocolate beautifully. I often do this when I want to impress my guests, and they always ask for my secret ingredient!
Lastly, let the bars chill for the full recommended time. I know it’s tempting to sneak a taste before they’re fully set, but patience pays off! The longer they chill, the firmer they become, making them easier to cut and serve. I’ve learned that waiting just a little longer can make all the difference in texture.
With these tips in your back pocket, you’re well on your way to creating the most delightful No-Bake Chocolate Peanut Butter Bars imaginable. I can’t wait for you to try them out and see how these little tricks can elevate your baking game. Happy cooking!
FAQs about No-Bake Chocolate Peanut Butter Bars Recipe
Can I substitute ingredients in the No-Bake Chocolate Peanut Butter Bars Recipe?
Absolutely! One of the things I love about this No-Bake Chocolate Peanut Butter Bars Recipe is its flexibility. If you’re out of graham cracker crumbs, you can use crushed cookies like Oreos or digestive biscuits for a different flavor. For the peanut butter, feel free to swap in almond butter or cashew butter if you prefer. Just keep in mind that the taste will change slightly, but it’ll still be delicious!
If you want to reduce sugar, you can use honey or maple syrup instead of powdered sugar. Just remember that this might alter the texture a bit, so adjust the amount of graham cracker crumbs accordingly. The beauty of cooking is experimenting, and I encourage you to make this recipe your own!
How long do No-Bake Chocolate Peanut Butter Bars last?
Once you’ve made your No-Bake Chocolate Peanut Butter Bars, they can last in the refrigerator for about a week. I usually store them in an airtight container to keep them fresh. If you’re like me and can’t resist snacking on them, they might not last that long! Just be sure to check for any changes in texture or smell before indulging.
If you want to keep them longer, you can freeze them! They can last up to three months in the freezer. Just make sure to wrap them tightly in plastic wrap or foil before placing them in a freezer-safe container. When you’re ready to enjoy, let them thaw in the fridge for a few hours or at room temperature for a quicker treat!
Can I freeze No-Bake Chocolate Peanut Butter Bars?
Yes, you can definitely freeze these delightful bars! Freezing is a great way to preserve their deliciousness for later. I often make a double batch and freeze half for those days when I need a quick sweet fix. Just remember to cut them into squares before freezing, as it makes it easier to grab a piece whenever the craving strikes!
To freeze, wrap each bar individually in plastic wrap, then place them in a freezer-safe bag or container. When you’re ready to enjoy, simply take out the desired amount and let them thaw in the fridge or at room temperature. It’s like having a little stash of happiness waiting for you!
What are some variations of No-Bake Chocolate Peanut Butter Bars Recipe?
The variations for No-Bake Chocolate Peanut Butter Bars are endless! One of my favorite twists is adding a layer of caramel sauce between the peanut butter and chocolate layers. It adds a gooey sweetness that’s simply irresistible. You can also mix in some chopped nuts, like almonds or walnuts, for a delightful crunch.
If you’re feeling adventurous, try adding a sprinkle of sea salt on top of the chocolate layer before chilling. The salty-sweet combination is heavenly! For a fruity twist, consider adding dried fruits like cranberries or raisins into the peanut butter mixture. It adds a burst of flavor and a chewy texture that’s delightful.
Lastly, you can experiment with different types of chocolate. Dark chocolate, white chocolate, or even flavored chocolate chips can change the entire vibe of the bars. I love to switch it up depending on my mood or the season. The possibilities are truly endless, and that’s what makes this recipe so much fun!
Conclusion on No-Bake Chocolate Peanut Butter Bars Recipe
As I wrap up this delightful journey through the world of No-Bake Chocolate Peanut Butter Bars, I can’t help but feel a sense of satisfaction. These bars are not just a treat; they’re a celebration of flavors, memories, and the joy of cooking. From the moment you gather your ingredients to the final bite, every step is filled with excitement and anticipation.
Print
No-Bake Chocolate Peanut Butter Bars Recipe: A Must-Try Delight!
- Total Time: 2 hours 20 minutes
- Yield: 16 bars
- Diet: Vegetarian
Description
A delightful combination of creamy peanut butter and rich chocolate, these No-Bake Chocolate Peanut Butter Bars are easy to make and perfect for any occasion.
Ingredients
- 🍪 Graham cracker crumbs – 2 cups
- 🥜 Creamy peanut butter – 1 cup
- 🍬 Powdered sugar – 1 cup
- 🍫 Chocolate chips – 1 cup (semi-sweet or milk chocolate)
- 🧈 Butter – 1/2 cup (1 stick, unsalted)
Instructions
- Prepare the baking dish by lining it with parchment paper.
- Mix graham cracker crumbs, creamy peanut butter, and powdered sugar in a large mixing bowl until combined.
- Press the mixture into the prepared baking dish to form a solid base.
- Melt chocolate chips and butter in a microwave-safe bowl, stirring until smooth.
- Pour the melted chocolate over the peanut butter layer and spread evenly.
- Chill in the refrigerator for at least 2 hours until firm.
- Lift the bars out using the parchment paper and cut into squares.
Notes
- Use room temperature ingredients for easier mixing.
- Measure ingredients accurately for best results.
- Pack the peanut butter layer tightly in the baking dish.
- Consider adding a splash of vanilla extract for extra flavor.
- Let the bars chill for the full recommended time for better texture.
- Prep Time: 20 minutes
- Cook Time: 0 minutes
- Category: Dessert
- Method: No-Bake
- Cuisine: American
Nutrition
- Serving Size: 1 bar
- Calories: 200
- Sugar: 15g
- Sodium: 100mg
- Fat: 10g
- Saturated Fat: 4g
- Unsaturated Fat: 6g
- Trans Fat: 0g
- Carbohydrates: 25g
- Fiber: 1g
- Protein: 4g
- Cholesterol: 15mg
Keywords: No-Bake, Chocolate, Peanut Butter, Bars, Dessert