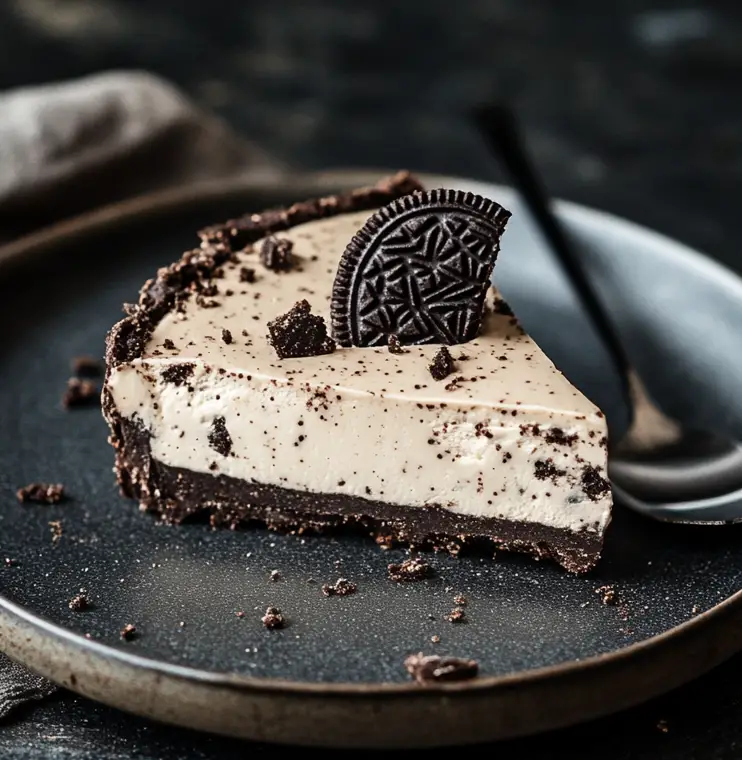
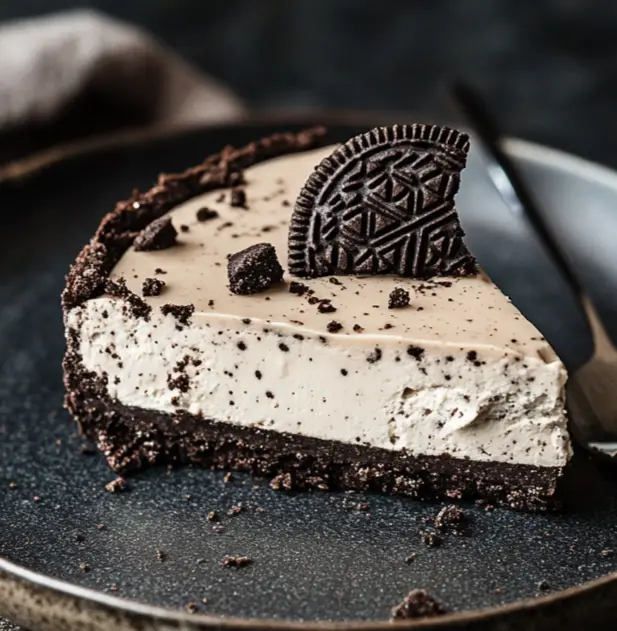
As a passionate home cook, I find joy in creating desserts that not only taste divine but also bring smiles to the faces of my loved ones. One of my all-time favorites is the No-Bake Oreo Cheesecake Recipe. This delightful treat is a perfect blend of creamy, sweet, and crunchy, making it a hit at any gathering. The best part? You don’t need to turn on the oven! Just the thought of indulging in a slice of this cheesecake makes my heart flutter with excitement.
Ingredients for No-Bake Oreo Cheesecake Recipe
Before we embark on this delicious journey, let’s gather all the ingredients needed for our No-Bake Oreo Cheesecake Recipe. I always find that having everything prepped and ready makes the cooking process smoother and more enjoyable. Plus, it builds the excitement as you see all the components come together!
- 🍪 Oreo cookies: 24 cookies for the crust and 8 cookies for topping. These little chocolate wonders are the star of the show!
- 🧈 Unsalted butter: 1/2 cup, melted. This will help bind the crust together and add richness.
- 🧀 Cream cheese: 16 oz, softened. Make sure it’s at room temperature for a smooth filling.
- 🍬 Powdered sugar: 1 cup. This sweetener will give our cheesecake that delightful sweetness.
- 🥛 Heavy cream: 1 cup, cold. Whipping this will create a light and airy texture.
- 🌿 Vanilla extract: 1 teaspoon. A splash of vanilla adds a warm, inviting flavor.
As I gather these ingredients, I can’t help but feel a sense of anticipation. Each item plays a crucial role in creating that creamy, dreamy cheesecake that melts in your mouth. I remember the first time I made this recipe; I was amazed at how just a handful of ingredients could create such a delightful dessert. It’s like magic in the kitchen!
Now that we have our ingredients ready, let’s move on to the tools we’ll need to bring this cheesecake to life. Trust me, having the right tools makes all the difference!
Tools Needed for No-Bake Oreo Cheesecake Recipe
Before we dive into the delicious world of cheesecake-making, let’s talk about the tools that will make our journey smoother. As a passionate home cook, I’ve learned that having the right equipment can turn a good recipe into a great one. Here’s what you’ll need for our No-Bake Oreo Cheesecake Recipe.
- 🍽️ Food Processor: This handy gadget is essential for crushing the Oreo cookies into fine crumbs. If you don’t have one, a zip-top bag and a rolling pin work just as well!
- 🥣 Mixing Bowls: You’ll need a couple of mixing bowls—one for the crust and another for the filling. I love using glass bowls because they let me see the beautiful layers forming.
- 🥄 Spatula: A rubber spatula is perfect for folding the whipped cream into the cream cheese mixture. It helps keep that airy texture we’re aiming for!
- 🍰 9-inch Springform Pan: This is where the magic happens! A springform pan allows you to easily remove the cheesecake once it’s set, making for a beautiful presentation.
- 🍴 Electric Mixer: Whether it’s a hand mixer or a stand mixer, this tool will help you achieve that smooth and creamy filling. Trust me, it’s worth the investment!
- ⏲️ Plastic Wrap: You’ll need this to cover the cheesecake while it chills in the fridge. It keeps the cheesecake fresh and prevents any unwanted odors from sneaking in.
As I gather these tools, I can’t help but feel a sense of excitement. Each piece of equipment plays a vital role in creating that luscious cheesecake. I remember the first time I made this dessert; I was amazed at how having the right tools made the process so much easier. It’s like having a trusty sidekick in the kitchen!
Now that we have our tools ready, let’s roll up our sleeves and get started on the step-by-step preparation of our No-Bake Oreo Cheesecake Recipe. I promise you, it’s going to be a delightful adventure!
Step-by-Step Preparation of No-Bake Oreo Cheesecake Recipe
Now that we have all our ingredients and tools ready, it’s time to dive into the fun part: making our No-Bake Oreo Cheesecake Recipe! I always find that the process of creating something delicious is just as rewarding as enjoying the final product. So, let’s get started!
Step 1: Prepare the Crust
The crust is the foundation of our cheesecake, and it’s super easy to make! First, I grab my food processor and toss in 24 Oreo cookies. Watching them transform into fine crumbs is like magic! If you don’t have a food processor, no worries—just place the cookies in a zip-top bag and crush them with a rolling pin. It’s a great way to relieve stress, too!
Once the cookies are crushed, I mix them with 1/2 cup of melted unsalted butter in a mixing bowl. The butter binds everything together, creating a rich and flavorful crust. I use my hands or the back of a measuring cup to press the mixture firmly into the bottom of a 9-inch springform pan. It’s important to pack it down tightly, so it holds its shape when we slice into the cheesecake later. After that, I pop the crust into the refrigerator to set while I prepare the filling. This step is crucial, as it helps the crust firm up nicely!
Step 2: Make the Cheesecake Filling
With the crust chilling, it’s time to whip up the creamy filling! I take my softened cream cheese and place it in a large mixing bowl. Using my electric mixer, I beat it until it’s smooth and creamy. The texture should be like a fluffy cloud—so dreamy!
Next, I gradually add in 1 cup of powdered sugar. This sweetener is what makes our cheesecake so delightful! I continue to mix until everything is well combined. The filling should be thick and luscious, just waiting to be folded with whipped cream.
Step 3: Combine and Layer
Now comes the fun part! In a separate bowl, I whip 1 cup of cold heavy cream with 1 teaspoon of vanilla extract until stiff peaks form. This step is essential for giving our cheesecake that light and airy texture. It’s like adding a fluffy pillow to our creamy filling!
Once the whipped cream is ready, I gently fold it into the cream cheese mixture. I take my time with this step, being careful not to deflate the whipped cream. The goal is to keep that airy texture intact. When everything is combined, I can’t help but sneak a taste—it’s heavenly!
Now, I pour the cream cheese filling over the chilled Oreo crust in the springform pan. Using a spatula, I smooth the top, making it look as pretty as a picture. It’s like painting a masterpiece, and I can already imagine how delicious it will be!
Step 4: Chill the Cheesecake
With the cheesecake assembled, it’s time for the most challenging part—waiting! I cover the cheesecake with plastic wrap and place it in the refrigerator. I usually let it chill for at least 4 hours, but overnight is even better. This allows the flavors to meld together and the cheesecake to set perfectly.
As I wait, I can’t help but daydream about the first slice. The anticipation builds, and I often find myself peeking into the fridge just to admire my creation. It’s a test of patience, but trust me, it’s worth it!
Once the cheesecake is set, I’ll be ready to decorate and serve it. But for now, let’s take a moment to appreciate the beauty of the process. Making this No-Bake Oreo Cheesecake Recipe is not just about the end result; it’s about the joy of creating something delicious from scratch!
Serving Suggestions for No-Bake Oreo Cheesecake Recipe
Now that our No-Bake Oreo Cheesecake Recipe is chilling in the fridge, it’s time to think about how to serve this delightful dessert. I believe that presentation can elevate any dish, and this cheesecake is no exception! Here are some creative ways to serve it that will surely impress your family and friends.
Creative Ways to Serve No-Bake Oreo Cheesecake
When it comes to serving, I love to get a little creative. Here are some of my favorite ideas:
- 🍫 Chocolate Drizzle: A rich chocolate ganache drizzled over the top adds a touch of elegance. Just melt some chocolate with a bit of cream, let it cool slightly, and then drizzle it over the cheesecake. It’s like a warm hug for your taste buds!
- 🍓 Fresh Berries: Adding a handful of fresh strawberries, raspberries, or blueberries on top not only looks beautiful but also adds a burst of freshness. The tartness of the berries balances the sweetness of the cheesecake perfectly.
- 🍦 Ice Cream Scoops: Serve slices of cheesecake with a scoop of vanilla or chocolate ice cream on the side. The combination of creamy cheesecake and cold ice cream is simply irresistible!
- 🍪 Oreo Crumbles: For an extra crunch, sprinkle crushed Oreo cookies on top of each slice before serving. It adds texture and makes each bite even more delightful.
- 🌰 Nuts and Whipped Cream: A dollop of whipped cream and a sprinkle of chopped nuts, like pecans or walnuts, can add a lovely crunch and flavor contrast. It’s a simple yet effective way to elevate your dessert.
As I think about these serving suggestions, I can’t help but feel excited. Each option brings its own unique twist to the cheesecake, making it a versatile dessert for any occasion. Whether it’s a birthday party, a family gathering, or just a cozy night in, this cheesecake can shine in so many ways!
So, when it’s time to slice into that beautifully set cheesecake, remember that how you serve it can make all the difference. Get creative, have fun, and most importantly, enjoy every delicious bite of your No-Bake Oreo Cheesecake Recipe!
Tips for Perfecting Your No-Bake Oreo Cheesecake Recipe
As I’ve made my fair share of No-Bake Oreo Cheesecake Recipes, I’ve learned a few tips and tricks along the way. These insights can help you avoid common pitfalls and elevate your cheesecake to new heights. Let’s dive into some common mistakes to avoid and exciting variations to try!
Common Mistakes to Avoid
Even the most seasoned home cooks can make mistakes, and I’m no exception! Here are some pitfalls I’ve encountered and how to steer clear of them:
- 🧀 Using Cold Cream Cheese: One of the biggest mistakes is using cold cream cheese. It’s essential to let it soften at room temperature. Cold cream cheese can lead to lumps in your filling, and nobody wants that!
- 🥄 Overmixing the Filling: When combining the whipped cream with the cream cheese mixture, be gentle. Overmixing can deflate the whipped cream, resulting in a denser cheesecake. Think of it like folding a delicate blanket—gentle and careful!
- ⏲️ Not Chilling Long Enough: Patience is key! If you don’t chill the cheesecake long enough, it won’t set properly. I recommend letting it chill overnight for the best results. Trust me, the wait is worth it!
- 🍪 Skipping the Crust Setting: Don’t skip the step of chilling the crust before adding the filling. A well-set crust provides a sturdy base for your cheesecake. It’s like building a house; a strong foundation is crucial!
- 🍬 Not Tasting as You Go: Always taste your filling before pouring it into the crust. Adjust the sweetness if needed. After all, you want to create a dessert that you absolutely love!
By keeping these tips in mind, you’ll be well on your way to creating a flawless cheesecake that will impress everyone at the table. Now, let’s explore some fun variations to make this recipe your own!
Variations to Try
One of the things I love about the No-Bake Oreo Cheesecake Recipe is its versatility. You can easily switch things up to suit your taste or the occasion. Here are some variations I’ve tried and adored:
- 🍫 Chocolate Oreo Cheesecake: For a chocolate lover’s dream, add melted chocolate to the cream cheese filling. You can also use chocolate Oreos for the crust. It’s a double chocolate delight!
- 🍓 Berry Swirl Cheesecake: Fold in some pureed strawberries or raspberries into the filling for a fruity twist. The vibrant color and flavor will make your cheesecake pop!
- 🍋 Lemon Zest: Add a teaspoon of lemon zest to the filling for a refreshing citrus flavor. It brightens up the cheesecake and adds a lovely zing!
- 🥜 Peanut Butter Oreo Cheesecake: Mix in some creamy peanut butter into the filling for a nutty flavor. Top with crushed peanuts for an extra crunch!
- 🍦 Ice Cream Cheesecake: For a fun twist, fold in some softened ice cream into the filling. It creates a creamy, dreamy texture that’s perfect for summer!
These variations not only keep things exciting but also allow you to express your creativity in the kitchen. I love experimenting with different flavors and textures, and I encourage you to do the same! The No-Bake Oreo Cheesecake Recipe is your canvas—paint it with your favorite flavors!
FAQs About No-Bake Oreo Cheesecake Recipe
How long does No-Bake Oreo Cheesecake last?
One of the best things about my No-Bake Oreo Cheesecake Recipe is that it can last for several days in the fridge! Typically, it stays fresh for about 3 to 5 days when stored properly. I always make sure to cover it tightly with plastic wrap or place it in an airtight container. This helps keep it from absorbing any unwanted odors from the fridge. Just remember, the longer it sits, the softer the crust may become, but it will still taste delicious!
Can I use different cookies for the crust?
Absolutely! While Oreos are the star of this recipe, I love experimenting with different cookies for the crust. You can use chocolate wafer cookies, graham crackers, or even peanut butter cookies for a unique twist. Each type of cookie brings its own flavor and texture, making your cheesecake even more exciting. Just make sure to crush them finely and mix them with melted butter, just like you would with Oreos. The possibilities are endless!
Is it possible to make No-Bake Oreo Cheesecake dairy-free?
Yes, it’s definitely possible to create a dairy-free version of my No-Bake Oreo Cheesecake Recipe! You can substitute the cream cheese with a dairy-free cream cheese alternative, which is widely available in stores. For the heavy cream, try using coconut cream or a dairy-free whipped topping. Just keep in mind that the flavor and texture may vary slightly, but it will still be a delicious treat that everyone can enjoy!
How do I store No-Bake Oreo Cheesecake?
Storing your cheesecake properly is key to keeping it fresh and tasty. After it has set in the fridge, I recommend covering it with plastic wrap or transferring it to an airtight container. This helps prevent it from drying out or absorbing any odors. If you have leftover slices, you can also wrap them individually in plastic wrap for easy grab-and-go treats. Just remember to keep it refrigerated, and it will be ready to enjoy whenever you crave a slice of that creamy goodness!
Conclusion on No-Bake Oreo Cheesecake Recipe
As I wrap up this delightful journey through my No-Bake Oreo Cheesecake Recipe, I can’t help but feel a sense of accomplishment. This recipe is not just about creating a dessert; it’s about the joy of sharing something special with those I love. Each slice of this cheesecake tells a story, from the moment I crushed the Oreos to the final presentation on the table.
Print
No-Bake Oreo Cheesecake Recipe: Indulge in Easy Bliss!
- Total Time: 4 hours 20 minutes
- Yield: 8 servings
- Diet: Vegetarian
Description
A delightful No-Bake Oreo Cheesecake that combines creamy, sweet, and crunchy elements, perfect for any gathering.
Ingredients
- 🍪 Oreo cookies: 24 cookies for the crust and 8 cookies for topping.
- 🧈 Unsalted butter: 1/2 cup, melted.
- 🧀 Cream cheese: 16 oz, softened.
- 🍬 Powdered sugar: 1 cup.
- 🥛 Heavy cream: 1 cup, cold.
- 🌿 Vanilla extract: 1 teaspoon.
Instructions
- Prepare the crust by crushing 24 Oreo cookies and mixing with melted butter. Press into a 9-inch springform pan and chill.
- Make the cheesecake filling by beating softened cream cheese until smooth, then gradually add powdered sugar.
- Whip the heavy cream with vanilla extract until stiff peaks form, then fold into the cream cheese mixture.
- Pour the filling over the chilled crust and smooth the top. Cover and chill for at least 4 hours or overnight.
Notes
- Using room temperature cream cheese prevents lumps.
- Be gentle when folding whipped cream to maintain airiness.
- Chill the cheesecake overnight for best results.
- Always taste the filling before pouring it into the crust.
- Prep Time: 20 minutes
- Cook Time: 0 minutes
- Category: Dessert
- Method: No-Bake
- Cuisine: American
Nutrition
- Serving Size: 1 slice
- Calories: 350
- Sugar: 25g
- Sodium: 200mg
- Fat: 25g
- Saturated Fat: 15g
- Unsaturated Fat: 5g
- Trans Fat: 0g
- Carbohydrates: 30g
- Fiber: 1g
- Protein: 4g
- Cholesterol: 70mg
Keywords: No-Bake, Oreo, Cheesecake, Dessert, Easy Recipe