Oh, let me tell you about the ultimate treat that never fails to bring a smile to my face: the Oreo milkshake! It’s that rich, creamy concoction that hits all the right notes of indulgence and nostalgia. I remember the first time I had one at a little diner down the street, the way the cold, velvety shake melted into my mouth, and those delightful chunks of Oreo cookies added a perfect crunch. It was love at first sip! This milkshake isn’t just a drink; it’s a dessert experience that you can whip up in just five minutes. Imagine blending together silky vanilla ice cream, sweet chocolate syrup, and crunchy Oreo pieces into a dreamy mixture that’s utterly irresistible. Whether it’s a hot summer day or a cozy night in, this Oreo milkshake is a go-to dessert that satisfies every craving. Trust me, once you try it, you’ll be dreaming about this creamy delight long after the last drop has vanished!
Ingredients
- 4 Oreo cookies, crushed into small pieces
- 2 cups vanilla ice cream, softened slightly for easy blending
- 1 cup milk, preferably whole for that extra creaminess
- 1 tablespoon chocolate syrup, plus more for drizzling if you like!
These simple ingredients come together to create something magical. The crushed Oreo cookies are what give this milkshake its signature flavor and delightful texture. Make sure to use good quality vanilla ice cream, as it really elevates the whole experience. Trust me, the richness of whole milk makes a noticeable difference too, so don’t skimp on that! You can always adjust the amount of chocolate syrup based on your sweetness preference, but I find that one tablespoon strikes the perfect balance. Get ready to blend up a delicious treat that’s sure to please!
How to Prepare Oreo Milkshake
Making an Oreo milkshake is as easy as pie—well, easier actually! Just follow these simple steps, and you’ll be sipping on a deliciously creamy milkshake in no time.
Step 1: Crush the Oreo Cookies
First things first, let’s get those Oreo cookies ready! You want them crushed into small pieces, so they blend perfectly into your milkshake. I like to pop them into a zip-top bag and use a rolling pin to crush them. It’s satisfying and keeps the mess contained! Alternatively, you can throw them in a food processor for a quicker method, but don’t overdo it; you want some texture, not dust. Aim for some chunky bits mixed with finer crumbs—that way, you get that delightful crunch in every sip!
Step 2: Blend the Ingredients
Now, onto the best part—blending! In a blender, combine your softened vanilla ice cream, milk, chocolate syrup, and the crushed Oreos you just prepared. I like to start with the ice cream and milk, then add in the syrup and cookies. This order helps everything mix together smoothly. Blend on medium-high until the mixture is perfectly smooth and creamy, but don’t be afraid to stop and scrape the sides down if needed. You want it to be thick but pourable, so if it feels too thick, just splash in a bit more milk until you reach your desired consistency. Wow, the smell is already heavenly!
Step 3: Serve and Garnish
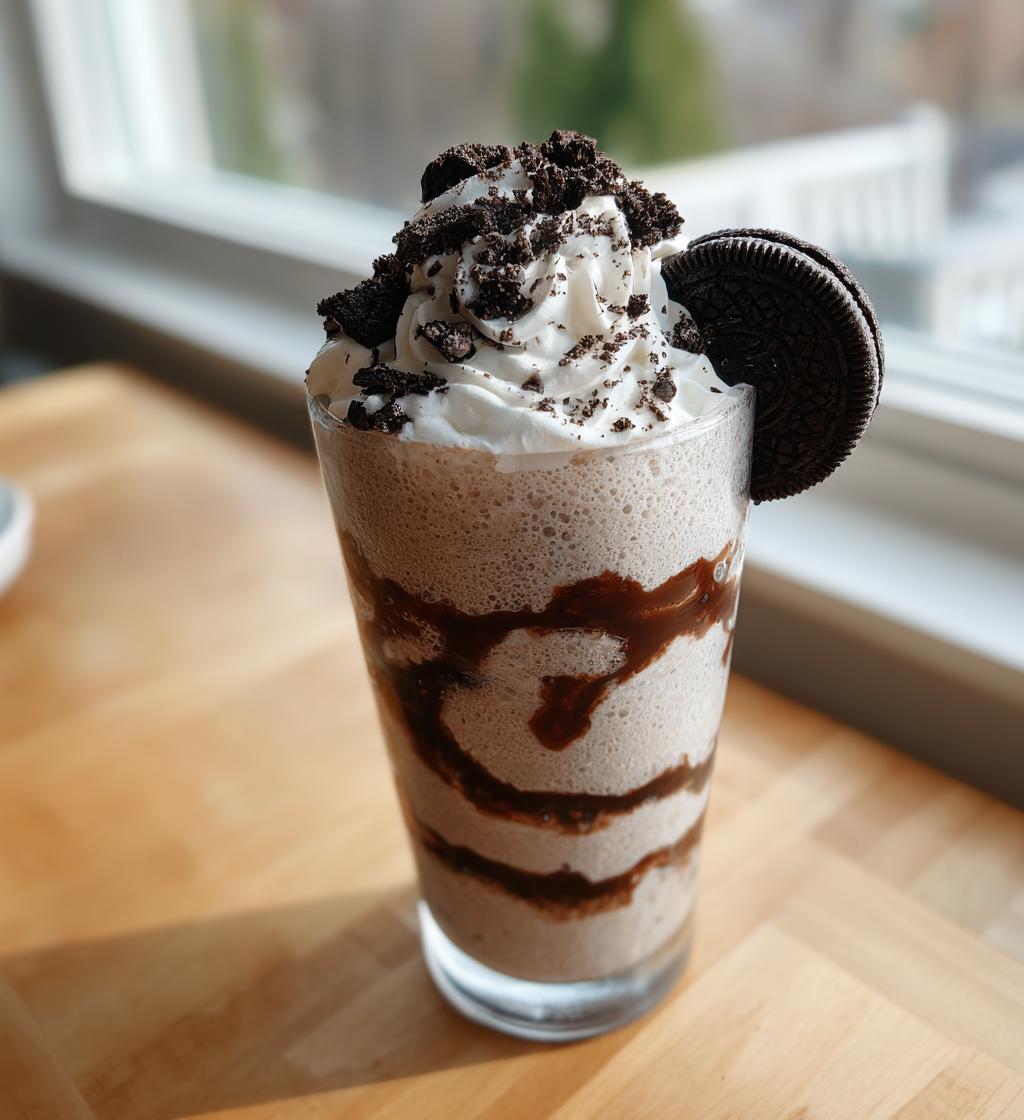
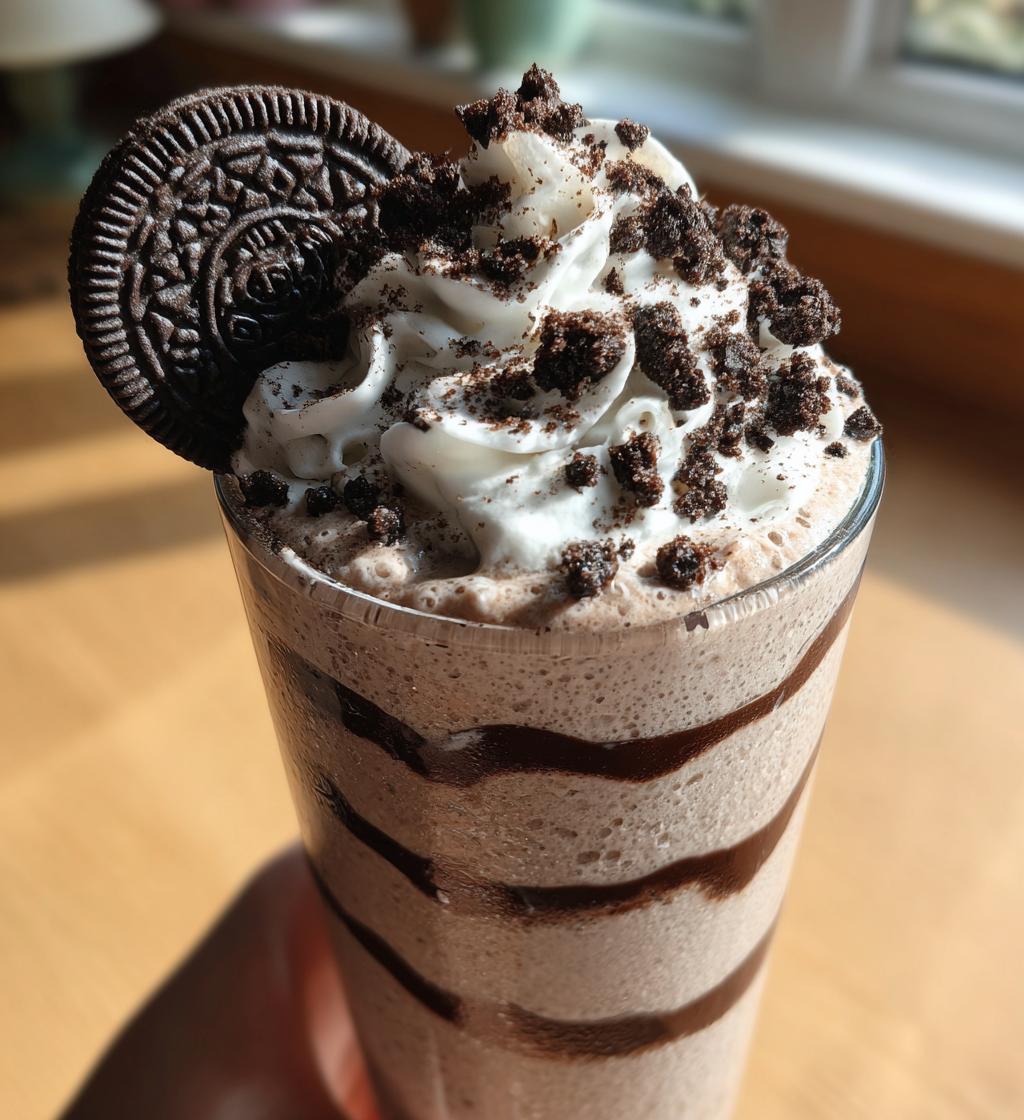
Once your Oreo milkshake reaches that delightful creamy texture, it’s time to serve! Grab your favorite glasses and pour the milkshake right in. If you’re feeling extra indulgent (and who isn’t?), top it off with some additional crushed Oreos or a generous swirl of whipped cream. You could even drizzle some chocolate syrup on top for a little extra flair. Trust me, your taste buds will thank you for this delicious treat, and your friends will be begging for the recipe!
Nutritional Information
Now, I know you’re probably curious about the nutritional side of this indulgent Oreo milkshake. While it’s definitely a treat, here’s a rough estimate of what you can expect per serving:
- Calories: 400
- Fat: 20g
- Saturated Fat: 10g
- Trans Fat: 0g
- Cholesterol: 60mg
- Sodium: 150mg
- Carbohydrates: 50g
- Fiber: 2g
- Sugar: 30g
- Protein: 6g
Keep in mind, these values are estimates and can vary based on the specific ingredients you use. It’s always good to indulge in moderation, but hey, a little treat here and there never hurt anyone! Enjoy savoring every rich and creamy sip of your homemade Oreo milkshake!
Why You’ll Love This Recipe
This Oreo milkshake isn’t just a dessert; it’s an experience that you’ll want to savor again and again. Here are some reasons why you’ll absolutely adore making this delectable treat:
- Quick and Easy: With just a five-minute prep time, you can whip up this milkshake without any fuss. It’s perfect for those late-night cravings or when unexpected guests pop by!
- Rich, Creamy Flavor: The combination of creamy vanilla ice cream and crunchy Oreos creates a flavor explosion that’s hard to resist. Each sip is a delightful blend of sweetness and texture!
- Customizable: Feel free to adjust the ingredients to suit your taste! Want it thicker? Just add more ice cream. Prefer a touch more chocolate? Drizzle in some extra syrup. The possibilities are endless!
- Perfect for Any Occasion: Whether it’s a summer barbecue, a cozy movie night, or a simple afternoon pick-me-up, this milkshake fits right in. It’s a crowd-pleaser that appeals to both kids and adults alike!
- Indulgent Treat: Sometimes, you just need a little indulgence, and this Oreo milkshake delivers. It’s a sweet escape that feels like a special treat every time you enjoy it.
Once you try it, I promise you’ll be hooked on this delightful dessert!
Tips for Success
To make sure your Oreo milkshake turns out absolutely perfect every time, I’ve gathered some tried-and-true tips that’ll elevate your milkshake game to a whole new level. Trust me, these little tricks will have you sipping in pure bliss!
Adjusting for Thickness
If you prefer a thicker milkshake (and let’s be honest, who doesn’t?), just add a little more vanilla ice cream to the blender. It’s all about finding that sweet spot! If you accidentally make it too thick, don’t fret—just splash in a bit more milk until you reach that dreamy, smooth consistency. You can also freeze some of your milkshake mixture in advance and blend it back in for an extra frosty treat.
Garnishing Like a Pro
Now let’s talk garnishes! While a sprinkle of crushed Oreos on top is always a winner, you can take it a step further. Consider adding a generous swirl of whipped cream—homemade or store-bought, it’s all good! For an extra touch of chocolatey goodness, drizzle some chocolate syrup over the whipped cream. Wow, just thinking about it makes me want to whip up another batch!
Feel free to get creative with your garnishes! Try adding a few mini chocolate chips, a dusting of cocoa powder, or even a cherry on top for that classic sundae feel. You could also use a fun straw or a fancy glass to serve it, which adds a little flair to your presentation.
Experimenting with Flavors
Don’t be afraid to experiment! Vanilla ice cream is fantastic, but you could switch it up with cookies and cream or even mint chocolate chip for a refreshing twist. Adding a scoop of peanut butter or a splash of coffee can also create a whole new flavor experience. The best part? You get to customize it to your liking!
So, go ahead, use these tips, and watch your Oreo milkshake become the star of the show. You’re going to impress everyone with this delicious creation, and they’ll be begging for seconds!
Variations of Oreo Milkshake
Once you’ve nailed the classic Oreo milkshake, the fun really begins! There are so many delicious twists you can put on this recipe to keep things exciting. Here are some of my favorite variations that are sure to tickle your taste buds:
- Mint Oreo Milkshake: Swap out regular Oreos for mint-flavored ones! The cool mint flavor combined with the creamy vanilla ice cream creates a refreshing shake that’s perfect for summer. You can even add a few drops of mint extract for an extra minty kick!
- Peanut Butter Oreo Milkshake: If you’re a peanut butter lover like me, this one’s for you! Just add a couple of tablespoons of creamy peanut butter to your blender before mixing. The combination of chocolate, vanilla, and peanut butter is pure heaven!
- Chocolate Oreo Milkshake: For an extra chocolatey delight, use chocolate ice cream instead of vanilla. You can also add a tablespoon of cocoa powder to intensify the chocolate flavor. Top it with chocolate shavings or a drizzle of chocolate syrup for that ultimate indulgence!
- Cookies and Cream Oreo Milkshake: Use cookies and cream ice cream for a double dose of cookie goodness! This variation enhances the Oreo flavor while keeping that creamy texture. Crushed Oreos on top are a must!
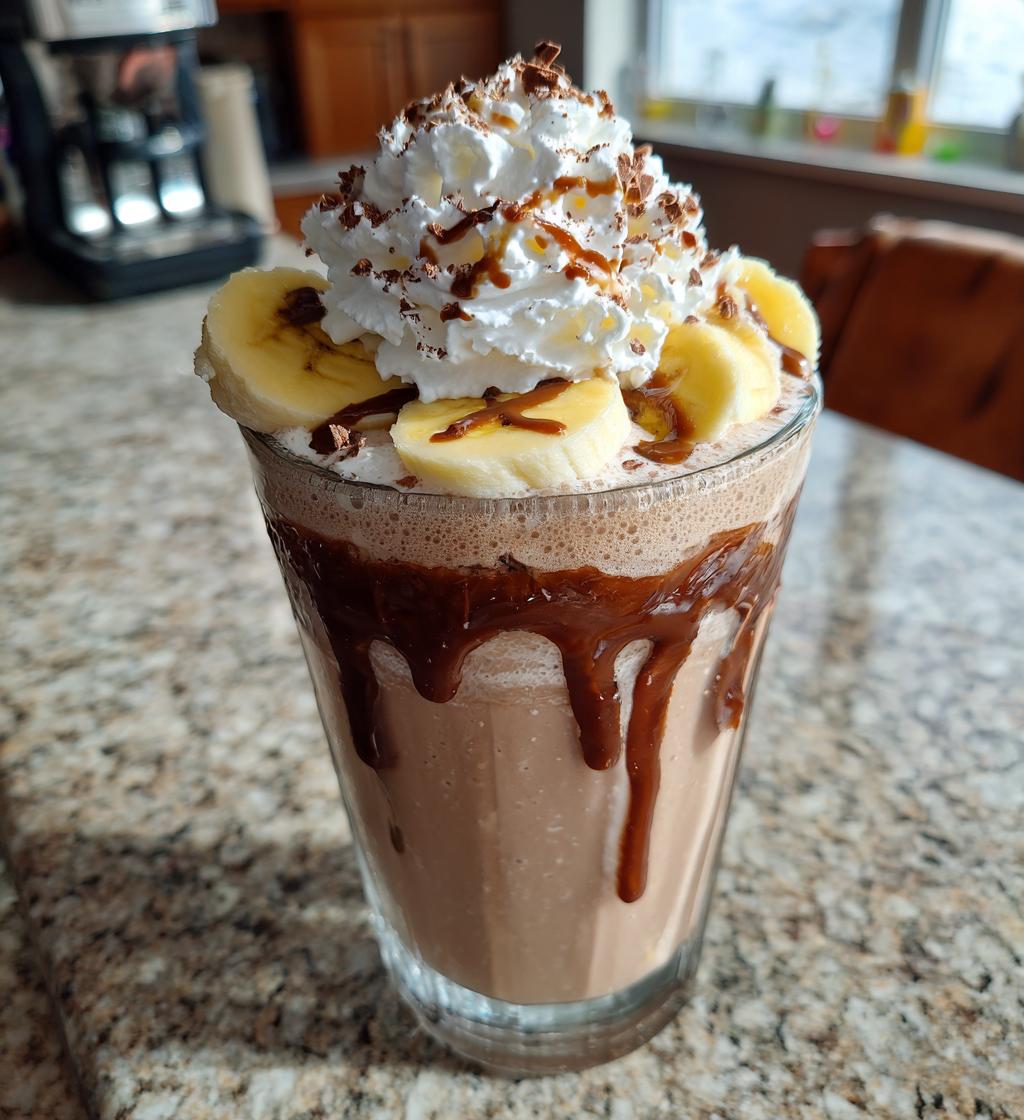
- Banana Oreo Milkshake: For a fruity twist, add a ripe banana into the mix. The banana adds natural sweetness and creaminess that pairs beautifully with the cookies. Plus, it’s a great way to sneak in some fruit!
- Caramel Oreo Milkshake: Drizzle some caramel sauce into your blender along with the other ingredients for a sweet, gooey infusion. This caramel addition adds a lovely richness that complements the chocolate perfectly!
Feel free to mix and match these ideas or come up with your own unique flavor combinations! The beauty of the Oreo milkshake is that it’s so versatile, and you can tailor it to suit your cravings. Get creative and enjoy every sip of your personalized treat!
Storage & Reheating Instructions
Now, let’s talk about storing any leftovers of your fabulous Oreo milkshake! First off, I have to say, milkshakes are best enjoyed fresh right after blending. There’s just something magical about that cold, creamy texture that doesn’t quite compare once it’s been sitting around. But hey, we all know life happens, and sometimes, you might just have a little left over!
If you find yourself with some leftover milkshake, here’s how to store it properly. Pour any remaining milkshake into an airtight container or a mason jar. Make sure to seal it tightly to prevent any unwanted odors from sneaking in from your fridge. You can store it in the refrigerator for up to 24 hours. Just keep in mind that the longer it sits, the more separation you might see, so give it a good shake or stir before enjoying it again!
If you’re really craving that milkshake again after a day, consider adding a splash of milk or a scoop of ice cream to revive its creamy consistency when you blend it back up. It helps bring back that thick, luscious feel!
One more tip: if you know you won’t finish your milkshake, you can freeze it! Just pour the leftover milkshake into an ice cube tray or freeze it in a larger container. When you’re ready to dive back in, you can blend those frozen chunks with a little bit of milk for a quick, creamy treat! Just remember, while the flavor will still be delightful, the texture might be a tad different than when it was freshly made. Enjoy every last sip, whether it’s right away or as a frozen treat later on!
Serving Suggestions
Now that you’ve whipped up this delightful Oreo milkshake, let’s talk about how to elevate your dessert experience even more! Pairing your milkshake with complementary treats can turn a simple indulgence into a full-on dessert extravaganza. Here are some of my favorite suggestions that work beautifully with the rich, creamy flavor of the Oreo milkshake:
- Chocolate Chip Cookies: Freshly baked chocolate chip cookies are a classic pairing. The warm, gooey cookies dipped into the cold milkshake create a heavenly contrast that you won’t be able to resist!
- Brownies: Rich, fudgy brownies are another indulgent option. Their dense texture complements the milkshake’s creaminess, and you can even crumble some on top for a double chocolate treat.
- Ice Cream Sundaes: Why not go all out with an ice cream sundae on the side? A scoop of vanilla or chocolate ice cream drizzled with hot fudge or caramel sauce can take your dessert game to the next level!
- Fruit Salad: For a lighter option, a refreshing fruit salad can provide a nice balance. The sweetness and acidity of fresh berries or tropical fruits can cut through the richness of the milkshake.
- Chocolate-Dipped Pretzels: The salty crunch of chocolate-dipped pretzels adds a delightful contrast to the milkshake. It’s the perfect sweet and salty combo!
- Mini Cheesecakes: Individual mini cheesecakes, whether they’re classic or flavored, pair wonderfully with the Oreo milkshake. Their creamy texture and tangy flavor make for a delightful bite alongside your shake.
Feel free to mix and match these suggestions based on your cravings or the occasion! Whether you’re hosting a party, having a cozy night in, or just treating yourself, these pairings will enhance your Oreo milkshake experience and leave everyone wanting more!
Print
Oreo Milkshake: 5 Indulgent Reasons to Savor It Today
- Total Time: 5 minutes
- Yield: 2 servings 1x
- Diet: Vegetarian
Description
A rich and creamy Oreo milkshake that’s perfect for dessert.
Ingredients
- 4 Oreo cookies
- 2 cups vanilla ice cream
- 1 cup milk
- 1 tablespoon chocolate syrup
Instructions
- Crush the Oreo cookies into small pieces.
- In a blender, combine ice cream, milk, chocolate syrup, and crushed Oreos.
- Blend until smooth and creamy.
- Pour into glasses and top with extra crushed Oreos if desired.
Notes
- Use whole milk for a richer shake.
- For a thicker shake, add more ice cream.
- Garnish with whipped cream for extra indulgence.
- Prep Time: 5 minutes
- Cook Time: 0 minutes
- Category: Dessert
- Method: Blending
- Cuisine: American
Nutrition
- Serving Size: 1 serving
- Calories: 400
- Sugar: 30g
- Sodium: 150mg
- Fat: 20g
- Saturated Fat: 10g
- Unsaturated Fat: 5g
- Trans Fat: 0g
- Carbohydrates: 50g
- Fiber: 2g
- Protein: 6g
- Cholesterol: 60mg
Keywords: Oreo Milkshake, dessert, milkshake, ice cream, Oreo