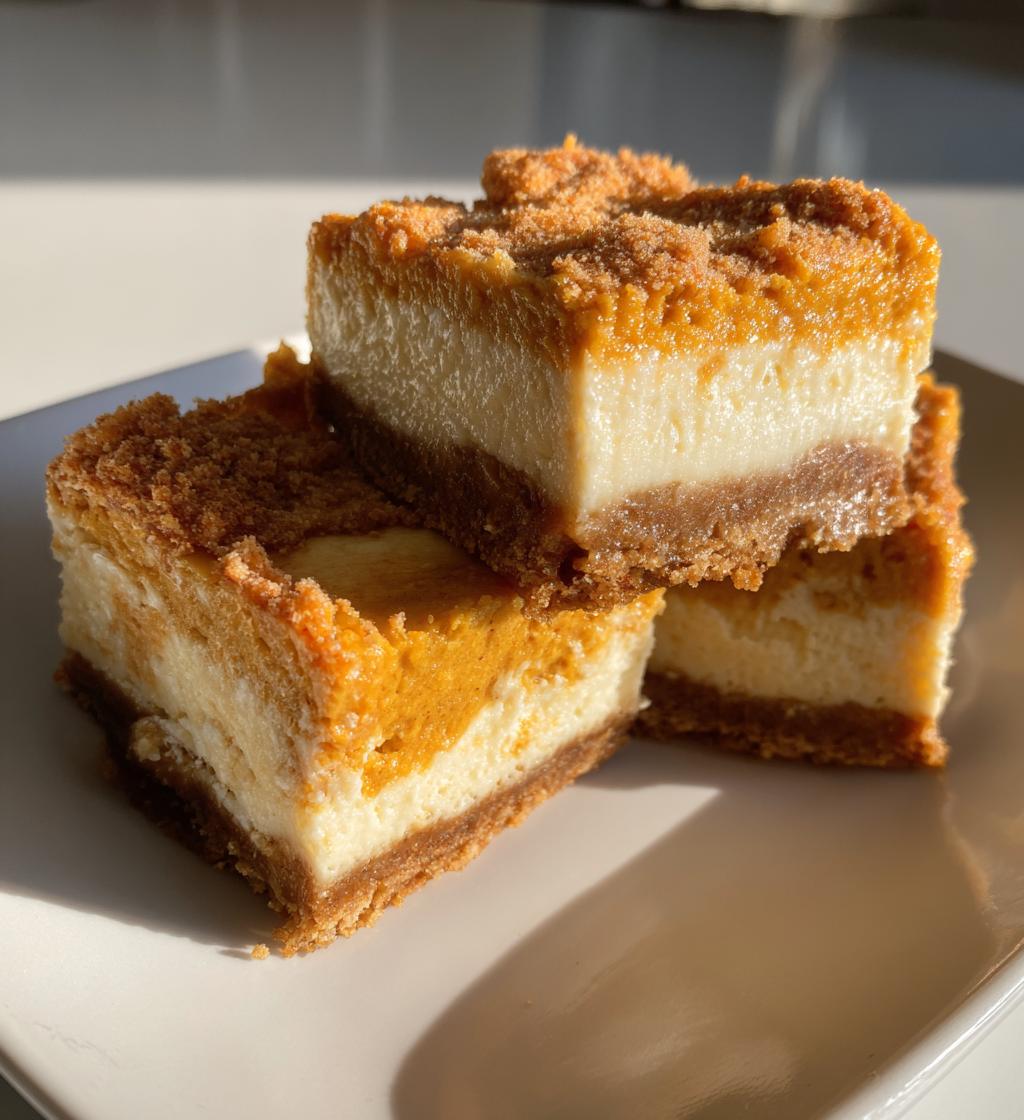
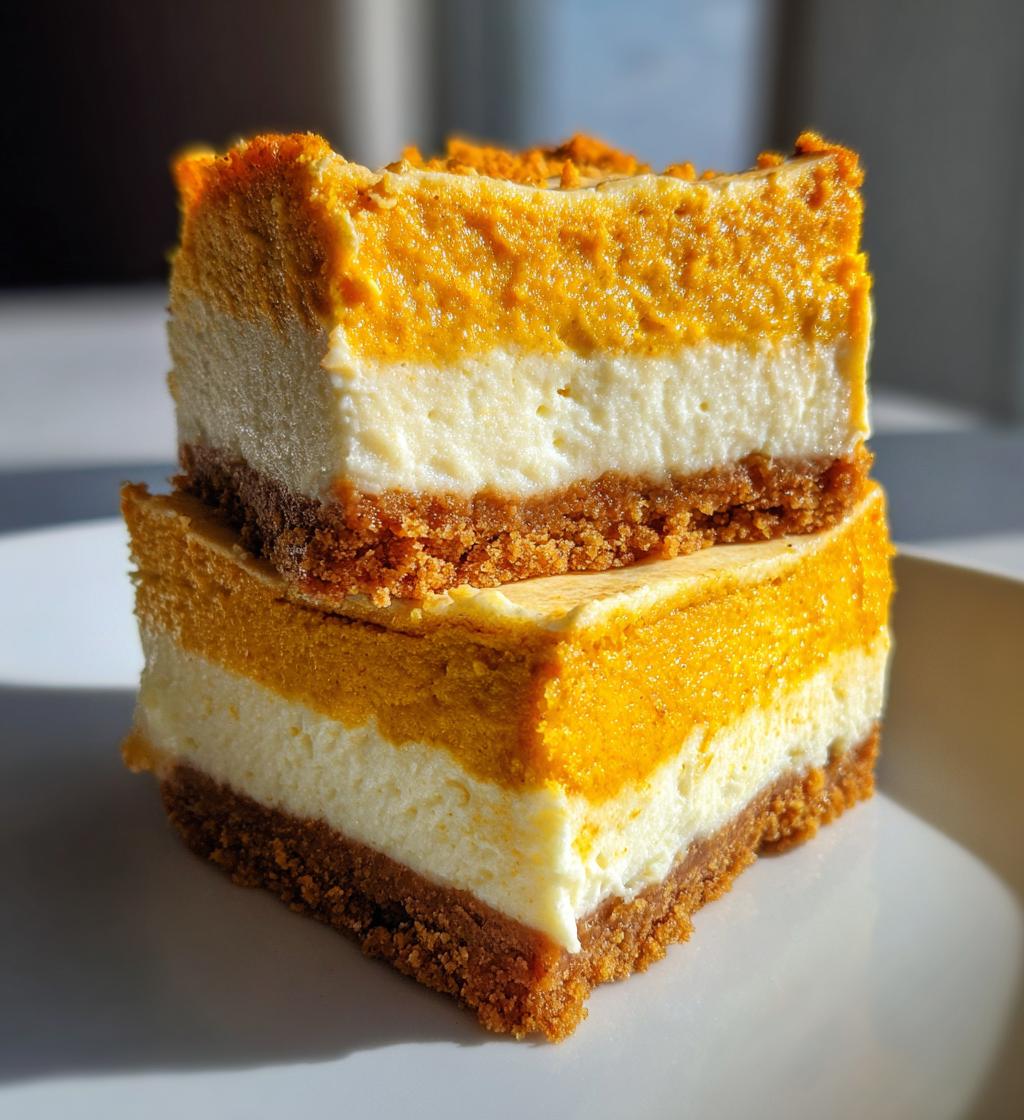
Oh, my goodness, let me tell you about pumpkin cheesecake bars! They’re like a cozy hug in dessert form, especially when the leaves start to change and fall is in the air. I can hardly resist their creamy filling, perfectly nestled on a buttery graham cracker crust. It’s a delightful combination that truly captures the essence of the season.
Every autumn, my family gathers for our traditional harvest party, and these pumpkin cheesecake bars are always the star of the dessert table. I remember the first time I brought them; the way everyone’s faces lit up with joy as they took their first bites was priceless. Kids and adults alike would ask for seconds, and I’d secretly pat myself on the back while trying to keep a straight face. It’s hard not to feel proud when you’ve made something that brings people together, right?
These bars are not just a treat; they’re a celebration of fall flavors and family memories, making them the perfect addition to any gathering. Trust me, once you try this recipe, you’ll be hooked on these pumpkin cheesecake bars, too!
Ingredients for Pumpkin Cheesecake Bars
- 1 1/2 cups graham cracker crumbs – these give the bars their delightful crust, so don’t skimp on freshness!
- 1/4 cup sugar – just a touch to sweeten the crust and balance flavors.
- 1/2 cup butter, melted – this adds richness and helps bind the crust together.
- 2 packages (8 oz each) cream cheese, softened – the star of the show for that creamy filling!
- 1 cup pumpkin puree – make sure it’s pure pumpkin, not pumpkin pie filling, for the best flavor.
- 1 cup sugar – this sweetens the filling and complements the pumpkin perfectly.
- 3 large eggs – they help set the filling, giving it that perfect texture.
- 1 teaspoon vanilla extract – for a hint of warmth and depth in flavor.
- 1 teaspoon ground cinnamon – because what’s pumpkin without cinnamon, right?
- 1/2 teaspoon ground nutmeg – it adds a cozy, autumnal touch.
- 1/2 teaspoon ground ginger – just a little zing to elevate the flavor profile.
How to Prepare Pumpkin Cheesecake Bars
Alright, let’s get down to the delicious business of making these pumpkin cheesecake bars! I promise, the steps are super straightforward, and before you know it, you’ll have a pan full of creamy goodness ready to impress your family and friends.
- Preheat your oven: Start by setting your oven to 350°F (175°C). This way, it’ll be nice and hot when your bars are ready to go in!
- Make the crust: In a medium bowl, combine 1 1/2 cups of graham cracker crumbs, 1/4 cup sugar, and 1/2 cup melted butter. Stir until everything is well mixed and resembles wet sand.
- Press the crust: Grab a greased 9×13 inch pan and press the crust mixture firmly into the bottom. You want it to be even and packed down, so don’t be afraid to use your hands or the back of a measuring cup!
- Prepare the filling: In a large mixing bowl, beat the 2 packages of softened cream cheese with an electric mixer until it’s smooth and creamy. This is where the magic begins!
- Add the pumpkin: Now, mix in 1 cup of pumpkin puree, 1 cup sugar, 3 large eggs, 1 teaspoon vanilla extract, 1 teaspoon ground cinnamon, 1/2 teaspoon ground nutmeg, and 1/2 teaspoon ground ginger. Blend until everything is well combined and you have that beautiful orange filling.
- Pour it in: Carefully pour the pumpkin mixture over the graham cracker crust in the pan. Use a spatula to spread it evenly, making sure every corner is covered.
- Bake: Pop that pan into your preheated oven and bake for 30 to 35 minutes. You’ll know they’re done when the edges are set, but the center may still have a slight jiggle. That’s okay; it’ll firm up as it cools!
- Cool down: Once baked, remove the bars from the oven and let them cool at room temperature. Then, refrigerate them for at least 2 hours. This chilling step is crucial because it helps the bars set up perfectly!
And there you have it! You’re just a few simple steps away from enjoying these fabulous pumpkin cheesecake bars. I can’t wait for you to taste them!
Why You’ll Love This Recipe
- Quick preparation: With just 20 minutes of prep time, you can whip these up in a flash, leaving you more time to enjoy with family and friends.
- Rich flavor: The combination of pumpkin, cream cheese, and warm spices creates a decadent filling that’s absolutely irresistible!
- Perfect for gatherings: These pumpkin cheesecake bars are a crowd-pleaser, making them the ideal dessert for potlucks, holiday parties, or cozy family gatherings.
- Make-ahead option: You can easily prepare these bars a day in advance, allowing the flavors to meld beautifully while saving you time on the day of your event.
- Versatile toppings: They’re delicious on their own, but you can also dress them up with whipped cream, caramel drizzle, or even a sprinkle of nuts for added texture!
Tips for Success
Now that you’re ready to dive into making these pumpkin cheesecake bars, let me share some of my favorite tips to ensure they turn out absolutely perfect every time!
- Use room temperature ingredients: Make sure your cream cheese and eggs are at room temperature before you start mixing. This helps create a smoother filling without lumps, which is key for that creamy texture.
- Don’t overmix the filling: Once you add the eggs, mix just until everything is combined. Overmixing can add too much air, leading to cracks in your cheesecake bars as they cool.
- Check for doneness carefully: Remember, the center should still have a slight jiggle when you take it out of the oven. It will continue to set as it cools, so don’t be tempted to bake it until it’s completely firm!
- Chill thoroughly: Allowing your bars to chill for at least 2 hours (or even overnight!) really helps with the flavor and texture. It’s worth the wait, I promise!
- Line your pan with parchment paper: For easy removal, consider lining the bottom of your pan with parchment paper before pressing in the crust. This little trick makes it so much easier to lift out the bars for cutting!
- Experiment with spices: Feel free to adjust the spices to your taste! If you love a bit more warmth, add extra cinnamon or even a pinch of clove for a deeper flavor profile.
With these tips in your back pocket, you’ll be well on your way to whipping up the most delightful pumpkin cheesecake bars that everyone will rave about!
Variations on Pumpkin Cheesecake Bars
Alright, let’s get creative with these pumpkin cheesecake bars! The base recipe is delicious as is, but I love to play around with flavors and add little twists to keep things exciting. Here are some fun variations you might want to try:
- Chocolate Swirl: For all the chocolate lovers out there, consider adding a rich chocolate swirl to your filling! Just melt some chocolate (about 4 ounces) and fold it into half of the cheesecake mixture before pouring it over the crust. You’ll get beautiful, marbled bars that are sure to impress!
- Spiced Up: Want to amp up the spice level? Try adding a pinch of ground cloves or allspice to the filling. It adds a warm, cozy depth that pairs beautifully with the pumpkin flavor.
- Nuts About It: If you enjoy a little crunch, stir in some finely chopped nuts, like pecans or walnuts, into the filling. You can also sprinkle some on top before baking for an added texture contrast!
- Caramel Drizzle: For a decadent finish, drizzle some homemade or store-bought caramel sauce over the cooled bars just before serving. The sweet, buttery flavor complements the pumpkin perfectly!
- Maple Twist: Swap out the regular sugar in the filling for maple syrup (about 3/4 cup) for a delightful maple flavor. Just reduce the amount of other liquids slightly to keep the texture right.
- Cheesecake Layer: For a two-layer treat, make a classic cheesecake layer below the pumpkin filling! Just prepare a simple cheesecake base with cream cheese, sugar, and eggs, bake it for a bit, then add the pumpkin layer on top and bake again.
These variations are just a starting point. Feel free to experiment and find your own favorite combinations. The beauty of these pumpkin cheesecake bars is their versatility, so let your creativity shine!
Serving Suggestions
Now that you’ve got your delicious pumpkin cheesecake bars ready to go, let’s talk about how to serve them up for maximum enjoyment! While they’re fantastic on their own, a few simple additions can elevate them even more. Here are some of my favorite serving suggestions that’ll have everyone coming back for more!
- Whipped Cream: You can’t go wrong with a dollop of freshly whipped cream on top! It adds a light, airy contrast to the dense filling and makes for a picture-perfect presentation. Just whip some heavy cream with a bit of sugar and vanilla until soft peaks form, and you’re good to go!
- Caramel Drizzle: A drizzle of warm caramel sauce takes these bars to the next level! The sweet, buttery flavor pairs beautifully with the pumpkin and spices, making each bite even more indulgent. You can use store-bought caramel or whip up a quick batch at home!
- Chopped Nuts: For those who love a bit of crunch, sprinkle some chopped pecans or walnuts over the top before serving. They add a delightful texture contrast and enhance the autumn flavors of the bars.
- Chocolate Shavings: If you’re feeling a bit fancy, garnish your bars with chocolate shavings. Dark chocolate complements the pumpkin flavor so well, and it looks so elegant, too!
- Spice Sprinkle: A light dusting of cinnamon or pumpkin pie spice on top can be a beautiful finishing touch. It not only enhances the flavor but also gives your bars an extra seasonal flair!
- Fruit Compote: Serve with a warm fruit compote made from apples or pears cooked down with a bit of sugar and cinnamon. The fruity sweetness brings a lovely balance to the rich cheesecake bars.
These serving suggestions will help you create a delightful experience for your guests and make these pumpkin cheesecake bars the star of the dessert table. Enjoy every bite, and don’t forget to share the love!
Storage & Reheating Instructions
So, you’ve made these scrumptious pumpkin cheesecake bars and have some leftovers (if they even last that long!). Here’s how to store them properly to keep that creamy goodness intact.
First, once the bars are completely cooled and have spent their necessary time chilling in the fridge, you’ll want to cover them tightly. I recommend using plastic wrap or aluminum foil, or you can pop them into an airtight container. This keeps them fresh and prevents any fridge odors from sneaking in.
These bars can be stored in the refrigerator for up to 5 days. Just make sure to keep them well covered! If you’re looking to save them for longer, you could also freeze them. Simply cut them into squares, wrap each piece individually in plastic wrap, and then place them in a freezer-safe container. They should last for about 2 to 3 months in the freezer.
When you’re ready to enjoy your frozen bars, just take them out and let them thaw in the fridge for a few hours or overnight. If you want to warm them up a bit, you can pop them in the microwave for about 15-20 seconds. This will bring back some of that creamy texture without overdoing it. Just be careful not to heat them too long, or you might lose that delicious creaminess!
And there you have it! With these storage and reheating tips, you can enjoy your pumpkin cheesecake bars any time you crave a taste of fall, even if it’s not quite autumn anymore. Happy baking!
Nutritional Information
Let’s talk numbers! It’s always good to know what you’re indulging in, right? Here’s the typical nutritional breakdown for one of these delightful pumpkin cheesecake bars:
- Calories: 250
- Fat: 15g
- Saturated Fat: 8g
- Unsaturated Fat: 5g
- Trans Fat: 0g
- Cholesterol: 50mg
- Sodium: 150mg
- Carbohydrates: 30g
- Fiber: 1g
- Sugar: 18g
- Protein: 3g
Keep in mind that these values might vary based on the specific ingredients and brands you use. It’s always a good idea to check the labels for the most accurate information. But hey, sometimes you just gotta treat yourself, and these pumpkin cheesecake bars are worth every bite!
FAQ About Pumpkin Cheesecake Bars
Got questions about making these delicious pumpkin cheesecake bars? You’re not alone! Here are some of the most common queries I hear, along with my answers to help you out in the kitchen:
- Can I use fresh pumpkin instead of canned pumpkin puree? Absolutely! If you want to use fresh pumpkin, just make sure to cook and puree it until smooth. You’ll need about 1 cup of fresh pumpkin puree, similar to the canned version.
- How do I know when the pumpkin cheesecake bars are done baking? Great question! The bars are done when the edges are set, and the center still has a slight jiggle. Remember, they’ll continue to firm up as they cool!
- Can I freeze pumpkin cheesecake bars? Yes, you can! Just be sure to wrap them tightly in plastic wrap and store them in an airtight container. They’ll keep well in the freezer for about 2 to 3 months. Perfect for when a pumpkin craving hits!
- What’s the best way to cut my bars for serving? I recommend using a sharp knife and wiping it clean between cuts for neat slices. If you’ve lined your pan with parchment paper, it makes lifting the bars out so much easier!
- Can I make these pumpkin cheesecake bars gluten-free? Definitely! Simply swap the graham cracker crumbs for a gluten-free alternative, like crushed gluten-free cookies or a gluten-free graham cracker brand. Your bars will still be just as delicious!
I hope these FAQs help clear up any questions you have about making pumpkin cheesecake bars! If you have more, feel free to reach out. Happy baking!
Print
Pumpkin Cheesecake Bars: 7 Irresistible Fall Delights
- Total Time: 2 hours 55 minutes
- Yield: 12 bars 1x
- Diet: Vegetarian
Description
Delicious pumpkin cheesecake bars with a creamy filling on a graham cracker crust.
Ingredients
- 1 1/2 cups graham cracker crumbs
- 1/4 cup sugar
- 1/2 cup butter, melted
- 2 packages (8 oz each) cream cheese, softened
- 1 cup pumpkin puree
- 1 cup sugar
- 3 large eggs
- 1 teaspoon vanilla extract
- 1 teaspoon ground cinnamon
- 1/2 teaspoon ground nutmeg
- 1/2 teaspoon ground ginger
Instructions
- Preheat the oven to 350°F (175°C).
- In a bowl, mix graham cracker crumbs, sugar, and melted butter.
- Press the mixture into the bottom of a greased 9×13 inch pan.
- In a large bowl, beat cream cheese until smooth.
- Add pumpkin puree, sugar, eggs, vanilla, cinnamon, nutmeg, and ginger. Mix until well combined.
- Pour the pumpkin mixture over the crust.
- Bake for 30-35 minutes or until set.
- Let cool, then refrigerate for at least 2 hours before serving.
Notes
- Store leftovers in the refrigerator.
- Top with whipped cream if desired.
- Can be made a day ahead.
- Prep Time: 20 minutes
- Cook Time: 35 minutes
- Category: Dessert
- Method: Baking
- Cuisine: American
Nutrition
- Serving Size: 1 bar
- Calories: 250
- Sugar: 18g
- Sodium: 150mg
- Fat: 15g
- Saturated Fat: 8g
- Unsaturated Fat: 5g
- Trans Fat: 0g
- Carbohydrates: 30g
- Fiber: 1g
- Protein: 3g
- Cholesterol: 50mg
Keywords: Pumpkin Cheesecake Bars