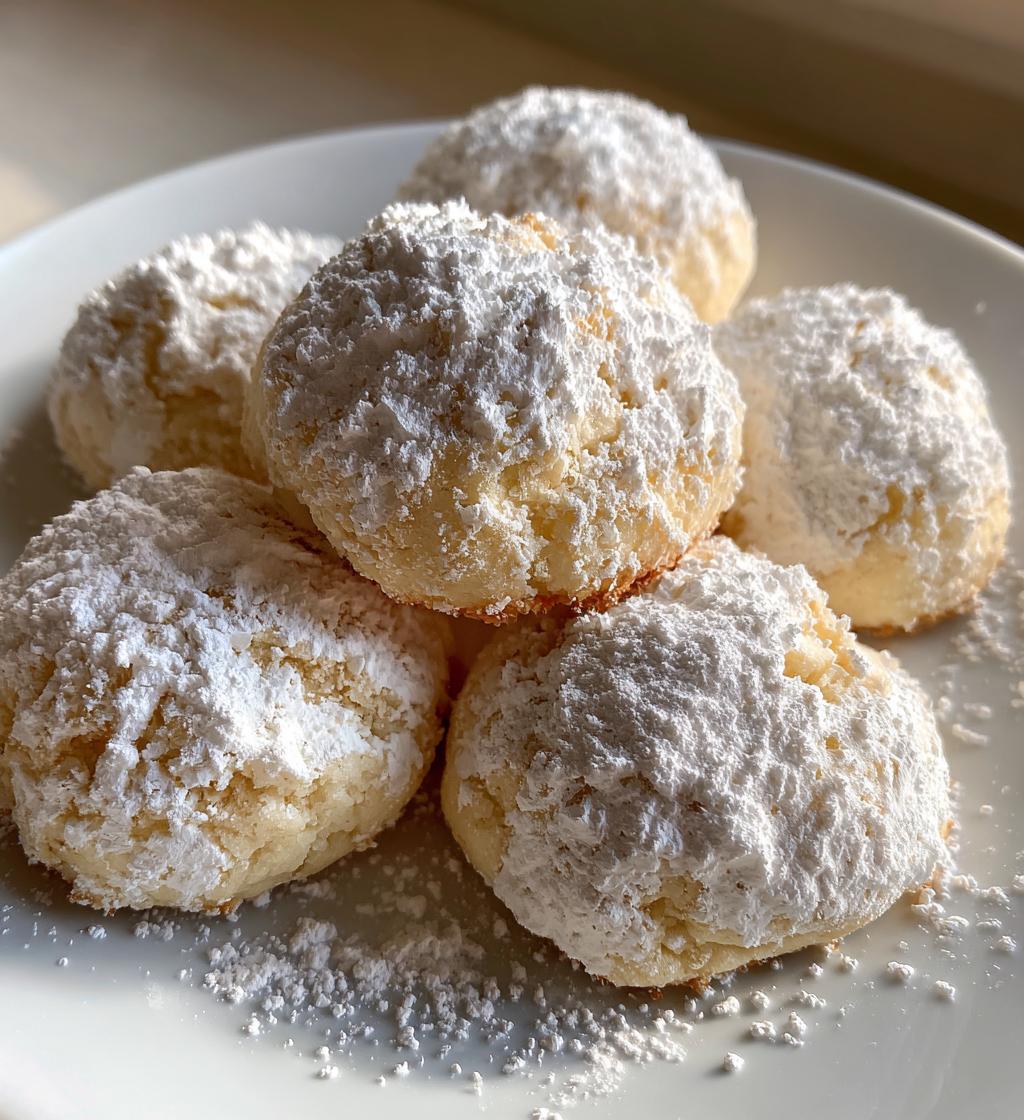
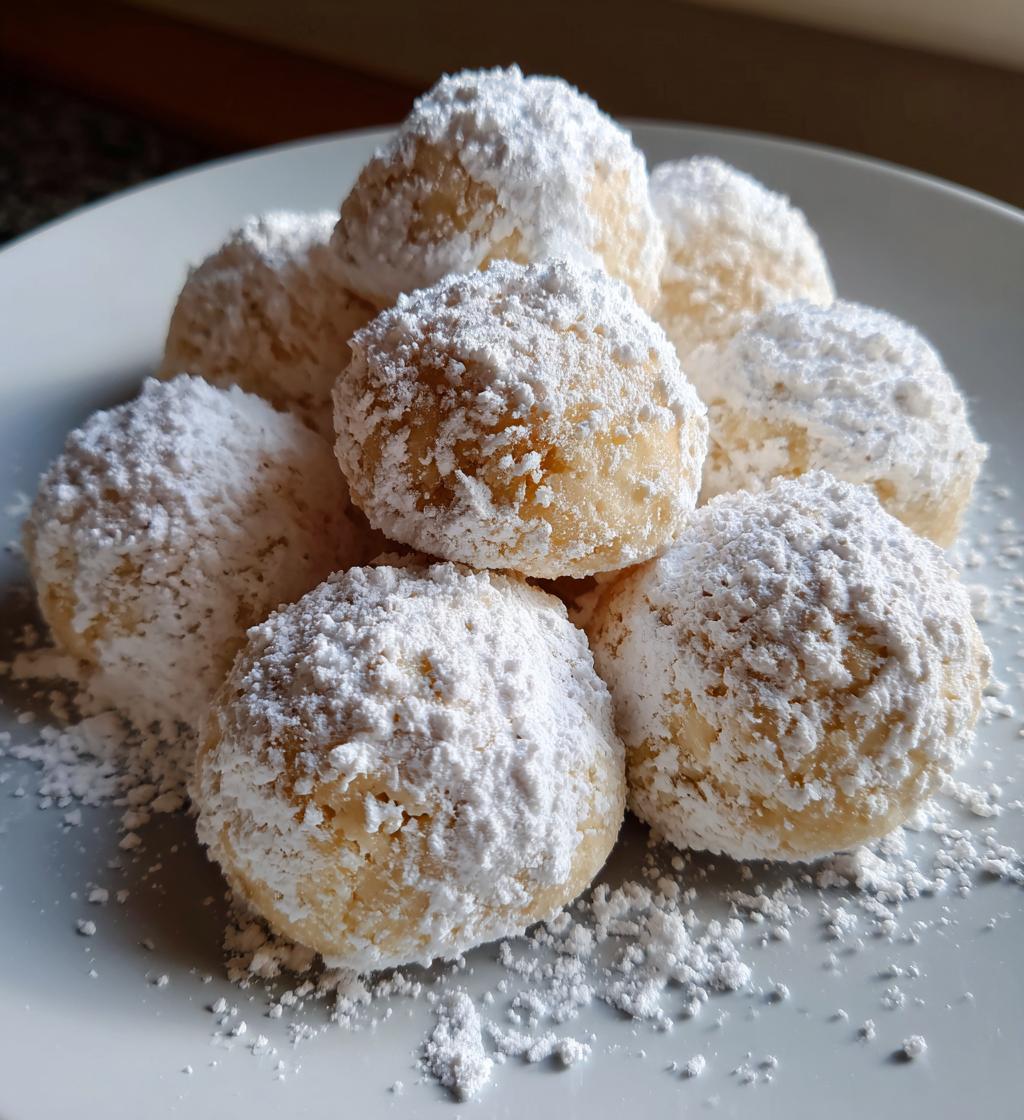
Oh my goodness, let me tell you about Snowball Cookies! These little gems, also known as Russian Tea Cakes, are one of my absolute favorites. They’re delicate and buttery, rolling right off your tongue like a sweet, fluffy cloud. Seriously, the melt-in-your-mouth texture is something you have to experience to believe! And the best part? They’re perfect for any occasion. Whether it’s a cozy winter gathering, a holiday party, or just a simple afternoon treat with tea, these cookies steal the show every time.
As I prepare these delightful bites, the aroma of baking butter and nuts fills my kitchen, instantly lifting my spirits. The way they look, coated in a generous layer of powdered sugar, makes them feel like little snowballs of joy! Trust me, you’ll want to keep this recipe close at hand. I often find myself making a double batch because they disappear so quickly! If you’re looking to impress your friends and family or simply indulge yourself, you can’t go wrong with Snowball Cookies.
Ingredients List
Gathering the right ingredients is essential for perfecting these delightful Snowball Cookies. Here’s what you’ll need:
- 1 cup unsalted butter, softened: Make sure it’s at room temperature for easy creaming with the sugar.
- 1/2 cup powdered sugar: This adds sweetness and gives the cookies that signature melt-in-your-mouth texture.
- 1 teaspoon vanilla extract: A dash of vanilla enhances the overall flavor, making each bite irresistible.
- 2 cups all-purpose flour: This is the base of your cookies, providing structure while keeping them tender.
- 1/4 teaspoon salt: Just a pinch helps to balance the sweetness and brings out the flavors.
- 1 cup chopped nuts (walnuts or pecans): Choose your favorite nuts, finely chopped, for that delightful crunch and nutty taste.
- Additional powdered sugar for coating: You’ll need more of this to roll the cookies in once they’re out of the oven, creating that snowy finish!
Having everything prepped and ready to go will make the process smooth and enjoyable. Trust me, you’ll want to savor every moment of creating these little treats!
How to Prepare Snowball Cookies
Making Snowball Cookies is an enjoyable experience that fills your kitchen with warmth and sweet aromas. Follow these steps closely to ensure your cookies turn out perfectly every time. Trust me, the process is as delightful as the cookies themselves!
Step-by-Step Instructions
Let’s get started! First things first, preheat your oven to 350°F (175°C). This is crucial because you want your cookies to bake evenly. While the oven is warming up, grab your mixing bowl and let’s dive into the magic of combining our ingredients.
1. **Cream the Butter and Sugar:** In a large mixing bowl, add 1 cup of softened unsalted butter and 1/2 cup of powdered sugar. Use a hand mixer or a wooden spoon to cream them together until the mixture is light and fluffy. This should take about 2-3 minutes. You want to see a lovely pale color; that’s when you know it’s just right!
2. **Add Vanilla:** Now, add in 1 teaspoon of vanilla extract and mix it in well. The aroma will make your heart sing! Vanilla is the secret ingredient that adds a warm depth of flavor to your cookies.
3. **Combine Dry Ingredients:** In a separate bowl, whisk together 2 cups of all-purpose flour, 1/4 teaspoon of salt, and your chopped nuts (1 cup). Mixing these dry ingredients separately ensures an even distribution of the nuts and salt in the final dough.
4. **Mix Everything Together:** Gradually add the dry mixture to your creamed butter and sugar. I like to do this in three parts, mixing gently after each addition until just combined. Be careful not to overmix, as we want our cookies to stay tender and delicate!
5. **Form the Dough Balls:** Once your dough is ready, it’s time to shape it into cookies. Using your hands, take about a tablespoon of dough and roll it into a ball—aim for about 1 inch in diameter. Place each ball on a baking sheet lined with parchment paper, spacing them about an inch apart. You should get about 24 cookies from this recipe!
6. **Bake Your Cookies:** Pop them into the preheated oven and bake for 12-15 minutes. You’re looking for a light golden color on the bottoms. Keep an eye on them! Remember, the centers will still be soft—don’t worry, they’ll firm up as they cool.
7. **Cooling Time:** Once baked, remove the cookies from the oven and let them cool on the baking sheet for about 5 minutes. This is the perfect time to prepare for the next step. While they’re still warm, roll each cookie in additional powdered sugar. This gives them that signature snowball look!
8. **Final Cooling and Coating:** After rolling them in sugar, transfer the cookies to a wire rack to cool completely. Once they’ve cooled, I like to roll them in powdered sugar one more time for that extra snowy finish. It’s like giving them a cozy blanket of sweetness!
And there you have it! Your Snowball Cookies are ready to shine at any gathering or just for your own indulgence. Don’t forget to save a few for yourself—they’re too delicious to share all of them!
Nutritional Information
When it comes to Snowball Cookies, it’s nice to know a bit about what you’re indulging in! Here’s a quick look at the estimated nutritional values per serving (1 cookie):
- Calories: 120
- Fat: 8g
- Saturated Fat: 5g
- Unsaturated Fat: 2g
- Trans Fat: 0g
- Sodium: 50mg
- Carbohydrates: 12g
- Fiber: 1g
- Sugar: 4g
- Protein: 2g
- Cholesterol: 30mg
Please keep in mind that these values are estimates and can vary based on specific ingredients and portion sizes. It’s always a good idea to enjoy your treats mindfully, especially when they’re as delightful as these Snowball Cookies!
Why You’ll Love This Recipe
Snowball Cookies are truly a treasure in the baking world, and here’s why you’ll find yourself falling head over heels for this recipe:
- Easy to Make: With just a handful of simple ingredients, you can whip up these cookies in no time. The steps are straightforward, making it perfect for both novice bakers and seasoned pros!
- Melt-in-Your-Mouth Goodness: The moment you take a bite, you’ll understand why they’re called Snowball Cookies. Their delicate texture melts in your mouth, leaving you craving more!
- Perfect for Any Occasion: Whether it’s a holiday gathering, a cookie exchange, or a cozy tea party, these cookies fit right in. They add a touch of elegance to any dessert table!
- Customizable: The beauty of Snowball Cookies lies in their versatility. You can easily switch up the nuts or add a hint of flavoring to cater to your taste. The possibilities are endless!
- Great for Gifting: Pack them up in a cute box or jar, and you’ve got a lovely homemade gift that’s sure to impress friends and family. Who wouldn’t love a sweet surprise?
- They Freeze Well: If you somehow manage to have leftovers, these cookies freeze beautifully. Just pop them in an airtight container, and you can enjoy them later without losing that delightful flavor.
Trust me, once you try making these Snowball Cookies, you’ll be hooked! They’re not just cookies; they’re little bites of joy that bring warmth and happiness into your kitchen and home.
Tips for Success
Making perfect Snowball Cookies is all about the details! Here are my top tips to ensure your cookies turn out absolutely delightful every time:
- Use Room Temperature Ingredients: Always make sure your butter is softened to room temperature. This allows for better creaming with the sugar, creating that light and fluffy texture we all adore. If you forget to take it out early, you can cut it into small pieces to speed up the softening process!
- Nut Variations: While walnuts and pecans are traditional, don’t hesitate to experiment! Try using almonds, hazelnuts, or even macadamia nuts for a unique twist. Just remember to finely chop them so they blend seamlessly into the dough.
- Watch Your Baking Time: Every oven behaves a bit differently, so keep an eye on your cookies as they bake. Start checking at the 12-minute mark. You want them to be lightly golden on the bottoms, but the tops should remain pale. Overbaking will lead to a firmer texture.
- Double Coat with Powdered Sugar: For that signature snowy finish, roll your cookies in powdered sugar while they’re still warm. Then, let them cool completely and give them another roll. This ensures they’ll have a beautiful coating that doesn’t just disappear!
- Storage Tips: To keep your Snowball Cookies fresh, store them in an airtight container at room temperature. They can last up to a week—if they last that long! If you want to save some for later, these cookies freeze beautifully. Just layer them between sheets of parchment paper in an airtight container, and they’ll be good for up to three months.
- Experiment with Flavors: Want to add a little something extra? Consider mixing in a teaspoon of almond extract or a bit of citrus zest into your dough for a refreshing flavor boost. Just a hint can elevate the cookies to a whole new level!
With these tips in your back pocket, you’ll be well on your way to creating the most scrumptious Snowball Cookies that will impress everyone who tries them. Happy baking!
Variations on Snowball Cookies
One of the best things about Snowball Cookies is their versatility! While the classic version is absolutely delightful, there are so many fun ways to switch things up and put your own spin on these little treats. Here are some ideas to inspire your creativity:
- Nutty Alternatives: While walnuts and pecans are traditional, don’t hesitate to try different nuts! Almonds, hazelnuts, or even macadamia nuts can add a unique flavor and crunch. Just remember to chop them finely so they blend seamlessly into the dough. I’ve even used pistachios for a pop of color and a delicious twist!
- Coconut Delight: For a tropical flair, consider adding shredded coconut to your dough! About 1/2 cup of unsweetened shredded coconut will give your cookies a lovely chewiness and a hint of coconut flavor that pairs beautifully with the buttery goodness.
- Chocolate Lovers Unite: If you’re a chocolate fan, why not mix in some mini chocolate chips? Just a handful (about 1/2 cup) can take these cookies to a whole new level. The combination of buttery cookie and melted chocolate is simply irresistible!
- Flavor Infusions: Beyond vanilla, you can add different extracts to your cookie dough for a flavor boost. Almond extract, hazelnut extract, or even a splash of orange or lemon zest can add a refreshing twist. Just a teaspoon will do, and it’ll elevate the taste beautifully!
- Spiced Up: Consider adding a sprinkle of warm spices like cinnamon or nutmeg to the dough. Just 1/2 teaspoon of cinnamon can add a cozy fall vibe, making these cookies perfect for the holidays or any chilly day!
- Gluten-Free Version: For those who are gluten-sensitive, swapping all-purpose flour with a gluten-free flour blend can work wonders! Just make sure to choose a blend designed for baking to maintain that delightful texture.
Experimenting with these variations not only personalizes your Snowball Cookies but also adds an exciting twist that can impress your family and friends. Each version brings its own charm, so don’t be afraid to get creative in the kitchen. I love trying new combinations and discovering which ones become family favorites! Happy baking!
Storage & Reheating Instructions
Storing your delicious Snowball Cookies properly is key to keeping them fresh and tasty! Here’s how to do it:
First, let the cookies cool completely after baking. This is super important because any residual heat can create moisture, leading to soggy cookies. Once they’re cool, layer them in an airtight container. I like to place a sheet of parchment paper between layers to help prevent sticking. They can last up to a week at room temperature, but trust me, they’ll likely disappear much faster than that!
If you want to keep your Snowball Cookies for a longer period, they freeze beautifully! Just place them in a freezer-safe container or a zip-top bag, ensuring to remove as much air as possible. They can stay good for up to three months in the freezer. To thaw, simply move them to the fridge overnight or let them sit at room temperature for about an hour before serving. The best part? They taste just as delightful after freezing!
Now, if you find yourself wanting to enjoy them warm, you can reheat them easily. Preheat your oven to 300°F (150°C) and place the cookies on a baking sheet lined with parchment paper. Warm them in the oven for about 5-7 minutes, just until they’re cozy and slightly warm. This will refresh their melt-in-your-mouth texture, making them feel freshly baked again!
With these storage and reheating tips, you’ll be able to savor your Snowball Cookies at their best, whether you’re enjoying them right away or bringing them out for a special treat later on!
Serving Suggestions
Pairing your delightful Snowball Cookies with the right accompaniments can elevate your dessert experience to a whole new level! Here are some ideas to enhance those melt-in-your-mouth treats:
- Hot Beverages: A warm cup of tea or coffee is a classic match for Snowball Cookies. The buttery sweetness of the cookies balances perfectly with the rich flavors of a smooth black tea or a robust coffee. Try a lovely Earl Grey or a creamy latte for a cozy afternoon treat!
- Milk: You can’t go wrong with a tall glass of cold milk! The creaminess of milk complements the delicate texture of the cookies beautifully, making each bite even more satisfying. It’s a nostalgic pairing that takes many of us back to our childhood!
- Chocolate Dipping Sauce: For a decadent twist, consider serving your Snowball Cookies with a warm chocolate dipping sauce. Just melt some dark or milk chocolate and serve it alongside the cookies for a delightful contrast. Dip away for a rich, chocolatey experience!
- Fruit Compote: A homemade fruit compote, like raspberry or strawberry, can add a delightful burst of flavor. The tartness of the fruit pairs wonderfully with the sweetness of the cookies, creating a lovely balance on your palate. Just heat some berries with a bit of sugar until they break down, and you’re all set!
- Cheese Platter: If you’re feeling adventurous, create a cheese platter featuring mild cheeses like brie or goat cheese. The creaminess of the cheese contrasts nicely with the cookies and adds an unexpected savory element to your dessert spread.
- Other Desserts: Snowball Cookies are also fantastic alongside other light desserts like meringues or panna cotta. Their delicate nature allows them to complement rather than overshadow other treats on the table!
- Decorative Touch: For a lovely presentation, serve your cookies on a beautiful platter garnished with fresh mint leaves or edible flowers. This adds a touch of elegance and makes your dessert table even more inviting!
With these serving suggestions, your Snowball Cookies are sure to shine, whether you’re hosting a gathering or simply treating yourself. Enjoy the delightful experience of these little bites of joy!
FAQ Section
Q1. What are Snowball Cookies?
Snowball Cookies, also known as Russian Tea Cakes, are delicate, buttery cookies rolled in powdered sugar. They’re famous for their melt-in-your-mouth texture and are a popular treat during the holiday season, but honestly, they’re perfect for any occasion!
Q2. Can I use different nuts in my Snowball Cookies?
Absolutely! While walnuts and pecans are the traditional choices, feel free to get creative. Almonds, hazelnuts, or even macadamia nuts can add a unique twist to your Snowball Cookies. Just remember to chop them finely for the best texture!
Q3. How do I store Snowball Cookies?
To keep your Snowball Cookies fresh, store them in an airtight container at room temperature. They can last for up to a week—if they last that long! If you want to keep them for longer, they freeze beautifully. Just layer them with parchment paper in a freezer-safe container, and they’ll be good for up to three months.
Q4. Can I make Snowball Cookies gluten-free?
Yes, you can! Simply swap out regular all-purpose flour for a gluten-free flour blend designed for baking. This will help maintain the delightful texture of your Snowball Cookies while catering to those with gluten sensitivities.
Q5. What’s the best way to serve Snowball Cookies?
Snowball Cookies are amazing on their own, but they pair beautifully with hot beverages like tea or coffee. You can also serve them with a warm chocolate dipping sauce or alongside a fruit compote for a delightful contrast of flavors. They add a lovely touch to any dessert spread!

Snowball Cookies (Russian Tea Cakes): 7 Ways to Delight
- Total Time: 35 minutes
- Yield: 24 cookies 1x
- Diet: Vegetarian
Description
Snowball Cookies are delicate, buttery cookies rolled in powdered sugar. They melt in your mouth and are perfect for any occasion.
Ingredients
- 1 cup unsalted butter, softened
- 1/2 cup powdered sugar
- 1 teaspoon vanilla extract
- 2 cups all-purpose flour
- 1/4 teaspoon salt
- 1 cup chopped nuts (walnuts or pecans)
- Additional powdered sugar for coating
Instructions
- Preheat your oven to 350°F (175°C).
- In a mixing bowl, cream the butter and powdered sugar together.
- Add vanilla extract and mix well.
- Gradually add flour and salt, mixing until combined.
- Stir in chopped nuts.
- Shape the dough into 1-inch balls and place them on a baking sheet.
- Bake for 12-15 minutes or until the bottoms are lightly golden.
- Remove from the oven and let cool slightly.
- While still warm, roll cookies in powdered sugar.
- Let cool completely and roll in powdered sugar again before serving.
Notes
- Store in an airtight container.
- These cookies freeze well.
- Use different nuts for variation.
- Prep Time: 20 minutes
- Cook Time: 15 minutes
- Category: Dessert
- Method: Baking
- Cuisine: Russian
Nutrition
- Serving Size: 1 cookie
- Calories: 120
- Sugar: 4g
- Sodium: 50mg
- Fat: 8g
- Saturated Fat: 5g
- Unsaturated Fat: 2g
- Trans Fat: 0g
- Carbohydrates: 12g
- Fiber: 1g
- Protein: 2g
- Cholesterol: 30mg
Keywords: Snowball Cookies, Russian Tea Cakes, Christmas Cookies